Intern lcd-venster gebruiksaanwijzing – Nikon Laser User Manual
Page 107
Ru
Se
Nl
Dk
Pl
Hu
Cz
Fi
No
En
De
Fr
Es
It
Ro
212
Ru
Se
Nl
Dk
Pl
Hu
Cz
Fi
No
En
De
Fr
Es
It
Ro
213
Intern LCD-venster
Gebruiksaanwijzing
6. 『
』 Prioriteit doel functie
A. Functie prioriteit eerste doel
『
』 Geeft aan dat de functie Prioriteit eerste doel is
ingesteld.
B. Functie Prioriteit verste doel
『
』 Geeft aan dat de functie Prioriteit verste doel is
ingesteld.
7. Zoeker met automatische helderheidsregeling
Zoeker met automatische helderheidsregeling stelt de
hoeveelheid omgevingslicht in het beeldveld vast en schakelt,
indien nodig, automatisch de oranje LED verlichting in.
De helderheid van de oranje verlichting wordt automatisch
aangepast aan de beschikbare hoeveelheid licht.
Hoewel bij de fabricage van het LCD-venster de meest
geavanceerde technologie is toegepast, is het onmogelijk de
aanwezigheid van stof volledig te voorkomen. De weergave op
het LCD-venster is een uitvergroting van het beeld dat wordt
ontvangen door de lens. Hierdoor kan een stofkorrel op de lens
de illusie wekken dat het venster defect is. Dit zal echter niet de
nauwkeurigheid van de meting beïnvloeden.
Voorzichtig: als u zich bij het bedienen of afstellen van
het instrument niet houdt aan de instructies in dit
document, kan dit blootstelling aan gevaarlijke
straling tot gevolg hebben.
1. Plaats een batterij in het batterijvak. (Zie 'Batterij
vervangen')
2. Rubberen oogschelp
Zowel brildragers als mensen zonder een bril kunnen deze
afstandsmeter gebruiken zonder de rubberen oogschelp te
bevestigen.
3. Aanpassing van de dioptrie
Pas de dioptrie aan om een scherp beeld te krijgen op het LCD-
venster.
Draai de dioptriering eerst helemaal naar links. Zet het
instrument aan om het LCD-venster in te schakelen wanneer
u door de Nikon Laser 1000A S kijkt. Draai de dioptriering naar
rechts totdat het beeld is scherpgesteld.
Als de dioptrie niet is afgesteld op uw gezichtsvermogen, kan
het lastig zijn om scherp te stellen op het doel.
4. Meten
NB: Als u de POWER-knop ingedrukt houdt, worden alle symbolen
weergegeven op het interne LCD-venster. Als u de POWER-knop
loslaat, wordt de laatst gebruikte instelling weergegeven. (Als u
de POWER-knop kort indrukt, kan de laatst gebruikte instelling
verschijnen op het LCD-venster, zonder dat alle symbolen worden
weergegeven. Dit is normaal en duidt niet op een storing of een
ander probleem.)
Voer pas een meting uit nadat u hebt gecontroleerd of alle
instellingen juist zijn. Denk hierbij aan de weergave-eenheid, de
meet-/weergavemodus en de prioriteitsmodus.
◎ : Zie de relevante modus sectie in deze handleiding voor de
instelling.
Measurement
1. Press the POWER button for power-on.
(Power turns off 8 seconds after the last
operation.)
Immediately after power-on.
(Initializing)
Stand-by.
3. Press POWER button once to start single measurement.
Measuring.
4. After measurement, “distance” or “fail to measure” indicator are displayed for 8 seconds, then power turns off. If you press the POWER
button during power-on (while the internal display is lit), another single measurement starts.
Failure to measure or
unable to measure distance.
Displays the measured
figure. (Target 1)
Displays the measured
figure. (Target 2)
3. Keep pressing POWER button to start continuous measurement up to 20 seconds. The internal display shows “distance” and
“fail to measure” indicator alternately.
Note: Laser irradiaton mark is blinking during the measurement.
Note: If you stop pressing the button, the continuous measuremen stops
Target focusing.
2. Aim at the target
.
Position the target at the center of the reticle
[Single measurement]
Failure to measure or
unable to measure distance.
Upward measurement.
Downward measurement.
Displays the measured figure.
[Continuous measurement]
4. After continuous measurement, the measure results are displayed for 8 seconds, then power turns off. If you press the POWER
button during power-on (while the internal display is lit), another measrement starts.
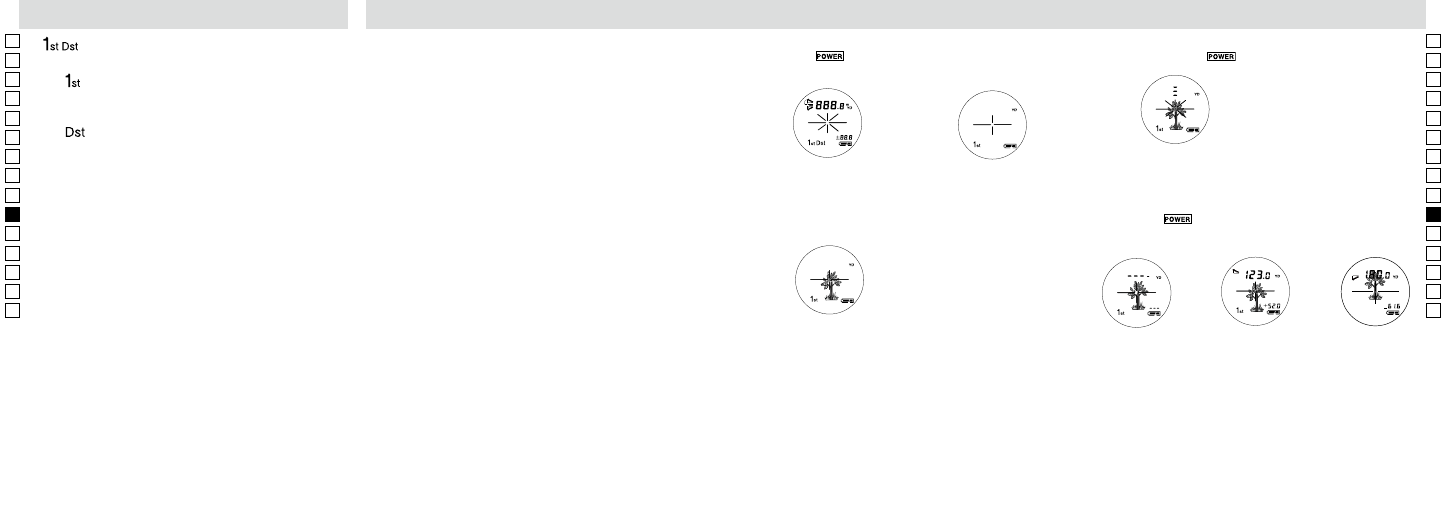
1. Druk op de
knop om het instrument aan te zetten.
(Het instrument wordt 8 seconden na de laatste handeling
automatisch uitgeschakeld.)
Onmiddellijk na inschakeling
(Opstarten)
Stand-by
2. Richt op het doel.
Plaats het doel in het midden van het dradenkruis.
Richten op het doel
3. Druk één keer op de
knop voor een enkelvoudige meting.
【Enkelvoudige meting】
Meten
Measurement
1. Press the POWER button for power-on.
(Power turns off 8 seconds after the last
operation.)
Immediately after power-on.
(Initializing)
Stand-by.
3. Press POWER button once to start single measurement.
Measuring.
4. After measurement, “distance” or “fail to measure” indicator are displayed for 8 seconds, then power turns off. If you press the POWER
button during power-on (while the internal display is lit), another single measurement starts.
Failure to measure or
unable to measure distance.
Displays the measured
figure. (Target 1)
Displays the measured
figure. (Target 2)
3. Keep pressing POWER button to start continuous measurement up to 20 seconds. The internal display shows “distance” and
“fail to measure” indicator alternately.
Note: Laser irradiaton mark is blinking during the measurement.
Note: If you stop pressing the button, the continuous measuremen stops
Target focusing.
2. Aim at the target
.
Position the target at the center of the reticle
[Single measurement]
Failure to measure or
unable to measure distance.
Upward measurement.
Downward measurement.
Displays the measured figure.
[Continuous measurement]
4. After continuous measurement, the measure results are displayed for 8 seconds, then power turns off. If you press the POWER
button during power-on (while the internal display is lit), another measrement starts.
4. Na meting wordt het 'afstand of 'meting is mislukt' symbool
gedurende 8 seconden getoond, daarna schakelt het instrument uit.
Als u op de
knop drukt terwijl het instrument is ingeschakeld
(en het interne LCD-venster aan staat), wordt een volgende
enkelvoudige meting gestart.
De meting is mislukt
of de afstand
kan niet worden
gemeten.
Omhoog
gerichte meting
Omlaag gerichte
meting
Toont de gemeten afstand.