Pax2d, Rogramming, Line 2 display loops – Red Lion PAX2D User Manual
Page 9: Code, Main display loop, Parameter and hidden parameter display loops, Programming mode entry, Module entry, Module menu, Parameter menu
9
The PAX2D offers three display loops to allow users quick access to needed
information.
Main Display Loop
In the Main display loop, the D key is pressed to sequence through the
selected Line 2 values. A left justified 2 or 3-character mnemonic indicates
which Line 2 value is currently shown. When in the Main display loop, the
Function keys ! and @ perform the user functions programmed in the User
Input parameter section.
Parameter and Hidden Parameter Display Loops
These Display loops provide quick access to selected parameters that can be
viewed and modified on Line 2 without having to enter Full Programming
mode. These values include Parameter List A/B selection, setpoints, scale
factors, counter load values and display (color, intensity and contrast) settings.
To utilize the Parameter or Hidden Parameter Display Loops, a security code
(1-250) must be programmed. (See Programming Security Code in the Display
Parameters programming section for details.)
The Parameter Display Loop is accessed by pressing the
P key. The selected
Parameter Display Loop values can be viewed and/or changed per the Line 2
Value Access setting programmed for each available value. The Hidden
Parameter Display Loop follows the Parameter display loop, and can only be
accessed when the correct security code is entered at the Code prompt.
Combining the two parameter loops provides an area for parameters that require
general access and/or protected or secure access depending on the application
needs.
While in the Parameter and Hidden Parameter loops, pressing the
D key will
return the meter to the Main Display Loop. To directly access the Code prompt,
press and hold the
P key. This can be done from the Main display loop or at any
point during the Parameter display loop. Also, to directly access Full
Programming mode while in the Hidden Parameter loop, press and hold the
P
key to bypass any remaining Hidden Parameter loop values.
6.0 p
rOgramming
T
he
paX2d
Pro
INPUt
Pro
OUtPUt
Pro
dISPLY
Pro
Port
Pro
FACtrY
Input
Parameters
Output
Parameters
Display
Parameters
Comms Port
Parameters
Factory
Service
Parameters
F1
Pro
NO
F1
F1
F1
F1
DISPLAY
MODE
P
line 2 display lOOps
It is recommended that program settings be recorded as programming is
performed. A blank Parameter Value Chart is provided at the end of this bulletin.
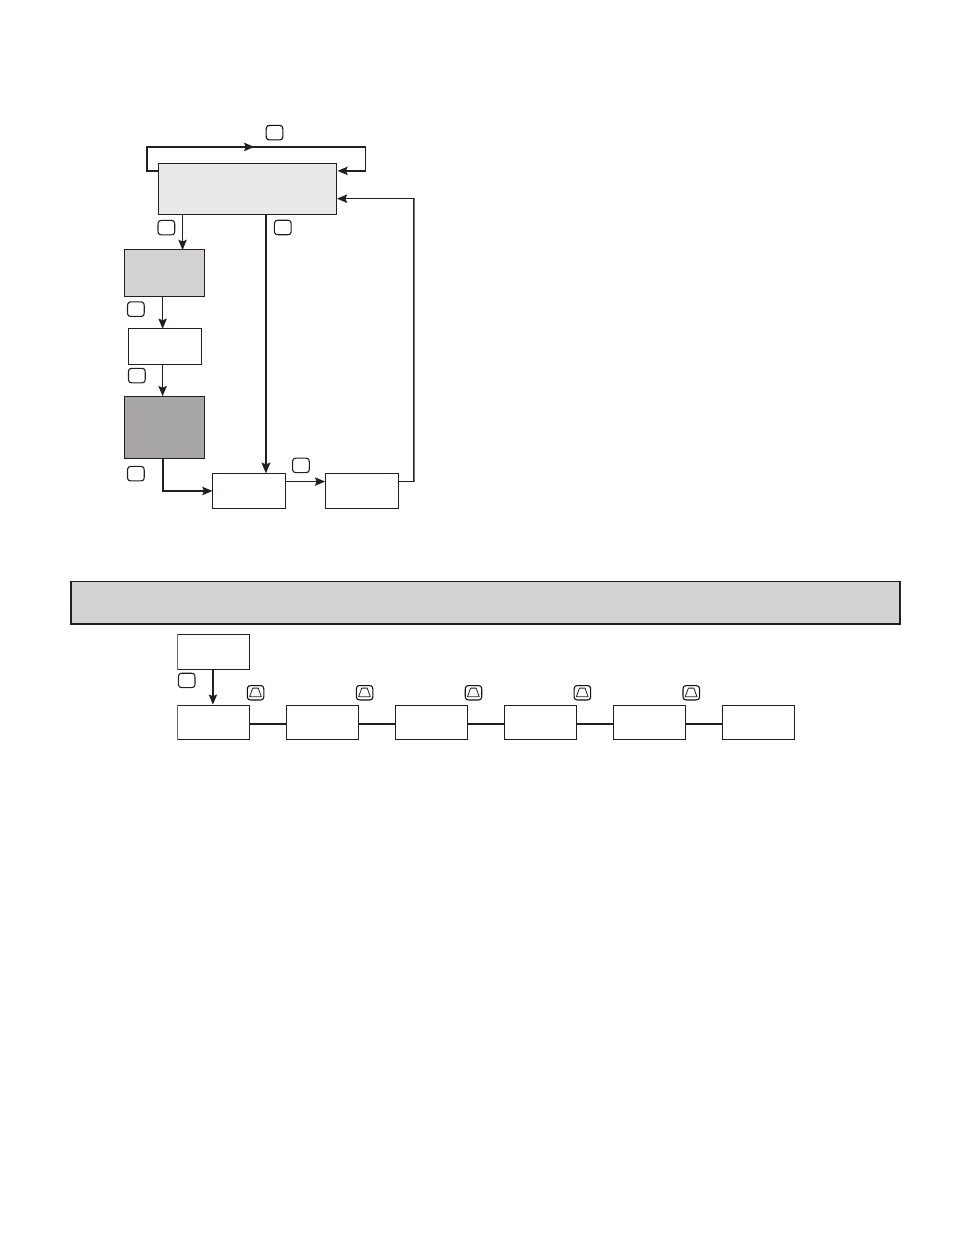
PROGRAMMING MODE ENTRY
The Programming Mode is entered by pressing the
P key. Full Programming
Mode will be accessible unless the meter is programmed to use the Parameter
loop or Hidden Parameter loop on the Line 2 display. In this case, programming
access will be limited by a security code and/or a hardware program lock. (Refer
to the previous section for details on Line 2 display loops and limited
programming access.) Full Programming Mode permits all parameters to be
viewed and modified. In this mode, the front panel keys change to Programming
Mode Operations and certain user input functions are disabled.
MODULE ENTRY
The Programming Menu is organized into five modules. These modules
group together parameters that are related in function. The ! and @ keys
are used to select the desired module. The displayed module is entered by
pressing the
P key.
MODULE MENU
Upon entering a module, a parameter selection sub-menu is provided to
choose the specific parameter type for programming. For example, this includes
counter, rate and user input under the Input Parameter menu. Use the ! and
@
keys to select the desired parameter type, and press the
P key to enter the
parameter menu.
PARAMETER MENU
Upon entering the Parameter Menu, the
P key is pressed to advance to a
specific parameter to be changed. After completing the parameter menu, or upon
pressing the
D key, the display returns to the initial entry point for the parameter
menu. For each additional press of the
D key, the display returns to the previous
level within the module until exiting the module entirely.
SELECTION/VALUE ENTRY
For each parameter, the top line display shows the parameter while the bottom
line shows the selections/value for that parameter. The ! and @ keys are
used to move through the selections/values for the parameter. Pressing the
P
key, stores and activates the displayed selection/value. This also advances the
meter to the next parameter.
Numerical Value Entry
If the parameter is programmed for enter (Entr), the ! and @ keys are used
to change the parameter values in any of the display loops.
The ! and @ keys will increment or decrement the parameter value. When
the ! or @ key is pressed and held, the value automatically scrolls. The longer
the key is held the faster the value scrolls.
For large value changes, press and hold the ! or @ key. While holding that
key, momentarily press the opposite arrow key ( @ or ! ) to shift decades (10’s
100’s, etc), or momentarily press the
D key and the value scrolls by 1000’s as
the arrow key is held. Releasing the arrow key removes the decade or 1000’s
scroll feature. The arrow keys can then be used to make small value changes as
described above.
Pro
NO
P
COdE
1-250
Pro
End
HIDDEN
PARAMETER
DISPLAY
LOOP
PARAMETER
DISPLAY
LOOP
P
P
P
P
P
MAIN DISPLAY LOOP
D
Code 0
Code 1-250
Full Programming
Mode