FEC AFC1200 User Manual
Page 74
)(& ,QF
7.10.3 SCREEN OPERATION
3-1.
AFTer selecting the [MACHINE CONFIGURATION] screen from the menu bar,
depress the [SEL] key and the first field will appear with a highlighted background.
3-2. USe
the
[↑]
[↓]
keys to move the highlighted cursor to the desired position.
3-3.
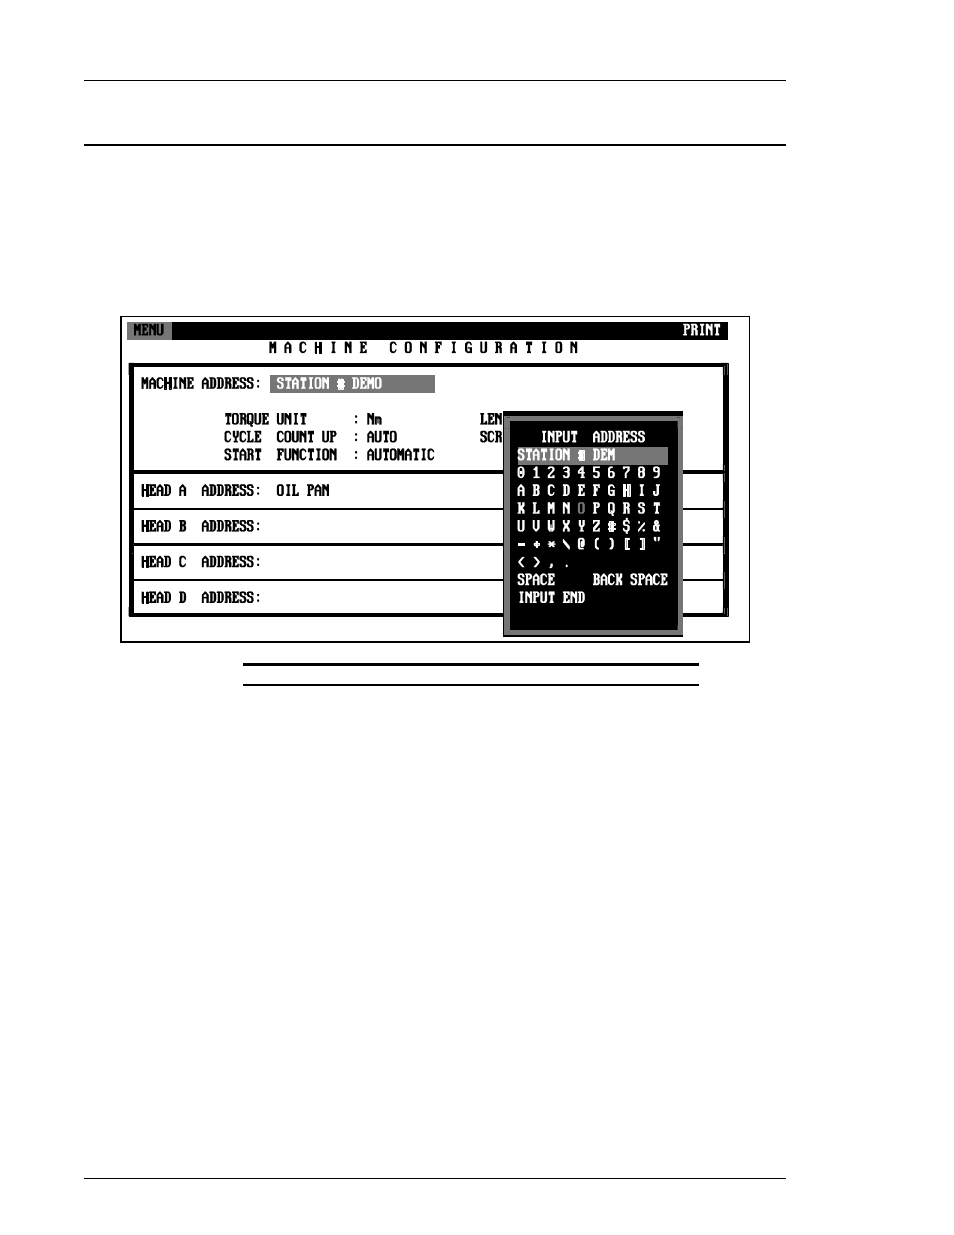
TO input an address in the machine address field or the head address fields, move
the highlighted cursor to the desired position and depress the
[↵]
key. THe
alphanumeric pulldown menu will appear with a small field and a black flashing
cursor. THE alphanumeric menu will show a red highlighted character.
FIG. 7-10-3-3 machine configuration alphanumeric pulldown menu
3-4.
TO input a character into the field, use the
[←]
[→]
key to move to the desired
character. The character to be selected will appear red highlighted. DEpress the
enter key and the red highlighted character will appear in the small field at the top of
the menu.
3-5.
UPOn completion of entering the desired address, move the red cursor to [INPUT
END] and depress the
[↵]
key. THe pulldown menu will disappear and the selected
address field will appear.
3-6.
TO change the TORQUE DIMENSION, LENGTH DIMENSION, CYCLE COUNT UP
SCREEN SAVER or START FUNCTION fields, move the cursor to the desired
position indicated by a highlighted background, and use the
[←]
[→]
keys to change
to the desired item. DEPRESs the
[↵]
key and the screen will change to display the
selected item.
3-7.
TO set the spindle number(s) to a designated head (A,B,C, or D) move the high-
lighted cursor to the position below the spindle uSing the
[↑]
[↓]
keys. Use the
[←]
[→]
keys to change to head A, B, C, or D. DEpress the
[↵]
key and the spindle
head designation will be set.
3-8.
WHEn all desired changes are complete, depress the [SEL] key and the question
"DATA CHANGE OK?" will appear. SELect YES or NO. The screen will change to
display new data or revert back to the previously entered information as selected.
3-9.
TO print the machine configuration screen, move the cursor on the menu bar to
[PRINT] and depress the
[↵]
key.
Chapter 7: System Operation
Page 7-74