Defining the audio/rs-232 wire pair, E pair (pins 3 and 6) for each tp input (see, Defining the audio – Extron Electronics MTPX Plus Series User Guide User Manual
Page 68: Rs-232 wire pair, Input configuration, Input, Port configuration, Is defined as audio (see
Defining the Audio/RS-232 Wire Pair
NOTE: The TP audio/RS-232 input wire pair configurations are protected when front
panel Lock mode 2 is selected. You can view the configurations in Lock mode 2
but you cannot adjust them from the front panel (see “
” on page 59).
The switcher is compatible with MTPs that transmit and receive mono audio and those that
transmit and receive RS-232 serial data. You must configure the switcher for the appropriate
audio/RS-232 input for each TP input. The audio/RS-232 settings for each TP input can be
viewed and changed from the front panel.
View and configure the TP input audio/RS-232 configuration settings for the switcher as
follows:
1.
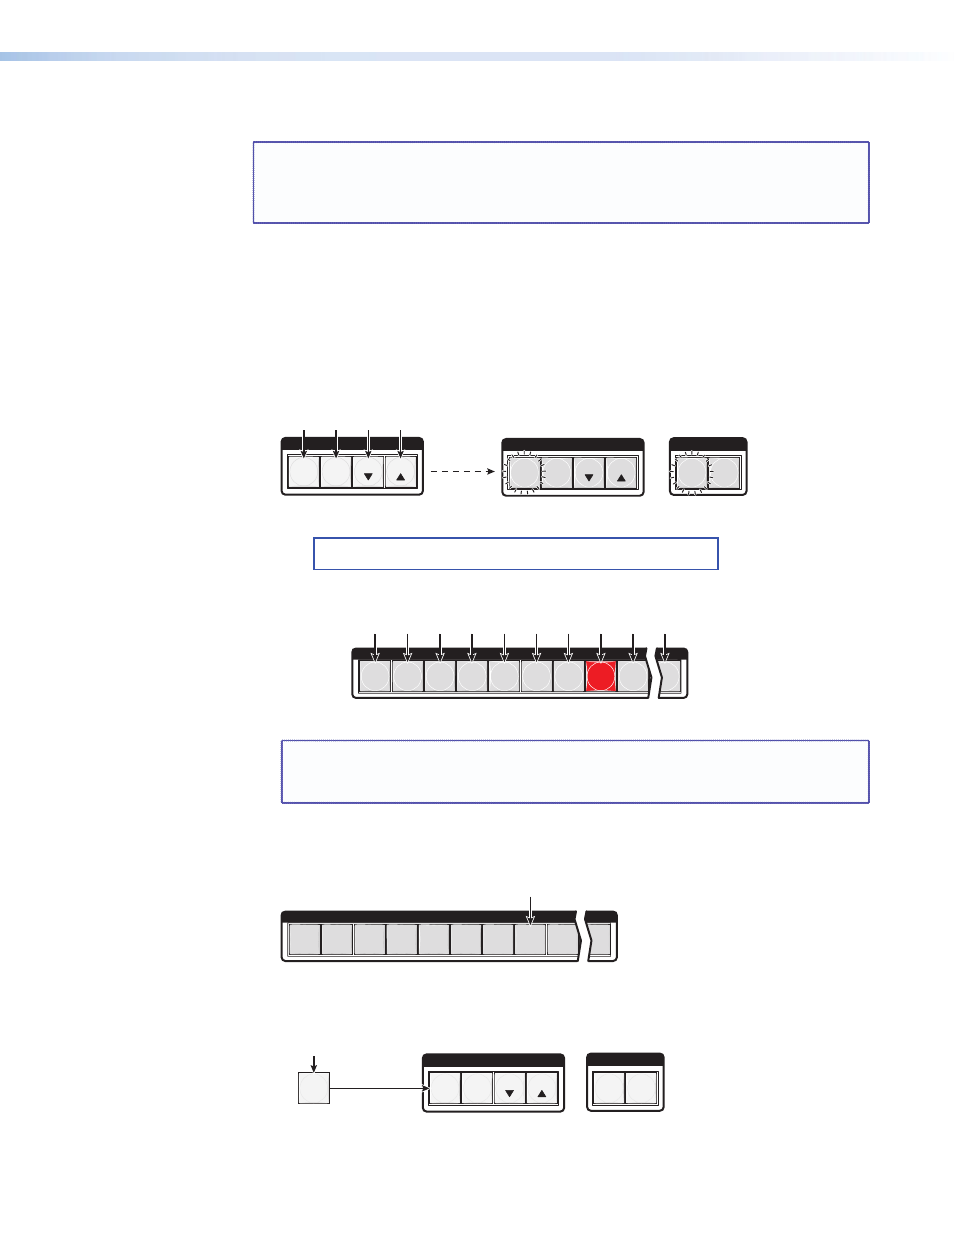
Select Serial Port and Audio/RS-232 Input Configuration mode: Simultaneously
press and hold all Control buttons (Enter, Preset, View, and Esc).
2 seconds
I / O
VIDEO
AUDIO
C O N T R O L
PRESET
ENTER
ESC
VIEW
C O N T R O L
PRESET
ENTER
ESC
VIEW
2
1
3 4 5 6 7 8 9 16
INPUTS
Press and
hold the buttons
.
All Control buttons light with
one flashing.
Both I/O buttons light
with one flashing.
Unlit input buttons indicate that the audio/RS-232 twisted wire pair of the input is configured as audio
.
Red input buttons indicate that the audio/RS-232 twisted wire pair of the input is configured as RS-232
.
Unlit
Unlit Unlit Unlit Unlit
Unlit
Red
Unlit
Unlit
Unlit
NOTE: The Control and I/O buttons indicate the baud rate and protocol. See “
the Rear Panel Remote Port Protocol and Baud Rate
”, later in this section.
2.
Release the Control buttons.
NOTE: If front panel Lock mode 2 is selected and you try to perform step 3, the
actions are ignored and the Enter, Video, and Audio buttons flash (see
“
Setting the Front Panel Locks (Executive Modes)
” on page 59).
3.
Change the audio/RS-232 wire pair configuration for an input: Press and release
the input button to toggle the configuration for that input.
2
1
3 4 5 6 7 8 9 16
INPUTS
Press the button to toggle the audio/RS-232 wire
pair configuration (to audio, in this example)
.
4.
Exit the Serial Port and Audio/RS-232 Input Configuration mode: Press and release
an output button.
C O N T R O L
PRESET
ENTER
I / O
VIDEO
AUDIO
ESC
VIEW
5
All Control, I/O, Input, and Output buttons
return to unlit or background illumination.
Press an
output button.
MTPX Plus Series • Operation
62