Recording settings, 39 how to set, Menu configuration – Sanyo DSR-3706PA User Manual
Page 40: English, B displaying the recording settings screen
English
39
How to set
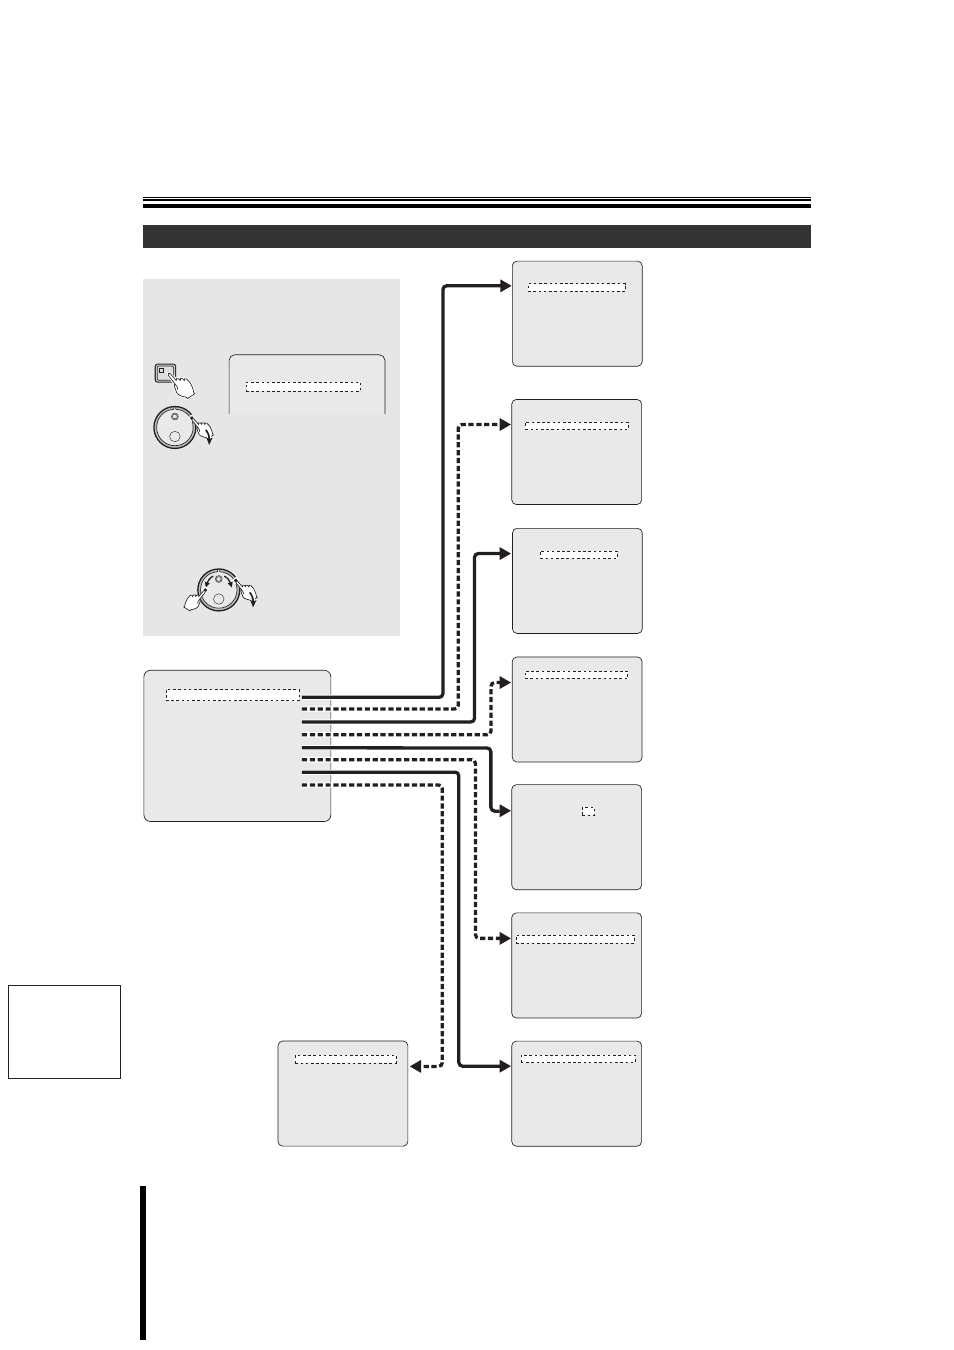
b Displaying the recording settings screen
Menu configuration
1.NORMAL REC EASY SET ->
2.RECORDING AREA SET ->
3.RECORDING CONDITIONS SET ->
4.NORMAL REC MODE SET ->
5.PROGRAM REC SET ->
6.TIMER SET ->
7.ALARM REC MODE SET ->
8.ALARM OPERATION SET ->
MOVE:JOG SELECT:SHUTTLE
ALARM RETRIGGER : OFF
MAIN MON. DISPLAY : FULL
ALARM PRIORITY : LAST
MON.2 DISPLAY : NC
RECORDING DURATION BASE ->
REC RATE BASE ->
CAUTION !
CONNECT CAMERA AND SET TIME
BEFORE SETUP
TOTAL CAPACITY : 82GB
NORMAL RECORDING AREA : 80 %
AREA FULL RESET ->
ALARM RECORDING AREA : 19 %
AREA FULL RESET ->
ARCHIVE AREA : 1 %
AREA FULL RESET ->
CAUTION : WHEN THE AREA SETTING IS CHANGED,
THE WHOLE AREA WILL BE INITIALIZED !
NORMAL RECORDING AREA
OVERWRITE : ON
ALARM RECORDING AREA
OVERWRITE : ON
REMAINING DISK WARNING : **
SERIES RECORDING : OFF
AUTO DELETE : OFF
PICTURE QUALITY : ENHANCED
AUDIO RECORDING : OFF
REC RATE : 12.5FPS ( 42H)
REC PROGRAM GROUP : OFF
PROGRAM : P-1
SELECT INDIVIDUAL CAMERA RATE(FPS)
01: 0.5 02: 0.5 03: 0.5
04: 0.5 05: 0.5 06: 0.5
NORMAL REC : 67H
WEEK START STOP PROGRAM FPS SET
SUN --:-- --:-- OFF 12.5 FPS OFF
MON --:-- --:-- OFF 12.5 FPS OFF
TUE --:-- --:-- OFF 12.5 FPS OFF
WED --:-- --:-- OFF 12.5 FPS OFF
THU --:-- --:-- OFF 12.5 FPS OFF
FRI --:-- --:-- OFF 12.5 FPS OFF
SAT --:-- --:-- OFF 12.5 FPS OFF
DLY --:-- --:-- OFF 12.5 FPS OFF
EXT ***** ***** OFF 12.5 FPS OFF
ALARM RECORDING : OFF
PICTURE QUALITY : ENHANCED
AUDIO RECORDING : OFF
ALARM INTERLEAVE : ONLY
REC RATE: 12.5FPS, DURATION: 20SEC
PRE-ALARM RECORDING : ***
REC RATE: **** FPS, DURATION: ****
=> (01731 ALARMS CAN BE RECORDED)
ALARM TRIGGER : ALARM
MOTION SENSOR ->
b Displaying the recording settings screen
1
Press the MENU button and use the
J-dial to select "2. RECORD SET",
and then turn the S-dial clockwise.
The
2
Turn the J-dial, select the desired
submenu, and turn the S-dial
clockwise.
The selected screen (A~H) is
displayed. Refer to the appropriate
pages for the settings.
1.INITIAL SET ->
2.RECORD SET ->
3.GENERAL SET ->
4.SCREEN SET ->
(S)
MENU
(S)
(J)
H Alarm operation/
display settings
(P60)
Sets the operation and display
to use at alarm detection.
A Easy recording settings
(P40)
The recording duration or rate can be
selected.
RECORDING DURATION BASE (P41)
Sets the standard recording duration
REC RATE BASE (P42)
Sets the standard recording rate
B Recording area settings
(P43)
Displays the total capacity of the
internal hard disk. The recording
capacity for each area (normal, alarm
recording and archive) can be set.
C Recording conditions
setting (P46)
Specifies settings such as allowing
overwrite or stopping instead when the
normal or alarm recording area of the
internal hard disk is full.
D Normal recording
settings (P49)
Sets the image quality, audio, recording
rate and programmed recording.
E Programmed recording
settings (P50)
Sets the recording rate of the recording
camera.
F Timer settings (P51)
Sets the recording according to day of
the week and time.
G Alarm recording
settings (P55)
Sets the alarm recording, pre-alarm
recording and motion sensors.
Recording settings