Names and functions of parts (rear panel), Foreword 10, Basic connections – Sanyo DSR-3706PA User Manual
Page 11: Power mode auto menu, English, 3 video input terminal (video in), 2 video output terminal (video out), 1 clear button (all reset), 5 microphone input terminal (mic in), 7 usb terminal (usb)
English
Foreword
10
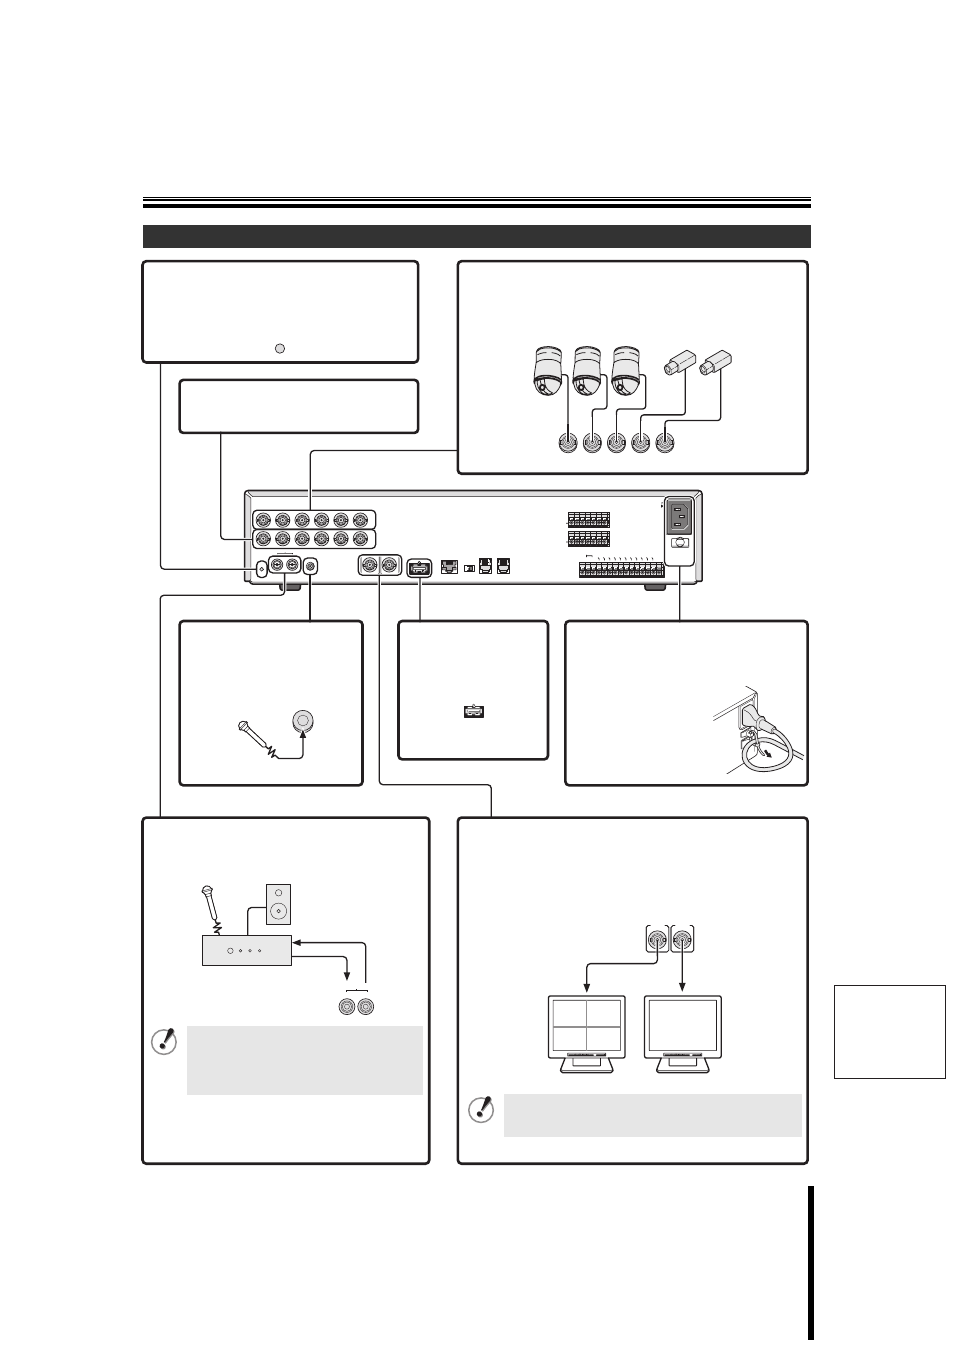
Names and functions of parts (rear panel)
Basic connections
USB
LAN
TERMINATE
RS-485
OFF
ON
A RS-485 B
ALARM IN
AC IN
SENSOR
ALARM OUT
C
CLO
CK IN
CLO
CK O
UT
ALARM OUT
ALARM RESET
ALARM FULL
NON REC OUT
WARNING OUT
FULL
SERIES OUT
EXIT TIMER IN
SERIES IN
REMOTE
CONTROL
C 1
2 3
4 5
6
C 1
2 3
4 5
6
C
R1 R2
1
IN
OUT
ALL
RESET
AUDIO
MON2
MIC IN
IN
OUT
2
3
4
5
6
MAIN
1
2
3
4
5
ALL
RESET
MIC IN
USB
3 Video input terminal (Video IN)
Connect SANYO protocol cameras (dome or zoom) or generic
cameras to these terminals. (P70)
Camera (sold separately)
2 Video output terminal (Video OUT)
Outputs the image input in the Video input
terminal.
1 Clear button (ALL RESET)
Press to reset the clocks connected to the digital video
recorder to their initial values.
5 Microphone input terminal
(MIC IN)
External microphone can be
connected to this terminal.
7 USB terminal (USB)
This terminal connects to an
optional CD-R/RW drive.
8 Power socket and cord tie
(AC IN~)
Securely connect the power cable supplied as
an accessory to the power socket, and use the
cord tie to attach it to the
cable holder.
Microphone
(sold separately)
4 Audio input/output terminals (AUDIO IN/OUT)
These terminals are used in connection with an amplifier to
input external audio from a microphone, or to listen to the
audio using external speakers.
The audio input terminal and the microphone
input terminal cannot be used for
simultaneous audio input. If both are
connected, the microphone input terminal
will be enabled.
AUDIO
IN
OUT
Audio output
Amplifier
(sold separately)
Audio
input
6 Monitor connection terminal (MONITOR OUT)
• Main monitor terminal (MAIN):
Connect to this terminal for normal surveillance.
• Monitor 2 terminal (MON2):
Connect to this terminal for convergence surveillance.
Display is possible only in full-screen mode.
If monitor 2 is not synchronized with the connected
cameras, vertical image instability may occur when
switching the camera video.
MONITOR OUT
POWER
MODE
AUTO
MENU
02
01
04
03
POWER
MODE
AUTO
MENU
MON2
MAIN
Video input terminal
Video input terminal
Monitor (sold separately)