Adjustable freestanding console bracket – Grass Valley Kalypso Installation Planning Guide User Manual
Page 33
Kalypso Installation Planning Guide
33
Menu Panel Installation
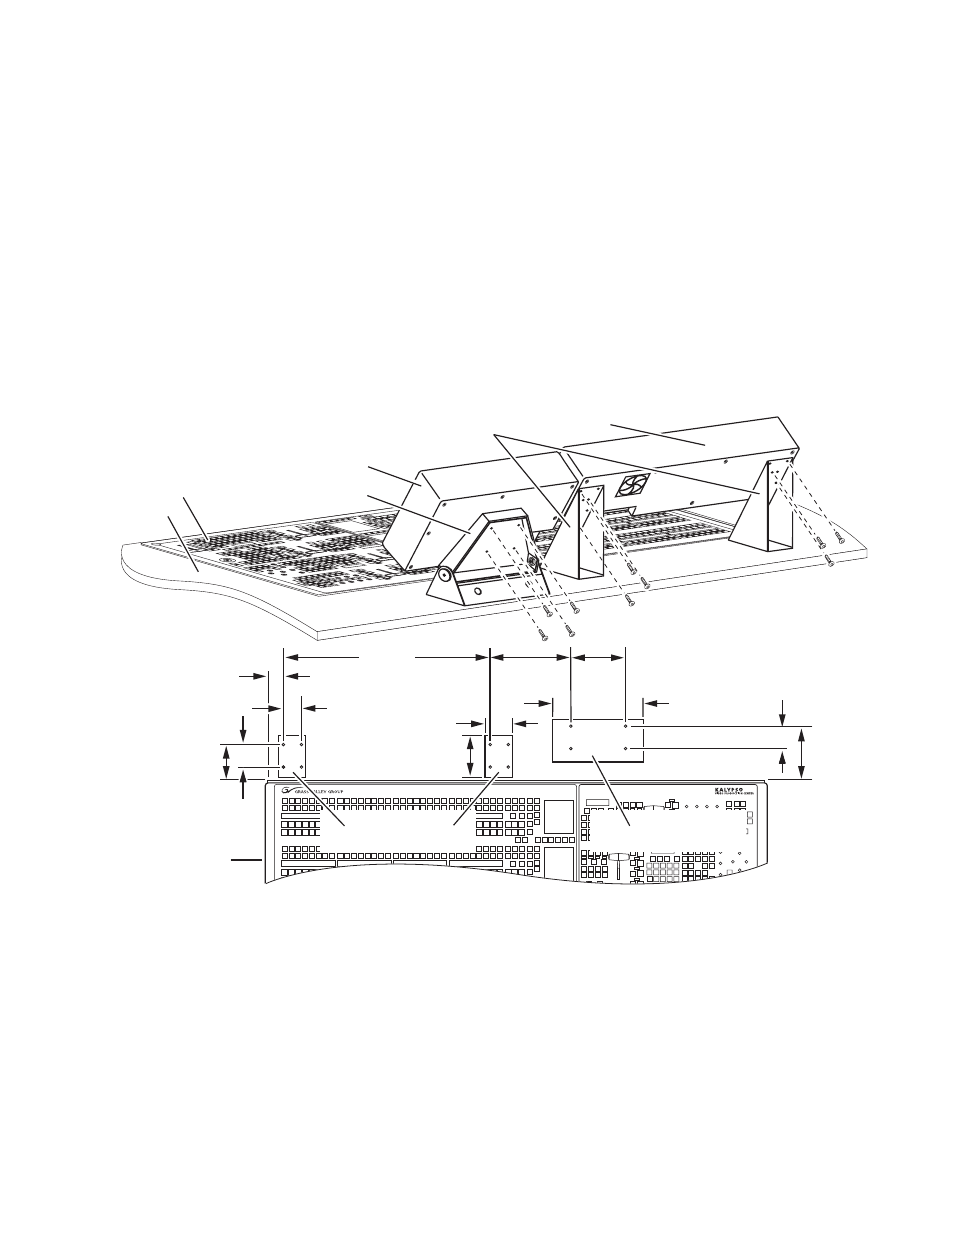
Adjustable Freestanding Console Bracket
A single four-hole screw pattern on the back of the Menu panel (
)
accommodates the Adjustable Freestanding Console bracket. This
bracket’s friction-lock can be set during installation to allow the user to tilt
the Menu panel on a horizontal axis during use for optimum viewing.
The Adjustable Freestanding Console bracket can be used to mount the
Menu panel to the console in the recommended position (
). The Menu panel can also be mounted above the Main panel with
this bracket, as shown in
. If installed in this orientation, follow
the recommended mounting dimensions to ensure adequate clearance
when the Main panel lid is opened.
Figure 32. Optional Placement of Menu Panel
CAUTION When finalizing the location of the Menu panel, be sure to open the Main
panel lid and check for sufficient clearance between the Menu panel and the
Main panel components. Without sufficient clearance, the lever arm or joy-
stick could damage the Touch Screen when the Main panel is opened.
If an overhang or wall exists by the Main panel, this bracket can be rotated
to mount the Menu panel to that surface (like the Adaptable Mounting
bracket). The four-hole screw pattern on the Menu panel may also be used
to attach a user-supplied articulated arm, for even more flexibility.
0619_00_00_r2
3.91 in.
99 mm
Measurements
referenced to left
rear corner of tub.
Main Panel
4.68 in.
119 mm
2.5 in.
64 mm
7.0 in.
178 mm
(minimum)
2.5 in.
64 mm
2.0 in.
51 mm
1.05 in.
27 mm
3.0 in.
76 mm
10.0 in.
254 mm
22.73 in.
577 mm
8.86 in.
225 mm
6.0 in.
152 mm
Local Aux Panel
Console Bracket Footprint
Menu Panel
Console Bracket Footprint
Grass V
Gra
ss V
alley
alle
y GroupG
rou
p
Kal
yp
so
Kal
yp
so
0619_00_44_r10
Local Aux Panel
Fixed Freestanding
Console Brackets
Menu Panel
Adjustable Freestanding
Console Bracket
Console
Main Panel