Rena MACH X (Digital Color Label Printer) User Manual
Page 61
SECTION 3
OPERATING THE PRINTER
55
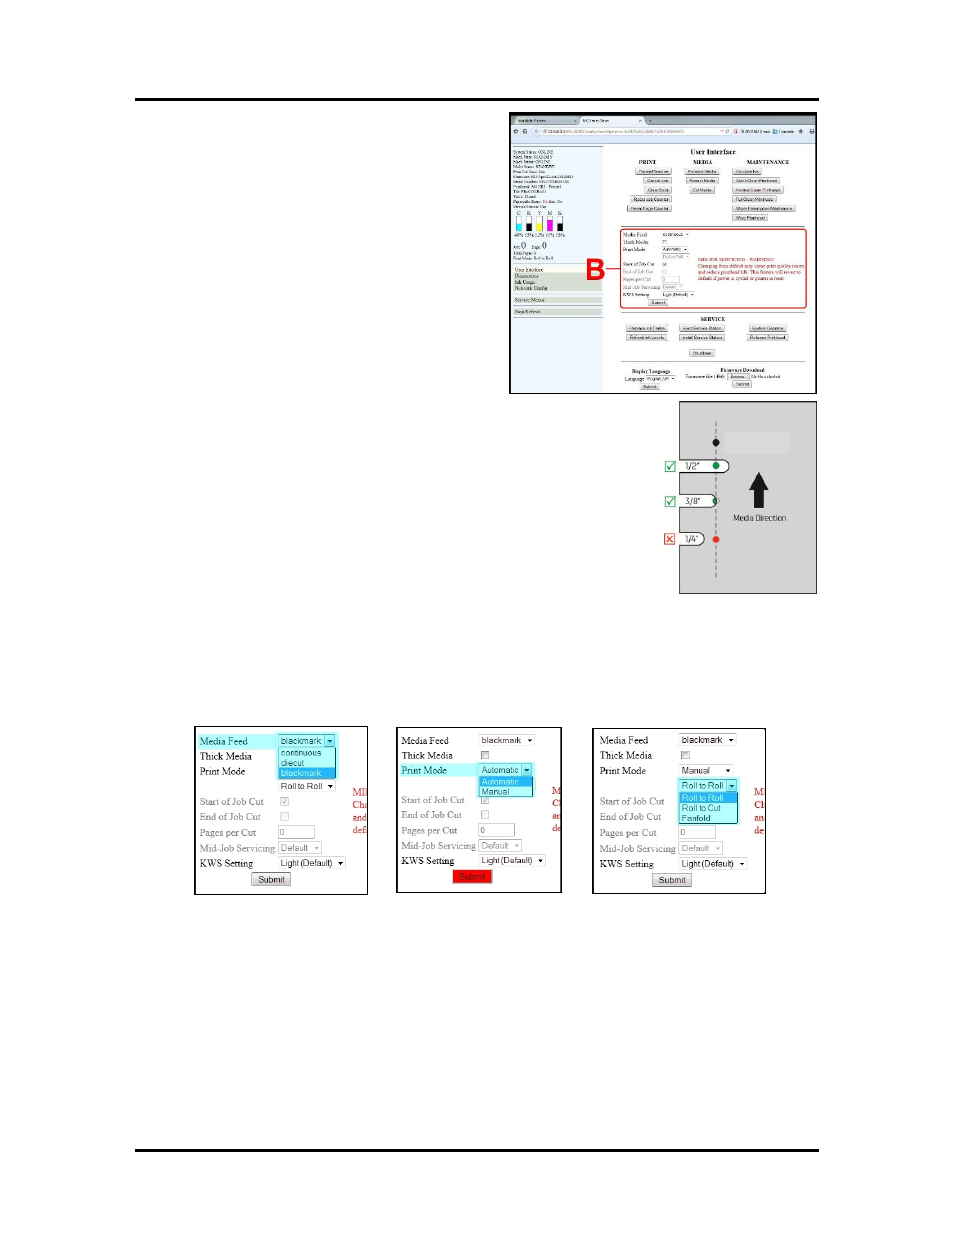
Mark Sensor
[B] Basic Printer Settings – Lets you adjust automated
service and cleaning intervals, adjust the feeder speed
for a job and adjust the Printer for pre-printed media.
Media Feed – Set for the type of “next page”
detection you want the printer to use.
Continuous – No gaps or tick marks present on media.
Next page starts after previous page ends. Can be used
in conjunction with the “Stitch” selection; found in the
MC Series Driver under Page Management.
Diecut – Label stock with 3 mm or larger gap between
labels. Gap (density difference between label and
backing) triggers printer to print next page.
Blackmark – Mark on underside of media, or notch
(hole), that travels over the Mark Sensor. Mark/notch
triggers printer to print next page.
Notch or Mark must be located at non-operator side of media and measure 3/8”
(9.5 mm) to 1/2” (12.7 mm) wide by 1/8” (3 mm) high. See example.
In addition the reflectivity between the Mark and underside of media must be
significant enough for the sensor to distinguish the Mark from the rest of the
media. Example: Flat-black Mark (light absorbing) on white surface.
Thick Media – Check this box to allow the sensors to read gaps in heavier
Diecut media (for example, when using labels with 50lb liner; the normal
setting may not be able to differentiate between the label and the backing/gap).
This setting can also be used to improve Blackmark sensing.
Print Mode – Set to Automatic when used with “interfaced” Unwinder and or
Winder. In this case the “Printing Mode” selection is grayed out (automatically selected by printer).
Set to Manual when using with an “non-interfaced” Unwinder and/or Winder or if you want to manually
control the “Printing Mode”, “Pages per Cut” and “Mid-Job Servicing”.
When Manual is selected, you will be able to manually select the desired Printing Mode
Roll to Roll, Roll to Cut or Fanfold.
NOTE: Depending on selection, certain other settings may be disabled (Start of Job Cut, End of Job
Cut, Pages per Cut, Mid-Job Servicing).
Start of Job Cut – Cuts the leading edge of the media at the start of the job to provide a clean edge for
TOF reference.
End of Job Cut – Cuts the end of the media after the job finishes printing. If running in Roll to Roll
mode, you may or may not want the web cut before starting a new job.
Pages per Cut – Set the number of labels (pages) between cuts.
Example: 1 = cut after every label. 5 = cut after every fifth
label.
NOTE: Since End of Job Cut will also be active, the last cut may have fewer labels than the set Pages
per Cut number depending on the total number of labels you are printing (ie, you print a total of 23 labels
set to cut after every fifth label, you will have 4 sets of 5 labels, 1 set of 3.)