Wing completion – Great Planes PT-40 MkII Kit - GPMA0118 User Manual
Page 36
❏
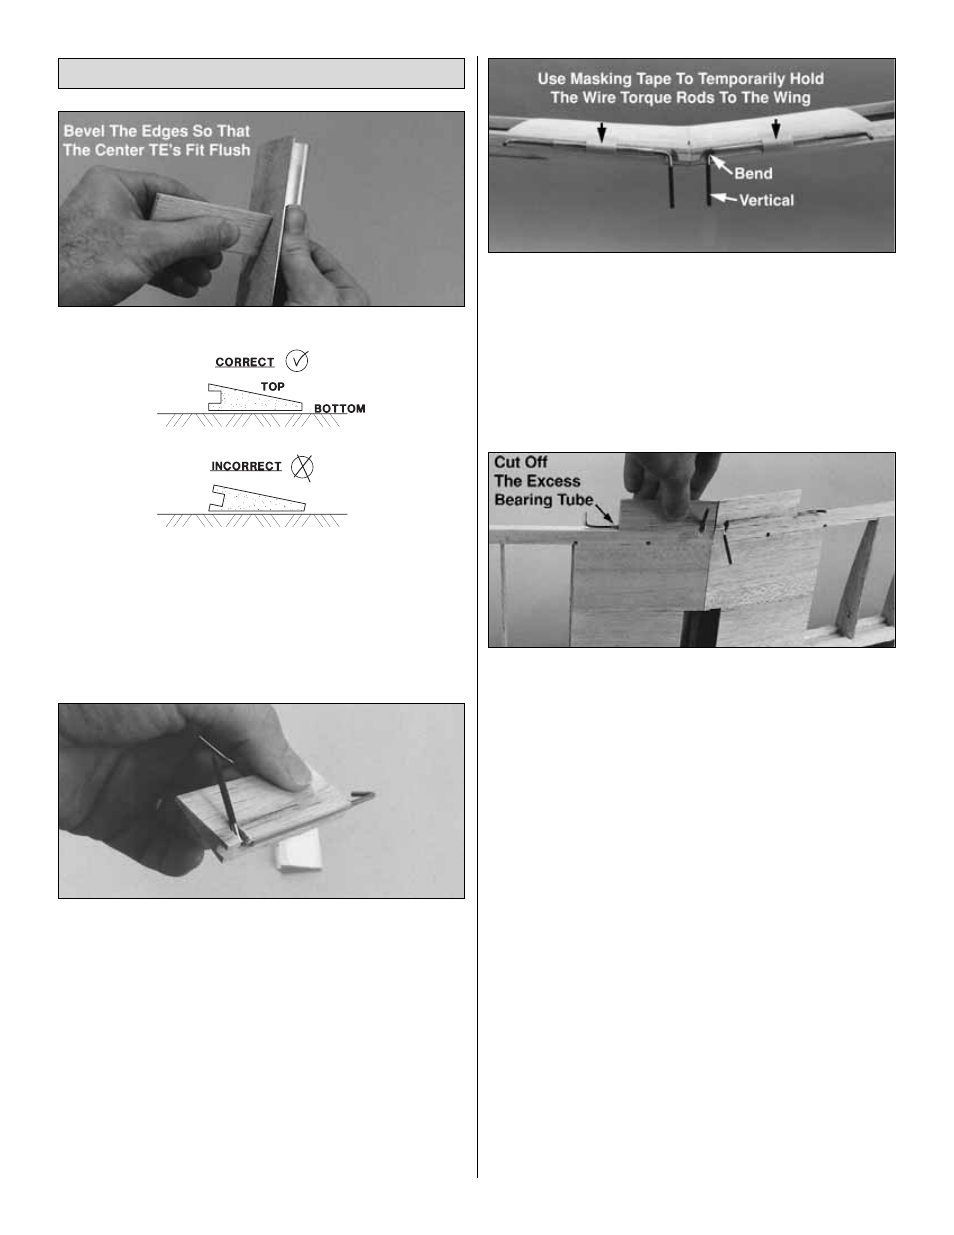
1. Reference the cross section on the wing plan so you
know which sides of the tapered and grooved wing center
trailing edges are the top and which sides are the bottom.
Position the wing center trailing edges on the wing and
sand a slight angle on the inboard end of each one so they
fit flush when matched to the dihedral angle. Lightly mark
the wing center TE’s as “R” and “L.”
❏
2. Position the wing center TE’s over the top view of the
plan with the root end aligned with the drawing. Mark the
location of the aileron torque rod exits and the outboard
ends of the wing center TE’s as shown on the plan. Cut a
notch in the bottom forward edge of each piece and cut
them to the length shown on the plan. Test fit the wire
torque rods.
❏
3. Hold the wing center TE’s against the aft edge of the
wing aligned with the wing’s centerline. Mark the torque rod
notches on the bottom of the wing, then cut the notches just
as you did for the wing center TE’s. The notches in the wing
TE don’t need to be nearly as deep as the notches in the
wing center TE’s.
❏
4. Use a pliers to bend the wire torque rods so the
threaded “ar m” is ver tical when the torque rods are
positioned on the trailing edge of the wing.
❏
5. With the torque rods in the wing center TE’s, position
the nylon bearing tubes so they do not restrict movement of
the torque rods. If part of the bearing tube protrudes from
the Wing center TE’s, trim it off (see the following photo).
❏
6. Position the Wing center TE’s with the torque rods on
the trailing edge of the wing. Make sure the notches align
and are deep enough to give the torque rods enough throw.
❏
7. Use coarse sandpaper to roughen the part of the
torque rods that fit into the ailerons and also the nylon
bearing tubes.
❏
8. With a toothpick, apply a small amount of petroleum
jelly (Vaseline, etc.) around the torque rods at each end of
the nylon tubes. This will help prevent glue from entering
the nylon tube.
❏
9. Apply 30-minute epoxy to the nylon tubes, staying
clear of the tubes ends. Insert the tubes into the grooves of
the Wing center TE’s. Use a paper towel to wipe off any
epoxy that squeezes out. Apply epoxy to the forward and
inboard edges of the Wing center TE’s, then glue them in
position as shown at step 6. Use masking tape to hold the
Wing center TE’s in position while the epoxy cures.
❏
10. Cut a 2-5/8" piece from each 30" aileron to make
the wing tip trailing edges. Glue the tip trailing edges to
the wing so that the end of the tip TE protrudes past the
wing tip by approximately 1/16". This will assure that the tip
TE is flush with the end of the wing after sanding.
Wing Completion
36