Installing the master cylinder and foot pedal, Figure 3-41: adjust the brake pad space – Dynojet 200: Installation Guide User Manual
Page 62
Motorcycle Dynamometer Installation Guide
C H A P T E R 3
Mechanical Brake
3-32
4
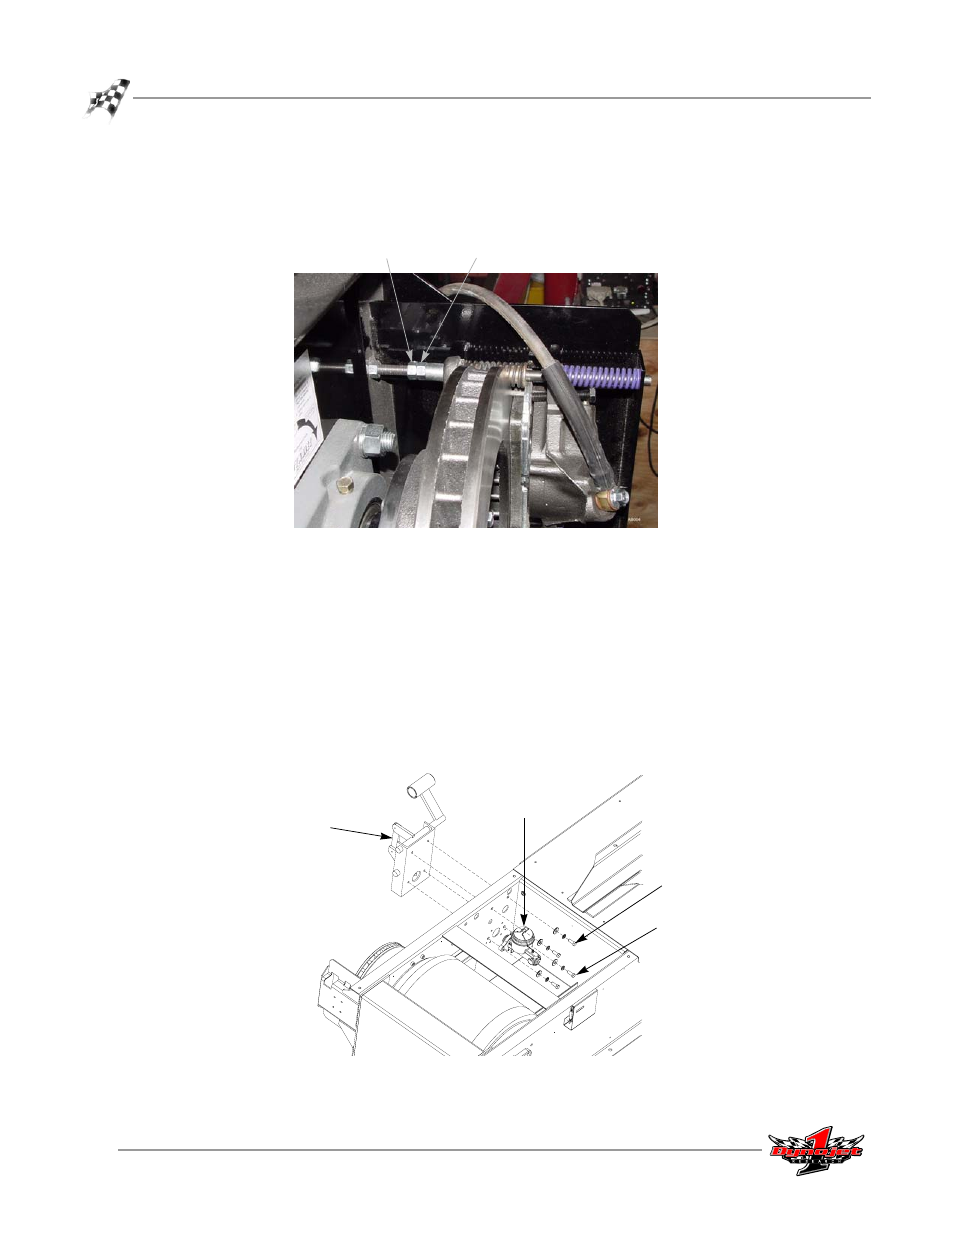
Adjust the space between the brake pad and the rotor making sure the rotor is
able to spin free of contact.
Loosen the jam nut and use the adjuster nut to move the brake pads in or out.
Figure 3-41: Adjust the Brake Pad Space
I
NSTALLING
THE
M
ASTER
C
YLINDER
AND
F
OOT
P
EDAL
1
Position the master cylinder to the inside of the dyno frame and slip the rubber
boot on from the outside. The rubber boot slips over the piston sleeve on the
master cylinder.
2
Mount the foot pedal to the outside of the dyno frame. The bolts should run from
the inside, through the master cylinder, and into the threaded foot pedal
mounting plate.
Note: Use the two 3/8 x 1-inch bolts on the top and the two 3/8 x 1 1/4-inch bolts
on the bottom. All bolts get a lock washer and flat washer.
Figure 3-42: Install the Master Cylinder and Foot Pedal
jam nut
adjuster nut
foot pedal
master cylinder
3/8 x 3/4-inch
bolts for top
3/8 x 1 1/4-inch
bolts for bottom
- 150: Kart and ATV Dynamometers (44 pages)
- 150: Dyno Drum Cover for Kart and ATV Dyno Motorcycle Option (3 pages)
- 150: WinPEP 7 (170 pages)
- 168: Eddy Current Brake (27 pages)
- 200: Eddy Current Brake (45 pages)
- 200: Replacing the Starter Ring Gear (7 pages)
- 200: Safety Switch (3 pages)
- 200: DynoWare EX+ Upgrade Installation Guide for Motorcycle Dynos (20 pages)
- 200: Throttle Stop (3 pages)
- 200: Eddy Current Brake Driveline Upgrade (17 pages)
- 200i: High Pressure Blower (20 pages)
- 200i: Pit Installation Guide (154 pages)
- 200i: Pre-Installation Guide (52 pages)
- 200i: Installation Guide (184 pages)
- 200i: Air Brake and EEC Kit (40 pages)
- 200i: Dynamometer Wiring Schematic (2 pages)
- 200i: Folding Ramp (15 pages)
- 200i: Control Panel Interface Upgrade (S/N 201xxxx) (31 pages)
- 200i: Control Panel Interface Upgrade (S/N 202xxxx) (29 pages)
- 200i: Motorcycle Exhaust Extraction System Drawings (18 pages)
- 200iP: Pit Installation Guide (148 pages)
- 200iPX: Installation Guide (163 pages)
- 200iPX: Installation Guide (52 pages)
- 200ix: Pit Installation Guide (163 pages)
- 200ix: Extended Carriage and Trike Adapter Assembly (15 pages)
- 200iX: Upgrade Installation Guide (56 pages)
- 200ix: Extended Carriage with Trike Adapter Assembly (13 pages)
- 224: CE Package (17 pages)
- 224: Maintenance Guide (35 pages)
- 224: Installation Guide (78 pages)
- 224/4WD: Installation Guide (77 pages)
- 224: Pit Installation Guide (56 pages)
- 224x: Above Ground Four Post Lift Dimensions (1 page)
- 224x: Pre-Installation Guide (63 pages)
- 224x: 4WD Dyno Air and Wiring Schematic (2 pages)
- 224: Eddy Current Brake (73 pages)
- 224: Pit Eddy Current Brake (69 pages)
- 224xLC2: Quickstart guide for DWRT (2 pages)
- 248: Pit Installation Guide (74 pages)
- 248: Installation Guide (58 pages)
- 248: DynoTRAC User Guide with Variable Brake (14 pages)
- 248: DynoWare EX+ Upgrade (22 pages)
- 248: Optical RPM Sensor (22 pages)
- 248: Proportional Air Brake (21 pages)