Installing the spring bolt assembly, Figure 3-16: install the spring bolt assembly – Dynojet 200: Installation Guide User Manual
Page 40
Motorcycle Dynamometer Installation Guide
C H A P T E R 3
Air Brake
3-10
I
NSTALLING
THE
S
PRING
B
OLT
A
SSEMBLY
1
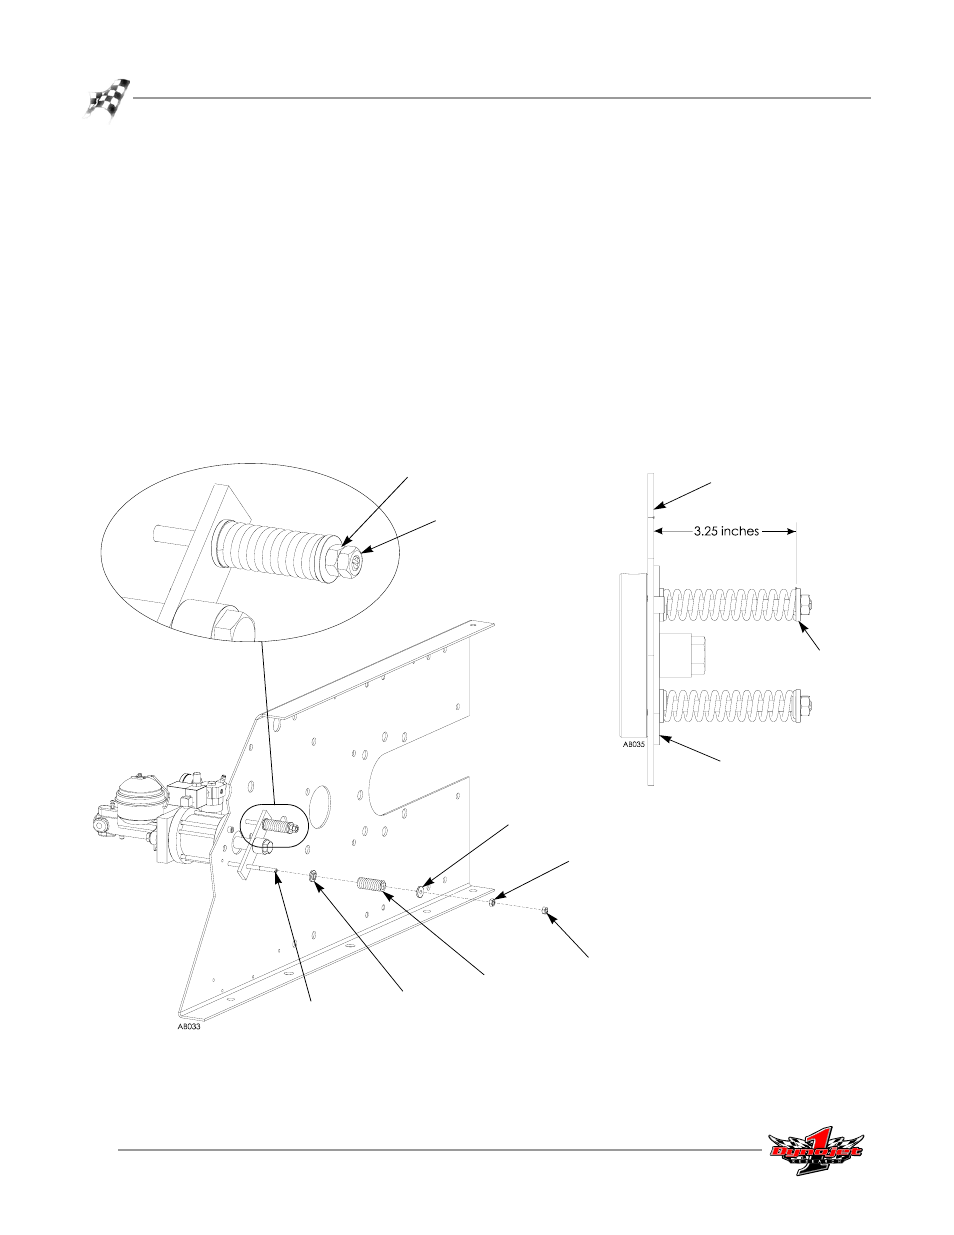
Push the mounting plate flush with the dyno cabinet.
2
Install the rear retainer, spring, front retainer, and adjuster nut. Be sure the
hardware is in this order.
Note: You may need to compress the spring to get the adjuster nut on.
The distance from the front retainer to the dyno cabinet should be 3.25 inches.
Final adjustments will be made later.
If the distance is less that 3.25 inches, us a flat blade screwdriver to unscrew the
spring rod until the proper distance is achieved.
3
Turn the adjuster nut to tighten the spring until there is enough room on the
spring rod for the jam nut.
4
While holding the adjuster nut from turning, tighten the jam nut against the
adjuster nut.
Figure 3-16: Install the Spring Bolt Assembly
spring
rear retainer
adjuster nut
jam nut
cut away view of dyno
side panel
spring rod
front retainer
tighten jam nut
against adjuster nut
hold adjuster nut
dyno cabinet
front retainer
mounting plate
- 150: Kart and ATV Dynamometers (44 pages)
- 150: Dyno Drum Cover for Kart and ATV Dyno Motorcycle Option (3 pages)
- 150: WinPEP 7 (170 pages)
- 168: Eddy Current Brake (27 pages)
- 200: Eddy Current Brake (45 pages)
- 200: Replacing the Starter Ring Gear (7 pages)
- 200: Safety Switch (3 pages)
- 200: DynoWare EX+ Upgrade Installation Guide for Motorcycle Dynos (20 pages)
- 200: Throttle Stop (3 pages)
- 200: Eddy Current Brake Driveline Upgrade (17 pages)
- 200i: High Pressure Blower (20 pages)
- 200i: Pit Installation Guide (154 pages)
- 200i: Pre-Installation Guide (52 pages)
- 200i: Installation Guide (184 pages)
- 200i: Air Brake and EEC Kit (40 pages)
- 200i: Dynamometer Wiring Schematic (2 pages)
- 200i: Folding Ramp (15 pages)
- 200i: Control Panel Interface Upgrade (S/N 201xxxx) (31 pages)
- 200i: Control Panel Interface Upgrade (S/N 202xxxx) (29 pages)
- 200i: Motorcycle Exhaust Extraction System Drawings (18 pages)
- 200iP: Pit Installation Guide (148 pages)
- 200iPX: Installation Guide (163 pages)
- 200iPX: Installation Guide (52 pages)
- 200ix: Pit Installation Guide (163 pages)
- 200ix: Extended Carriage and Trike Adapter Assembly (15 pages)
- 200iX: Upgrade Installation Guide (56 pages)
- 200ix: Extended Carriage with Trike Adapter Assembly (13 pages)
- 224: CE Package (17 pages)
- 224: Maintenance Guide (35 pages)
- 224: Installation Guide (78 pages)
- 224/4WD: Installation Guide (77 pages)
- 224: Pit Installation Guide (56 pages)
- 224x: Above Ground Four Post Lift Dimensions (1 page)
- 224x: Pre-Installation Guide (63 pages)
- 224x: 4WD Dyno Air and Wiring Schematic (2 pages)
- 224: Eddy Current Brake (73 pages)
- 224: Pit Eddy Current Brake (69 pages)
- 224xLC2: Quickstart guide for DWRT (2 pages)
- 248: Pit Installation Guide (74 pages)
- 248: Installation Guide (58 pages)
- 248: DynoTRAC User Guide with Variable Brake (14 pages)
- 248: DynoWare EX+ Upgrade (22 pages)
- 248: Optical RPM Sensor (22 pages)
- 248: Proportional Air Brake (21 pages)