2 of 3 installation sheet, Wet location wall washers, Independent setup – Diode LED Wet Location Wall Washer User Manual
Page 2: P 6 3, 0 0 1 dmx controller setup, Operation overview (continued)
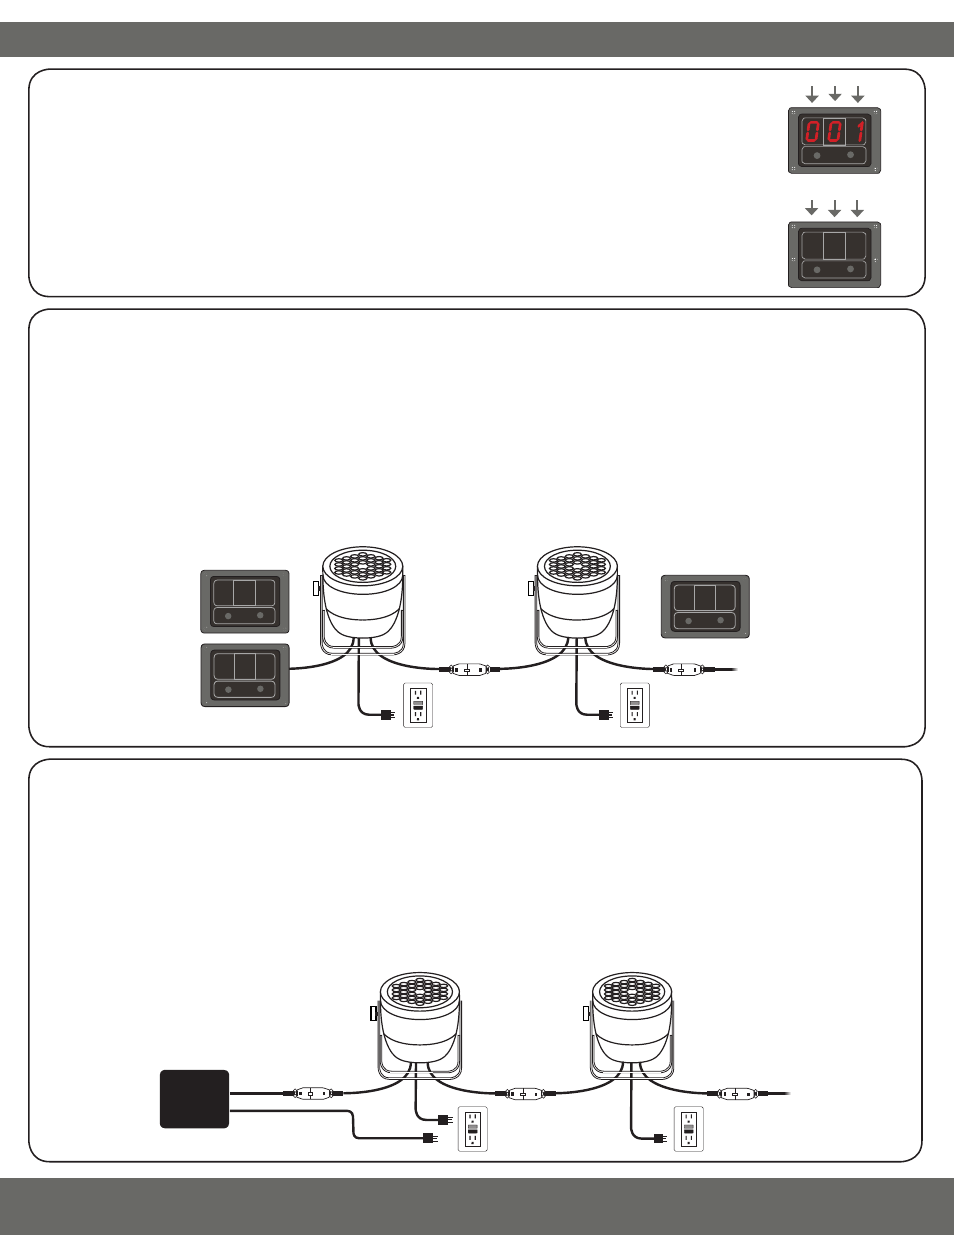
2 OF 3
INSTALLATION SHEET
Independent Setup:
(Primary fixture operating independently or commanding additional fixtures)
1. Link each wall washer together with the attached male and female 3-pin M14 connetions (maximum run: 10 fixtures). Power up each wall washer
by inserting the AC cord into a standard 120VAC electrical receptacle (Fig. 2a).
2. Once powered, the on-board control pad of each wall washer will automatically set to the Address Menu. Choose the preferred fixture to operate
as the master controller (this can be any fixture in the series) and set the code in the Address Menu of the master fixture to the default address
‘001’. Do so by setting Fields 1 & 2 to ‘0’ and Field 3 to ‘1’.
3. In the master wall washer Function (P) Menu (Fig. 2a), set the desired command for all master & slave fixtures to perform in Fields 2 & 3. Once
selected, wait 10 seconds for the selected field to stop flashing and the selected command will be set
4. To sync the slave washers to the master washer, set the code in the Address Menu of each slave fixture to any number other than ‘001’ (Fig. 2b). It
is recommended to set each slave with an individual code (e.g. ‘002’, ‘003’, ‘004’ etc.). The Function (P) Menu is not required to operate slave wall
washers.
WET LOCATION WALL WASHERS
A B
Address Menu
Fig. 1a
Field 1
Field 2
Field 3
A B
Field 1
Field 2
Field 3
Function (P) Menu
Fig. 1b
P 6
Master Wall Washer
Slave Wall Washer
Fig. 2b
Fig. 2a
A B
0 0 2
A B
P 6 3
A B
0 0 1
DMX Controller Setup:
(One or more wall washers commanded by a DMX controller)
Please note that all DMX control systems operate differently and may require additional technical knowledge of the DMX controller and equipment to
operate the wall washers effectively. It is recommended that only experienced technicians install DMX control systems.
1. Attach the included XLR-3 adapter cable between the DMX controller and wall washer 3-pin M14 connection (Fig. 3)
(not all DMX controllers have XLR-3 connections).
2. Link each additional wall washer together with the attached male and female mini 3-pin cables (maximum run: 10 fixtures).
3. Power each fixture by inserting the AC cord into a standard 120VAC electrical receptacle.
4. Once powered, the on-board control pad of each wall washer will automatically set to the Address Menu. To effectively command the fixtures
with the DMX control, match the value of each addressing field with the 3-channel address code commanded from the DMX controller.
DMX Controller
with 3-pin XLR Plugs
Fig. 3
Operation Overview (continued)
Each wall washer has its own on-board control pad and 3-digit display, operated by two menu button
controls – ‘A’ and ‘B’. Button ‘A’ cycles through the 3-digit display and switches the display from the
Address Menu (Fig. 1a) to the Function (P) Menu (Fig. 1b). Pressing Button ‘B’ continually changes the
desired value of each field.
At startup, the wall washer will always be set in the Address Menu. To switch to the Function (P) Menu
(Fig. 1b), press Button ‘A’ once and Field 3 will begin to flash. Press Button ‘A’ three times to be directed
to the Function (P) Menu. Once in the Function (P) Menu, press Button ‘A’ two times to switch back to
the Address Menu.