Using the multi-zone controls, Other connections 07, Secondary multi-zone setup (zone 3) – Pioneer SC-LX90 User Manual
Page 66: Assignable 6 1 assignable, Single), Surround back, 14 assignable, R1 r5 l1, 16 zone2 out source out zone3 /source out, Zone3 /source out
Other connections
07
66
En
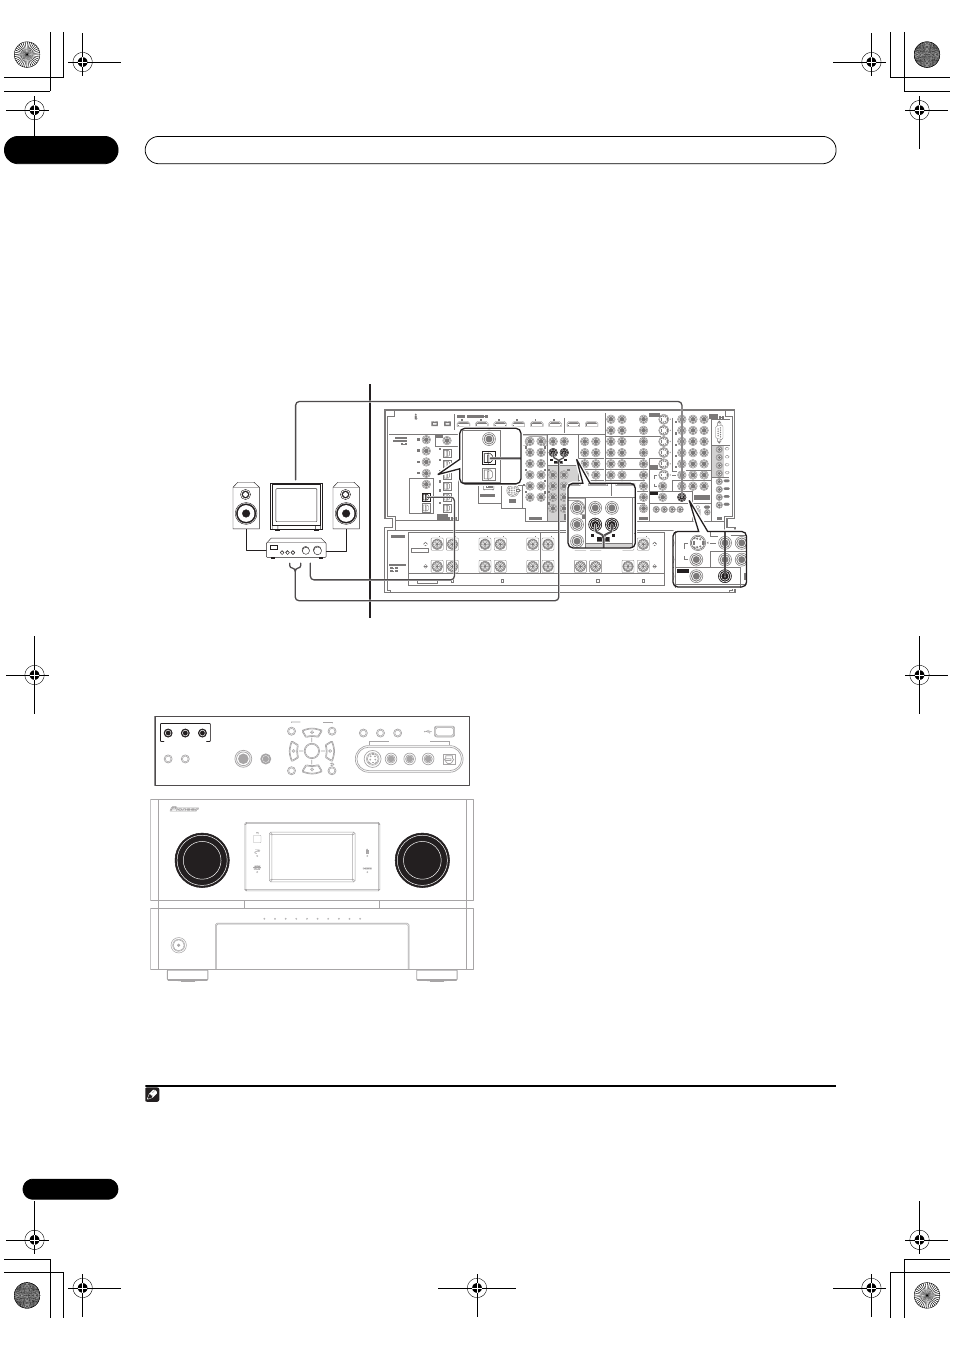
Secondary MULTI-ZONE setup (ZONE 3)
1
Connect a separate amplifier to the AUDIO ZONE3
OUT jacks and a TV monitor to the VIDEO ZONE3 OUT
jacks, both on the rear of this amplifier.
2
Connect a separate amplifier to the ZONE3/
SOURCE OUT digital output on the rear of this
amplifier.
The amplifier must have an optical digital input to make
this connection. This will allow you to hear the digital
output of a component in a second sub zone.
Using the MULTI-ZONE controls
The following steps use the front panel controls to adjust
the sub zone volume and select sources.
1
See
MULTI-
ZONE remote controls on page 67.
1
Press ZONE2 or ZONE3 to select the desired zone
(room).
The zone turns on and off each time the corresponding
button is pressed. It is possible to turn both on.
2
Press CTRL to select the sub zone(s) you want.
2
If you selected
ZONE 2 ON and ZONE 3 ON above, you
can toggle among
ZONE 2, ZONE 3 and ZONE 2&3.
• When the amplifier is on,
3
make sure that any
operations for the sub zone are done while
ZONE and
your selected sub zone(s) show in the display. If this
is not showing, the front panel controls affect the
main zone only.
3
Use the INPUT SELECTOR dial to select the source
for the zone you have selected.
For example,
ZONE 2 CD-R sends the source connected
to the
CD-R inputs to the primary (ZONE 2) sub room.
4
Use the MASTER VOLUME dial to adjust the
volume.
This is only possible if you selected the
VARIABLE
volume control in
ZONE Audio Setup on page 97.
4
5
When you’re finished, press CTRL again to return to
the main zone controls.
You can also press the
ZONE 2 or ZONE 3 button on the
front panel to switch off all output to the sub zone(s).
5
S400
S400
(AUDIO)
(For LD)
ASSIGNABLE
6
1
ASSIGNABLE
FRONT
FRONT
CENTER
SUR-
ROUND-A
SUR-
ROUND-A
SUR-
ROUND-B
R1
L
R
VIDEO
AUDIO
L
R
AUDIO
L
L
L
R
R
L
R
R
L
L
R
R
L
R
L
R
AUDIO
ZONE3
OUT
ZONE2
OUT
ZONE2
OUT
ZONE3
OUT
MONITOR
OUT
OUT
IN
1
IN
2
IN
3
IN
4
1
OUT
2
OUT
3
OUT
4
IR
CONTROL
COMPONENT
VIDEO
ASSIGN-
ABLE
ASSIGN-
ABLE
VIDEO
IN
OUT
SUB
WOOFER
FRONT
CENTER
1
2
1
2
EXTRA
SUR-
ROUND
(Single)
SUB W.
FRONT
CENTER
SUR-
ROUND
SUR-
ROUND
BACK
SURROUND
BACK
PRE OUT
MULTI CH
IN
IN
1
IN
2
IN
3
IN
4
IN
5
IN
6
OUT1
(HDMI CTRL)
OUT2
HDMI
RF IN
IN
(TV)
1
IN
(SAT)
2
IN
(DVR/
VCR 1)
3
IN
(DVR/
VCR 2)
4
IN
(VIDEO/
GAME
1)
5
IN
(CD-R/
TAPE/
MD)
6
(DVD/LD)
2
IN
1
(BD)
IN
2
(CD)
IN
3
(SACD)
IN
4
COAXIAL
1
4
ASSIGNABLE
SELECTABLE
SELECTABLE
R1
R5
L1
SEE
INSTRUCTION
MANUAL
VOIR LE MODE
D'EMPLOI
4
Ω 16Ω
R2
6
Ω 16Ω
SURROUND
BACK
SUR-
ROUND-B
R3
6
Ω 16Ω
R4
6
Ω 16Ω
R5
6
Ω 16Ω
L5
6
Ω 16Ω
SURROUND
BACK
(Single)
L4
6
Ω 16Ω
L3
6
Ω 16Ω
L2
6
Ω 16Ω
L1
AC IN
4
Ω 16Ω
L5
SPEAKERS
Normal
LOW
HIGH
FRONT
All ch Bi-Amp.
OPTICAL
1
6
ZONE2
OUT
SOURCE
OUT
ZONE3
/SOURCE
OUT
R
LOW
HIGH
SURROUND
LOW
HIGH
CENTER
R
HIGH
LOW
SURROUND L
HIGH
LOW
FRONT
L
1
2
3
4
12 V TRIGGER
(DC OUT 12V TOTAL 250 mA MAX)
RS-
232C
VIDEO/
GAME 1
IN
SAT
IN
IN
IN
AUX
IN
IN
IN
CD-R/
TAPE/
MD
REC
SEL
OUT
CD
SACD
PHONO
TV
IN
BD
IN
DVD/LD
IN
IN
IN
IN
(DVD/LD)
IN
(DVD/LD)
1
1
5
IN
(VIDEO/
GAME
1)
3
IN
(BD)
2
IN
(DVR/VCR 1)
4
IN
(DVR/VCR 2)
5
IN
ZONE2
OUT
DVR/
VCR 2
DVR/
VCR 1
REC SEL
OUT
REC SEL
OUT
IN
REC SEL
OUT
REC SEL
OUT
S-VIDEO
Y
P
B
P
R
LAN (10/100)
IN
iPod
L
R
AUDIO
VIDEO
ZONE3
/SOURCE
OUT
ZONE3
OUT
ZONE3
OUT
DIGITAL IN
AUDIO IN
ZONE3
OUT
ZONE2
OUT
MONITOR
OUT
CO
C
V
VIDEO
12 V TRIGGER
(DVR/VCR 2)
ZONE2
OUT
VIDEO
VCR 1)
IN
(DVR/
VCR 2)
IN
(VIDEO/
GAME
1)
IN
(CD-R/
TAPE/
MD)
ZONE2
OUT
SOURCE
OUT
ZONE3
/SOURCE
OUT
L
L
R
AUDIO
ZONE2
OUT
ZONE3
OUT
1
1
L
R
AUDIO
Main zone
Sub zone (
ZONE 3)
Note
1 When you use
ZONE 3, you must set ZONE 3 / RECSEL Setting in the ZONE Audio Setup menu to ZONE 3 (page 97).
PHONES
SPEAKERS
AUTO SURROUND
/STREAM DIRECT
STATUS
LCD
VIEW
DIMMER
CTRL
ZONE2
ZONE3
VIDEO/GAME 2 INPUT
DIGITAL IN
S-VIDEO
VIDEO
L
R
AUDIO
MULTI-ZONE CONTROL
MCACC
SETUP MIC
USB
PARAMETER
SETUP
AUDIO
VIDEO
RETURN
ENTER
CTRL
ZONE2
ZONE3
MULTI-ZONE CONTROL
SC-LX90
MASTER
VOLUME
STANDBY/ON
INPUT
SELECTOR
R1
R2
R3
R4
R5
ACTIVE MONITOR
L5
L4
L3
L2
L1
MASTER
VOLUME
INPUT
SELECTOR
2 Note that when recording, this also selects the
RECOUT input source. See Making an audio or a video recording on page 102 for more on this.
3 If the amplifier is in standby, the display is dimmed, and
ZONE and your selected sub zone(s) continue to show in the display.
4 The volume levels of the main and sub zones are independent.
5 • You won’t be able to switch the main zone off completely unless you’ve switched off the MULTI-ZONE control first.
• If you don’t plan to use the MULTI-ZONE feature for awhile, turn off the power in both the sub and main rooms so that this amplifier is in standby.
SC_LX90_WY.book Page 66 Wednesday, February 6, 2008 11:49 AM