The system setup menu 06, Audio video, Enter mcacc setup mic – Pioneer SC-LX90 User Manual
Page 42
The System Setup menu
06
42
En
3
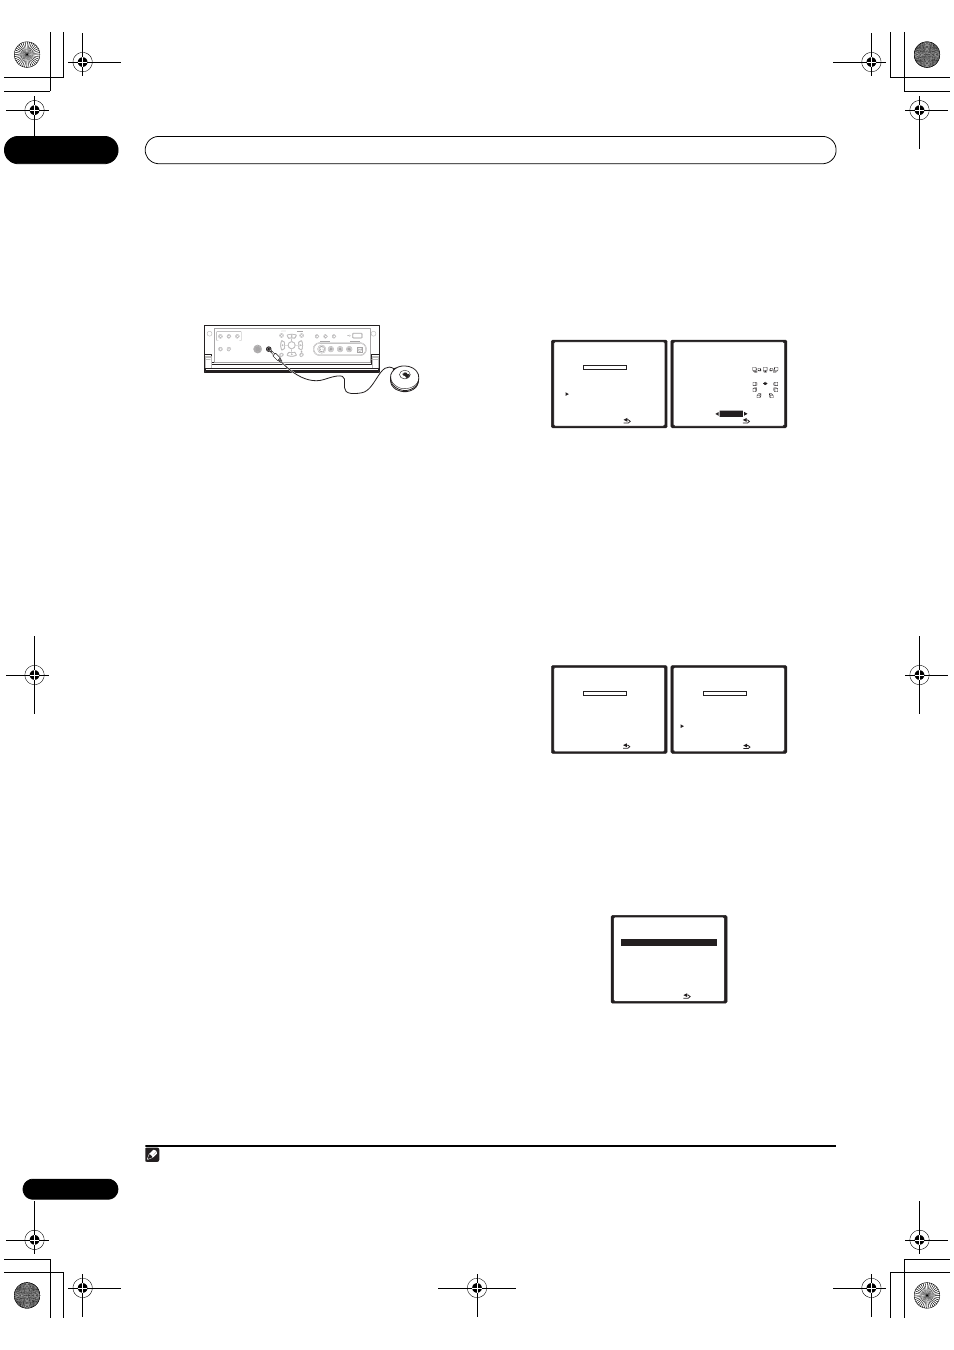
Connect the microphone to the MCACC SETUP MIC
jack on the front panel.
Make sure there are no obstacles between the speakers
and the microphone.
If you have a tripod, use it to place the microphone so that
it’s about ear level at your normal listening position.
Otherwise, place the microphone at ear level using a
table or a chair.
4
Follow the instructions on-screen.
• Make sure the microphone is connected.
• If you’re using a subwoofer, it is automatically
detected every time you switch on the system. Make
sure it is on and the volume is turned up.
• See
Problems when using the Auto MCACC Setup on
page 13 for notes regarding high background noise
levels and other possible interference.
5
Wait for the Auto MCACC Setup to finish
outputting test tones.
A progress report is displayed on-screen while the
amplifier outputs test tones to determine the speakers
present in your setup. Try to be as quiet as possible while
it’s doing this.
• Do not adjust the volume during the test tones. This
may result in incorrect speaker settings.
• With error messages (such as
Too much ambient
noise! or Check Microphone) select RETRY after
checking for ambient noise (see
Problems when
using the Auto MCACC Setup on page 13) and
verifying the mic connection. If there doesn’t seem to
be a problem, you can simply select
GO NEXT and
continue.
6
If necessary, confirm the speaker configuration in
the OSD.
1
The configuration shown on-screen should reflect the
actual speakers you have.
If no operations are performed for 10 seconds while the
speaker configuration check screen is being displayed,
the Auto MCACC Setup will resume automatically. In this
case, you don’t need to select ‘
OK’ and press ENTER in
step 7.
If you see an error message (
ERR) in the right side
column (or the speaker configuration displayed isn’t
correct), there may be a problem with the speaker
connection. If selecting
RETRY doesn’t work, turn off the
power and check the speaker connections. If there
doesn’t seem to be a problem, you can simply use
/
to select the speaker and
/ to change the setting
(and number for surround back) and continue.
7
Make sure ‘OK’ is selected, then press ENTER.
A progress report is displayed on-screen while the
amplifier outputs more test tones to determine the
optimum amplifier settings for channel level, speaker
distance, and Acoustic Calibration EQ.
Again, try to be as quiet as possible while this is
happening. It may take 3 to 7 minutes.
• If you selected a
Stand.Wave Multi-Point setup (in
step 2), you will be asked to place the mic at the 2nd
and 3rd reference points before finally placing it at
your main listening position.
8
The Auto MCACC Setup has finished! Press RETURN
to go back to the System Setup menu.
Note
1 This screen is only shown if you selected
ALL or Speaker System in Custom Menu from the Auto MCACC CUSTOM menu.
PHONES
SPEAKERS
AUTO SURROUND
/STREAM DIRECT
STATUS
LCD
VIEW
DIMMER
CTRL
ZONE2
ZONE3
VIDEO/GAME 2 INPUT
DIGITAL IN
S-VIDEO
VIDEO
L
R
AUDIO
MULTI-ZONE CONTROL
MCACC
SETUP MIC
USB
PARAMETER
SETUP
AUDIO
VIDEO
RETURN
ENTER
MCACC
SETUP MIC
N ow A n a ly z i n g …
( 2 / 1 0 )
E nv i ro n m e n t C h e ck
A m b i e n t N o i s e
[ O K ]
M i c ro p h o n e
[
]
S p e a k e r Y E S / N O
[
]
: C a n c e l
DV D / L D
0 . 0 dB
1. Auto MCACC
C H E C K
F ro n t [
Y E S
]
C e n t e r [
Y E S
]
S u r r A
[ Y E S ]
S u r r B
[ Y E S ]
S B [
Y E S x 2
]
S W [
Y E S x 2
]
O K
: C a n c e l
DV D / L D
0 . 0 dB
1 . Au t o M C AC C
10:Next
N ow A n a ly z i n g …
S u b wo o fe r C h e ck
: C a n c e l
1 . Au t o M C AC C
DV D / L D
0 . 0 dB
N ow A n a ly z i n g … ( 6 / 1 0 )
S u r ro u n d A n a ly s i s
S p e a k e r S y s t e m
[ O K ]
C h a n n e l L ev e l
[ O K ]
S p e a k e r D i s t a n c e [
]
: C a n c e l
1 . Au t o M C AC C
DV D / L D
- 5 5 . 0 dB
: R e t u r n
5 a . M C AC C D a t a C h e ck
DV D / L D
- 5 5 . 0 dB
1 . S p e a k e r S e t t i n g
2 . C h a n n e l L ev e l
3 . S p e a k e r D i s t a n c e
4 . S t a n d i n g Wav e
5 . A c o u s t i c C a l E Q
6 . F U L L BA N D P H A S E C T R L
E N T E R : N ex t
SC_LX90_WY.book Page 42 Wednesday, February 6, 2008 11:49 AM