Connecting an ipod, Connecting your ipod to the amplifier, Other connections – Pioneer SC-LX90 User Manual
Page 56: Other connections 07, Chapter 7, Ipod control cable control dock for ipod
Other connections
07
56
En
Chapter 7:
Other connections
Caution
• Make sure the power is switched off before making or
changing the connections.
Connecting an iPod
This amplifier has a dedicated iPod terminal that will allow you to control playback of audio content from your iPod
using the controls of this amplifier.
1
If
Error I3 is displayed when this amplifier is connected to an iPod and the input
is set to the iPod, this amplifier’s iPod operation mode must be switched. To do so, follow the procedure at
Switching
the iPod operation mode on page 58 and switch to
Type 2. The iPod can now be operated from this amplifier.
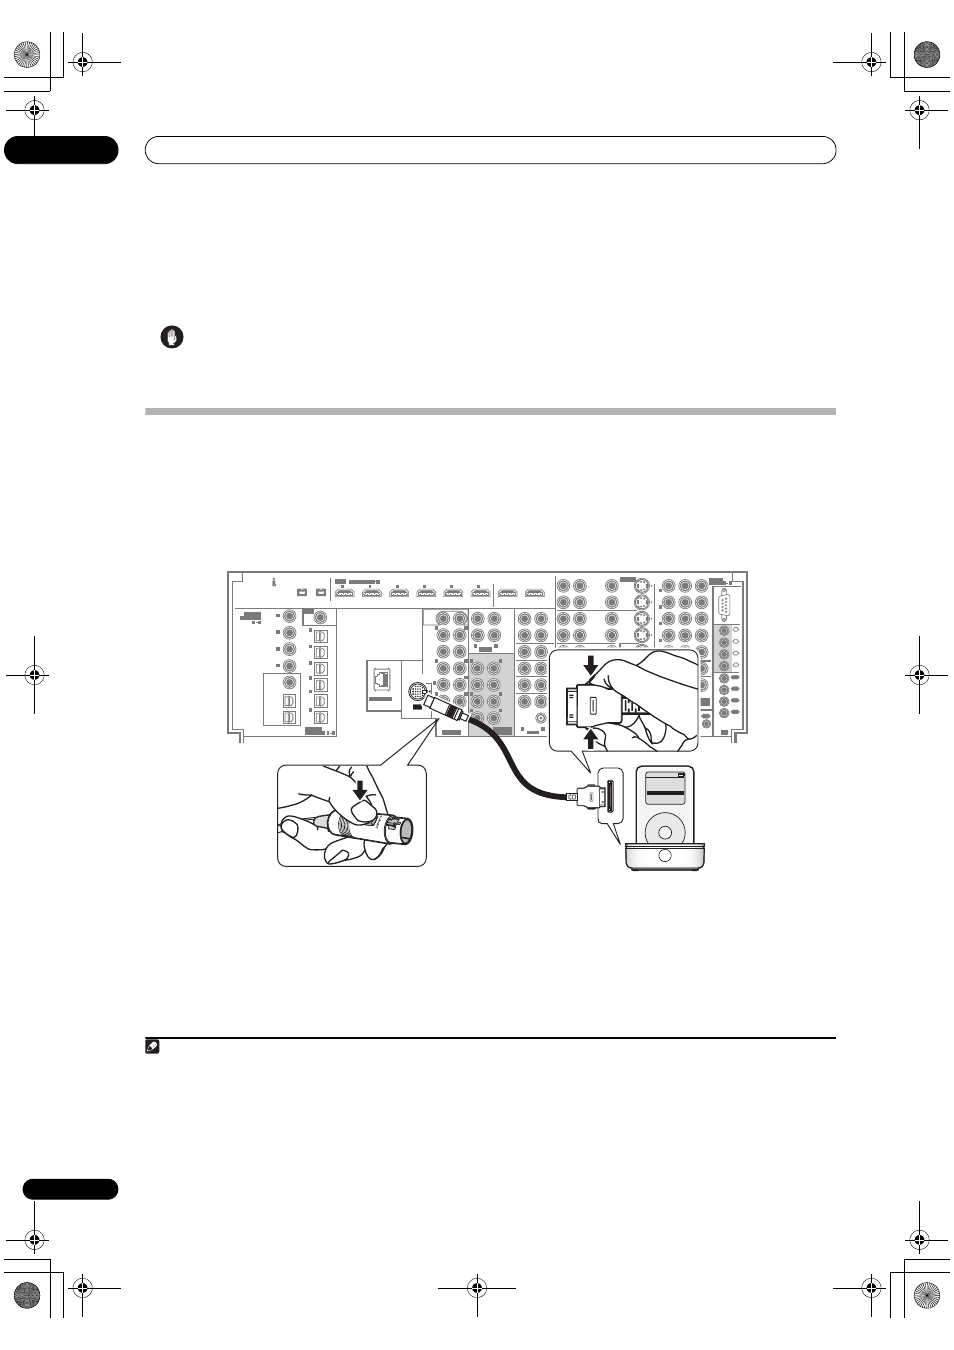
Connecting your iPod to the amplifier
1
Set this amplifier to the standby mode, and then
use the supplied iPod control cable
2
to connect your
iPod to the iPod terminal on the rear panel of this
amplifier.
Push the connector in until you hear it click home. To
disconnect, squeeze the connector (as shown) to release
the catch, then pull out.
2
Switch the amplifier on and press the iPod input
source button to switch the amplifier to the iPod.
The front LCD display shows
Loading while the amplifier
verifies the connection and retrieves data from the iPod.
Note
1 • This system is compatible with an iPod, iPod mini, iPod nano and iPod Photo portable device (fourth generation and above). However, compatibility may
vary depending on the software version of your iPod. Note, however, that some of the functions may be restricted for some models.
• iPod nanos of the second generation and before do not output video signals externally, so iPod nano images cannot be played on this amplifier.
• When an iPod or iPod nano of fifth generation or above is connected, the audio signals are transferred from the iPod in digital format (LPCM), allowing
playback with higher sound quality.
• Video contents can be played on this amplifier by connecting an iPod compatible with the Video Browse function.
S400
S400
(AUDIO)
(For LD)
ASSIGNABLE
6
1
ASSIGNABLE
L
R
VIDEO
AUDIO
L
R
AUDIO
L
L
L
R
R
L
R
R
L
L
R
R
L
R
L
R
AUDIO
ZONE3
OUT
ZONE2
OUT
ZONE2
OUT
ZONE3
OUT
MONITOR
OUT
OUT
IN
1
IN
2
IN
3
IN
4
1
OUT
2
OUT
3
OUT
4
IR
CONTROL
COMPONENT
VIDEO
ASSIGN-
ABLE
ASSIGN-
ABLE
VIDEO
IN
OUT
SUB
WOOFER
FRONT
CENTER
1
2
1
2
EXTRA
SUR-
ROUND
(Single)
SUB W.
FRONT
CENTER
SUR-
ROUND
SUR-
ROUND
BACK
SURROUND
BACK
PRE OUT
MULTI CH
IN
IN
1
IN
2
IN
3
IN
4
IN
5
IN
6
OUT1
(HDMI CTRL)
OUT2
HDMI
RF IN
IN
(TV)
1
IN
(SAT)
2
IN
(DVR/
VCR 1)
3
IN
(DVR/
VCR 2)
4
IN
(VIDEO/
GAME
1)
5
IN
(CD-R/
TAPE/
MD)
6
(DVD/LD)
2
IN
1
(BD)
IN
2
(CD)
IN
3
(SACD)
IN
4
COAXIAL
1
4
ASSIGNABLE
OPTICAL
1
6
ZONE2
OUT
SOURCE
OUT
ZONE3
/SOURCE
OUT
1
2
3
4
12 V TRIGGER
(DC OUT 12V TOTAL 250 mA MAX)
RS-
232C
VIDEO/
GAME 1
IN
SAT
IN
IN
IN
AUX
IN
IN
IN
CD-R/
TAPE/
MD
REC
SEL
OUT
CD
SACD
PHONO
TV
IN
BD
IN
DVD/LD
IN
IN
IN
IN
(DVD/LD)
IN
(DVD/LD)
1
1
5
IN
(VIDEO/
GAME
1)
3
IN
(BD)
2
IN
(DVR/VCR 1)
4
IN
(DVR/VCR 2)
5
IN
ZONE2
OUT
DVR/
VCR 2
DVR/
VCR 1
REC SEL
OUT
REC SEL
OUT
IN
REC SEL
OUT
REC SEL
OUT
S-VIDEO
Y
P
B
P
R
LAN (10/100)
IN
iPod
IN
iPod
MENU
iPod
Music >
Extras >
Settings >
Shuffle Songs
Backlight
iPod control
cable
Control Dock
for iPod
2 • This cable is for use with this unit only. Do not use it with other equipment.
• This product is the Pioneer Control Dock for iPod (IDK-80) for use with an iPod equipped with a dock connector port (fourth generation and above),
iPod mini, iPod nano or iPod Photo.
• For detailed instructions on using the iPod, please refer to the manual supplied with the iPod.
SC_LX90_WY.book Page 56 Wednesday, February 6, 2008 11:49 AM