Remote control, Controls and displays 04 – Pioneer SC-LX90 User Manual
Page 32
Controls and displays
04
32
En
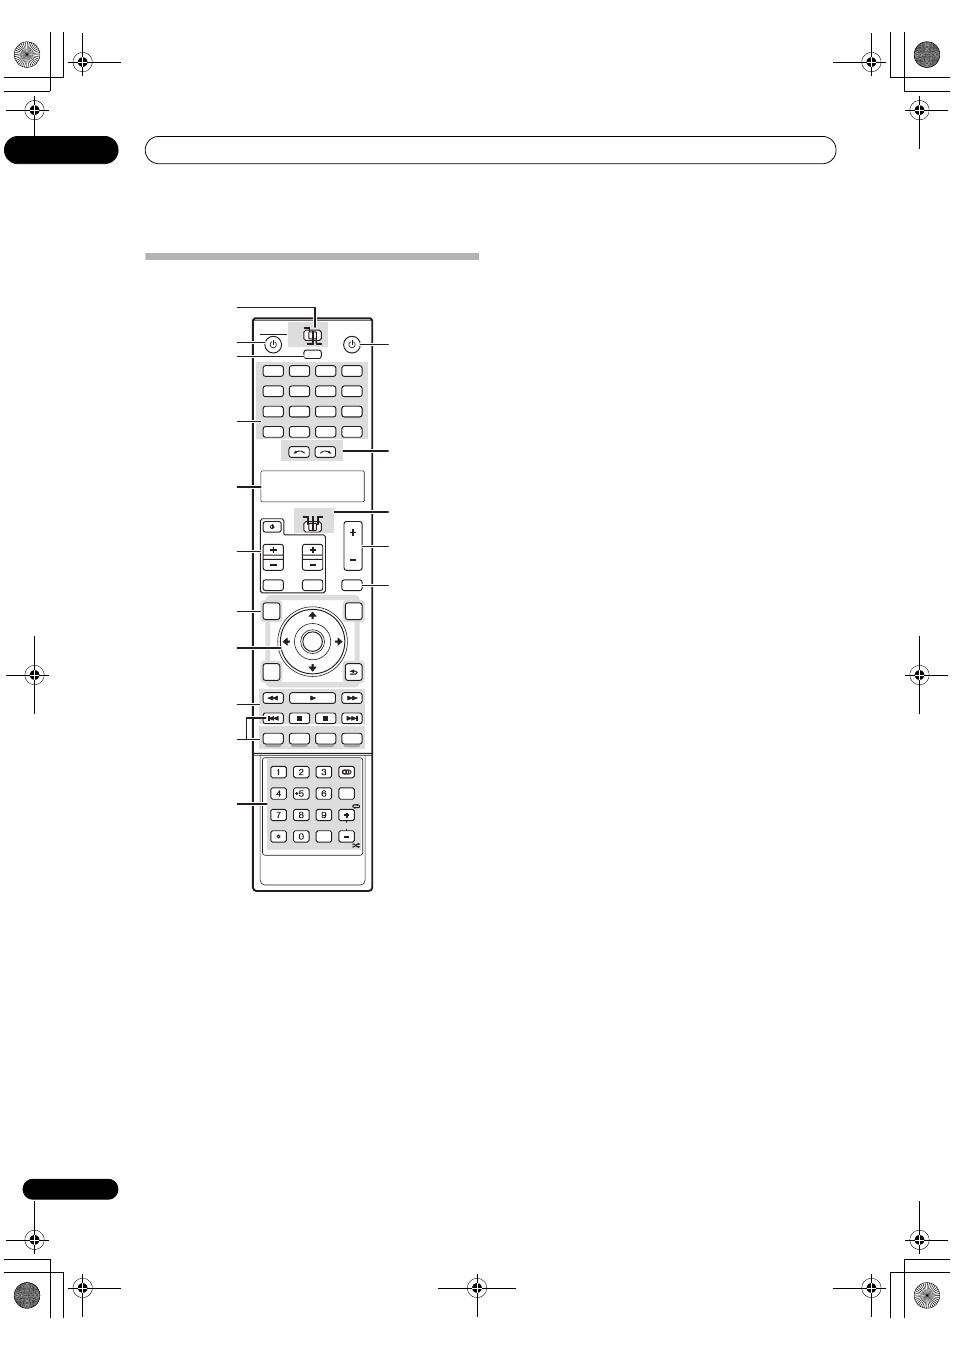
Remote control
The remote has been conveniently color-coded according
to component control using the following system:
•
White – amplifier control, TV Control
•
Blue – Other controls
1
MULTI-ZONE operation selector switch
Switch to perform operations in the main zone, zone 2
and zone 3 (page 64).
2
AV AMPLIFIER
This switches between standby and on for this amplifier.
3
MULTI OPERATION
Use this button to perform multi operations (page 108).
4
Input source buttons
Press to select control of other components (see
Controlling the rest of your system on page 106).
5
Character display (LCD)
This display shows information when transmitting
control signals.
The following commands are shown when you’re setting
the remote to control other components (see
Controlling
the rest of your system on page 106):
SETUP – Indicates the setup mode, from which you
choose the options below.
PRESET – See Selecting preset codes directly on
page 106.
LEARNING – See Programming signals from other
remote controls on page 106.
MULTI OP – See Multi Operation and System Off on
page 108.
SYS OFF – See Multi Operation and System Off on
page 108.
DIRECT F – See Direct function on page 108.
RENAME – See Renaming input source names on
page 108.
ERASE – See Erasing one of the remote control button
settings on page 107.
RESET – See Resetting the remote control presets on
page 107.
READ ID – See Confirming preset codes on page 108.
6
TV CONTROL buttons
These buttons are dedicated to control the TV assigned to
the
TV button. Thus if you only have one TV to hook up to
this system assign it to the
TV input source button (see
page 106 for more on this).
TV
– Use to turn on/off the power of the TV.
TV VOL +/– – Use to adjust the volume on your TV.
INPUT – Use to select the TV input signal.
TV CH +/– – Use to select channels.
MUTE – Use to mute the sound or cancel the mute
mode.
7
Tuner/component control buttons/SETUP
These button controls can be accessed after you have
selected the corresponding input source button (
DVD,
DVR 1, TV, etc.). Set the operation selector switch to
AMP to access the following controls:
AUDIO PARAMETER – Use to access the Audio
options (page 99).
VIDEO PARAMETER – Use to access the Video
options (page 101).
SETUP – Use to access the System Setup menu
(page 40).
RETURN – Press to confirm and exit the current
menu screen (also use to return to the previous menu
with DVDs or to select closed captioning with DTV).
ENTER
DVD
AV AMPLIFIER
SOURCE
MAIN
MULTI
OPERATION
AUDIO
PARAMETER
TOP MENU
STATUS
THX
CH LEVEL
MENU
VIDEO
PARAMETER
RETURN
SETUP
ZONE2
SOURCE
TV
AMP
3
DVR1
GALLERY
HOME MEDIA
INPUT SELECT
CD
TUNER
INPUT
MUTE
MUTE
VOL
VOL
TV CONTROL
CH
iPod
HDMI
STEREO/
F.S.SURR
SIGNAL SEL SLEEP
AUDIO
DIMMER
SR+
CLR
SBch
PHASE
iPod CTRL
A.ATT
GENRE HDMI OUT
ENTER
MCACC
DISP
CH
AUTO/
DIRECT
STANDARD ADV SURR
PHONO
CD-R
DVR2
VIDEO1
VIDEO2
BD
TV
SAT
SACD
2
12
13
14
15
16
3
4
5
6
7
8
9
10
11
1
SC_LX90_WY.book Page 32 Wednesday, February 6, 2008 11:49 AM