Allied Telesis FastPrint Server User Manual
Page 23
Chapter 4. Novell NetWare
Using PCONSOLE / PSCONFIG
FastPrint Server User’s Guide
13
4.4.1. Novell Print Server mode
Before you begin, please note the following information:
♦
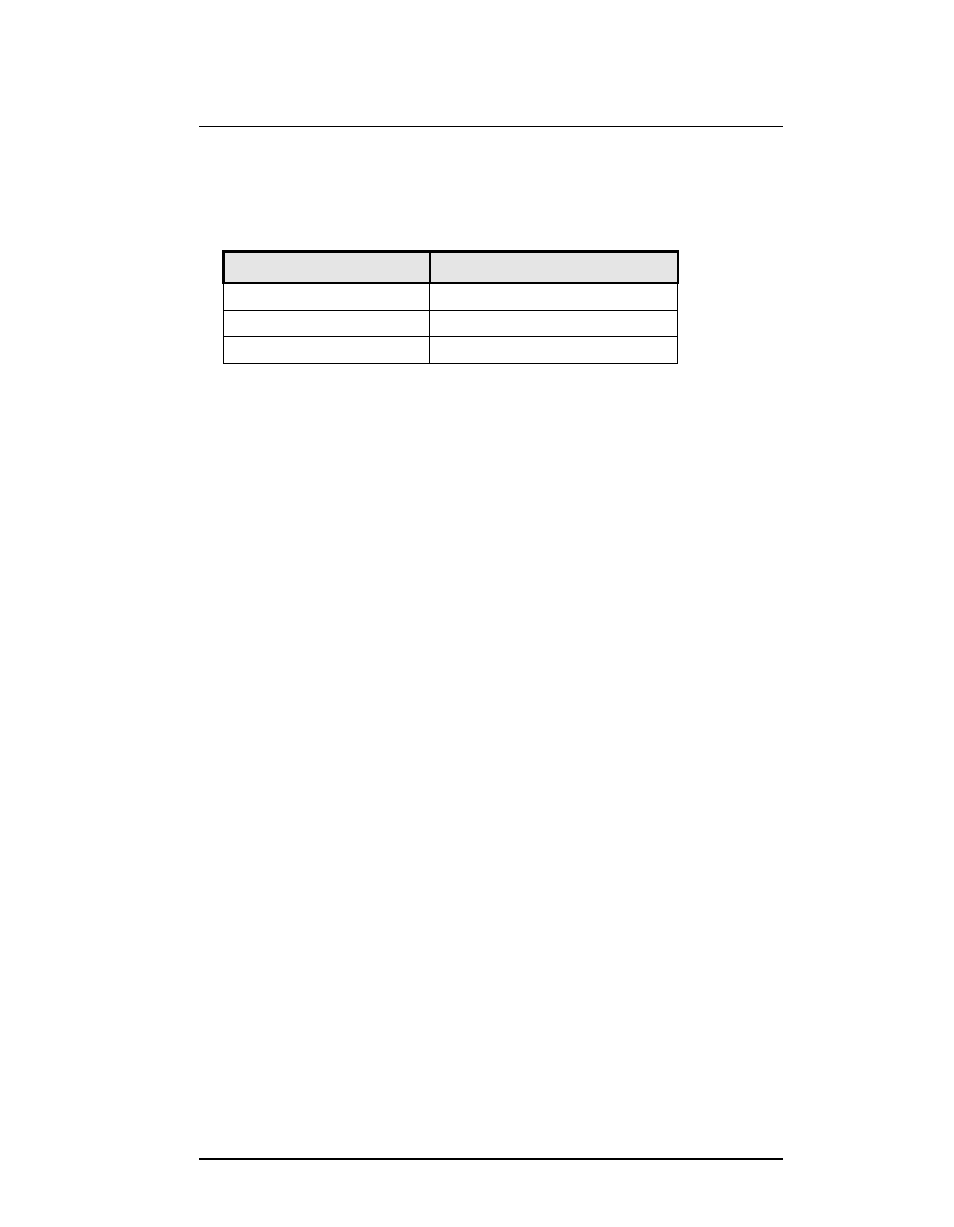
Novell printer numbers
NetWare printer numbers match FastPrint ports as follows.
Novell printer number
Novell printer number
FastPrint Server port
FastPrint Server port
Printer number 0
Parallel port 1
Printer number 1
Parallel port 2
Printer number 2
Parallel port 3
♦
Assigning users to printer queues
If you have created new printer queues, you may also need to use PCONSOLE to
designate any users who need to use the print queues as queue users.
4.4.1.1. Print server mode in NetWare 2.x, 3.x
Follow the steps listed below to configure the FastPrint in NetWare Print Server mode.
1.
1. Create queues
Create queues
Note: If you are setting up the FastPrint Server for use with existing queues,
proceed to step 2.
(a) Log into a NetWare file server as a SUPERVISOR or as a user with
SUPERVISOR rights.
(b) Run PCONSOLE program.
(c) Select Print Queue Information (or skip to step 6 if you do not need to add new
queues).
(d) Press [Ins] key to add a new queue.
(e) Type a queue name, and press [E
NTER
].
(f) Repeat steps (d) and (e) until you have the desired number of queues.
2.
2. Add a Novell Print Server
Add a Novell Print Server
Follow these steps to inform NetWare that a FastPrint Server exists.
(a) From the PCONSOLE Main Menu, select Print Server Information
(b) Press [Ins] key to add a new Print Server.
(c) Enter your desired Print Server name.
3.
3. Assign printers
Assign printers
Follow these steps to associate the NetWare printer objects with the FastPrint’s
printer ports.
(a) Select the Novell Print Server added in step 2.
(b) Select Print Server Configuration.
(c) Select Printer Configuration.
(d) Select the print number, using the printer numbers shown on page 13.
(e) Press [Esc].
(f) Select YES.