Ransburg No. 2 Air Motor Atex Approved Unit 80086-XX User Manual
Page 47
47
47
47
47
AH
AH
AH
AH----12
12
12
12----01.03 No. 2 Air Motor Handgun
01.03 No. 2 Air Motor Handgun
01.03 No. 2 Air Motor Handgun
01.03 No. 2 Air Motor Handgun
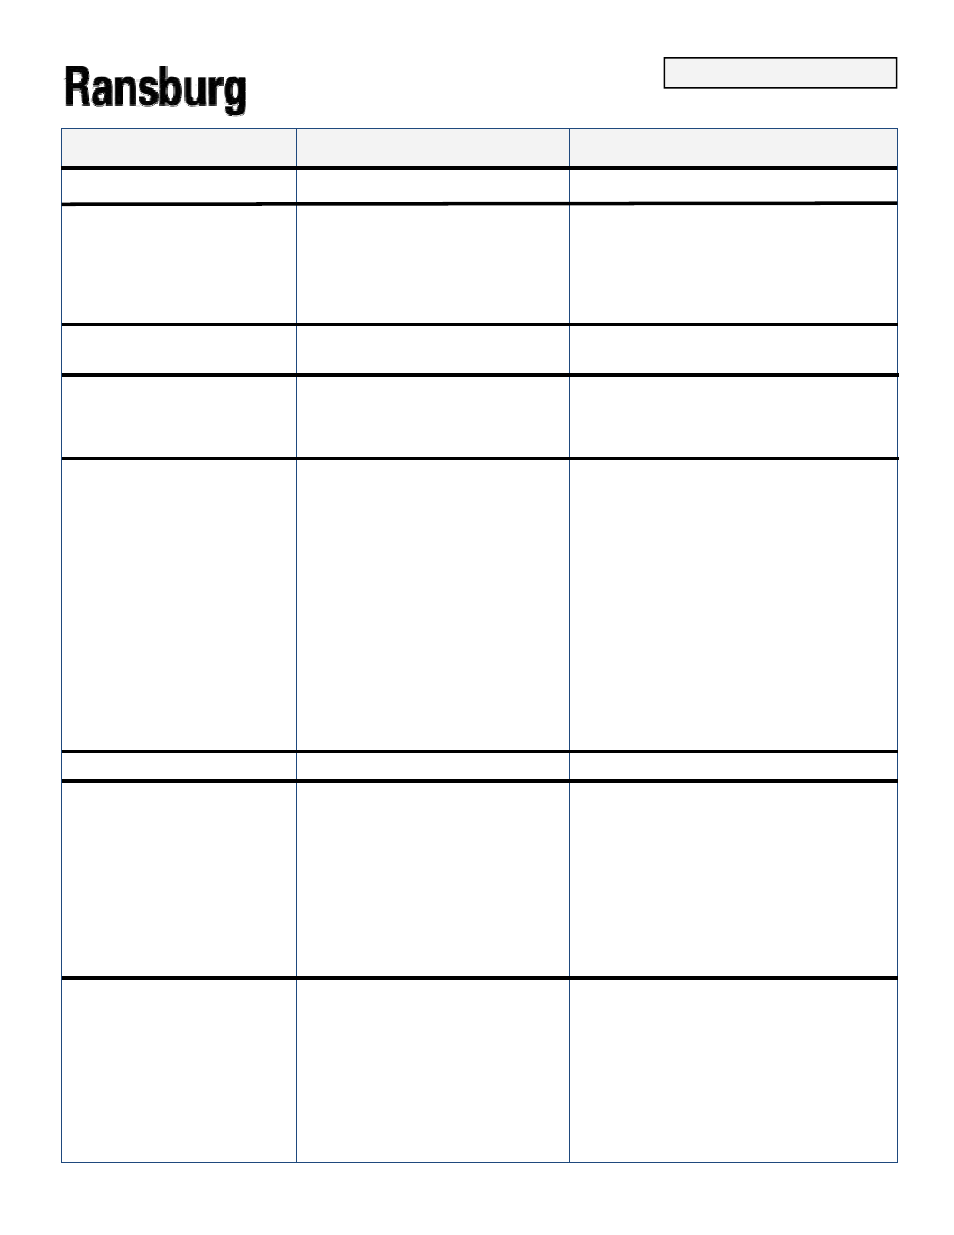
General Problem
General Problem
General Problem
General Problem
Possible Causes
Possible Causes
Possible Causes
Possible Causes
Solution
Solution
Solution
Solution
Mechanical
Mechanical
Mechanical
Mechanical
Paint Drips From Paint Hose
Paint Drips From Paint Hose
Paint Drips From Paint Hose
Paint Drips From Paint Hose
Connection or Rear of Applica-
Connection or Rear of Applica-
Connection or Rear of Applica-
Connection or Rear of Applica-
tor
tor
tor
tor
1. Hose fittings not tight
1. Hose fittings not tight
1. Hose fittings not tight
1. Hose fittings not tight
1. Fluid hose fittings are all Left Handed
1. Fluid hose fittings are all Left Handed
1. Fluid hose fittings are all Left Handed
1. Fluid hose fittings are all Left Handed
threads. Insure each connection is properly
threads. Insure each connection is properly
threads. Insure each connection is properly
threads. Insure each connection is properly
secured.
secured.
secured.
secured.
2. Hose broken or worn
2. Hose broken or worn
2. Hose broken or worn
2. Hose broken or worn
2. Order replacement or remove fitting, cut
2. Order replacement or remove fitting, cut
2. Order replacement or remove fitting, cut
2. Order replacement or remove fitting, cut
off defective area and replace fitting.
off defective area and replace fitting.
off defective area and replace fitting.
off defective area and replace fitting.
Paint Leaks from Inside Hand
Paint Leaks from Inside Hand
Paint Leaks from Inside Hand
Paint Leaks from Inside Hand
Grip or trigger Mechanism
Grip or trigger Mechanism
Grip or trigger Mechanism
Grip or trigger Mechanism
1. Needle packing worn
1. Needle packing worn
1. Needle packing worn
1. Needle packing worn
1. Adjust packing nut or rebuild handle and
1. Adjust packing nut or rebuild handle and
1. Adjust packing nut or rebuild handle and
1. Adjust packing nut or rebuild handle and
replace packing.
replace packing.
replace packing.
replace packing.
Paint Leaks From Barrel and
Paint Leaks From Barrel and
Paint Leaks From Barrel and
Paint Leaks From Barrel and
Handle Assembly Connections
Handle Assembly Connections
Handle Assembly Connections
Handle Assembly Connections
1. O
1. O
1. O
1. O----ring worn or missing
ring worn or missing
ring worn or missing
ring worn or missing
1. Replace O
1. Replace O
1. Replace O
1. Replace O----ring
ring
ring
ring
2. Paint bushing missing
2. Paint bushing missing
2. Paint bushing missing
2. Paint bushing missing
2. Insure paint busing is properly installed.
2. Insure paint busing is properly installed.
2. Insure paint busing is properly installed.
2. Insure paint busing is properly installed.
Large Hole in the Center of the
Large Hole in the Center of the
Large Hole in the Center of the
Large Hole in the Center of the
Pattern
Pattern
Pattern
Pattern
1. Bell probe electrically dead
1. Bell probe electrically dead
1. Bell probe electrically dead
1. Bell probe electrically dead
1. Replace.
1. Replace.
1. Replace.
1. Replace.
2. Spring missing in back of bell
2. Spring missing in back of bell
2. Spring missing in back of bell
2. Spring missing in back of bell
2. Replace.
2. Replace.
2. Replace.
2. Replace.
3. Spring not contacting end of shaft
3. Spring not contacting end of shaft
3. Spring not contacting end of shaft
3. Spring not contacting end of shaft
3. Clean or replace.
3. Clean or replace.
3. Clean or replace.
3. Clean or replace.
4. Ground resistor damaged or not
4. Ground resistor damaged or not
4. Ground resistor damaged or not
4. Ground resistor damaged or not
contacting
contacting
contacting
contacting
4. Replace.
4. Replace.
4. Replace.
4. Replace.
5. Spring in ground resistor missing or
5. Spring in ground resistor missing or
5. Spring in ground resistor missing or
5. Spring in ground resistor missing or
not contacting
not contacting
not contacting
not contacting
5. Replace.
5. Replace.
5. Replace.
5. Replace.
6. Contaminated hub leaking high
6. Contaminated hub leaking high
6. Contaminated hub leaking high
6. Contaminated hub leaking high
voltage to the probe
voltage to the probe
voltage to the probe
voltage to the probe
6. Clean or replace hub assembly.
6. Clean or replace hub assembly.
6. Clean or replace hub assembly.
6. Clean or replace hub assembly.
Electrical
Electrical
Electrical
Electrical
Poor Attraction
Poor Attraction
Poor Attraction
Poor Attraction
1. Target parts not properly grounded
1. Target parts not properly grounded
1. Target parts not properly grounded
1. Target parts not properly grounded
to earth ground
to earth ground
to earth ground
to earth ground
1. Strip workholders and ground wires of built
1. Strip workholders and ground wires of built
1. Strip workholders and ground wires of built
1. Strip workholders and ground wires of built
up paint to ensure proper earth ground or
up paint to ensure proper earth ground or
up paint to ensure proper earth ground or
up paint to ensure proper earth ground or
check ground wires to parts.
check ground wires to parts.
check ground wires to parts.
check ground wires to parts.
2. Bell outer coating damaged
2. Bell outer coating damaged
2. Bell outer coating damaged
2. Bell outer coating damaged
2. Replace bell.
2. Replace bell.
2. Replace bell.
2. Replace bell.
3. Paint too conductive
3. Paint too conductive
3. Paint too conductive
3. Paint too conductive
3. See “solvent Selection”.
3. See “solvent Selection”.
3. See “solvent Selection”.
3. See “solvent Selection”.
4. Low short circuit current
4. Low short circuit current
4. Low short circuit current
4. Low short circuit current
4. Perform SCI tests.
4. Perform SCI tests.
4. Perform SCI tests.
4. Perform SCI tests.
Poor Atomization (See First
Poor Atomization (See First
Poor Atomization (See First
Poor Atomization (See First
“Mechanical Troubleshooting”)
“Mechanical Troubleshooting”)
“Mechanical Troubleshooting”)
“Mechanical Troubleshooting”)
1. Atomizing voltage too low
1. Atomizing voltage too low
1. Atomizing voltage too low
1. Atomizing voltage too low
1.
1.
1.
1. Perform tests: See “Electrical Testing”
Perform tests: See “Electrical Testing”
Perform tests: See “Electrical Testing”
Perform tests: See “Electrical Testing”
Contact your Ransburg Distributor
Contact your Ransburg Distributor
Contact your Ransburg Distributor
Contact your Ransburg Distributor
TROUBLESHOOTING
TROUBLESHOOTING
TROUBLESHOOTING
TROUBLESHOOTING