Ransburg No. 2 Air Motor Atex Approved Unit 80086-XX User Manual
Page 33
33
33
33
33
AH
AH
AH
AH----12
12
12
12----01.03 No. 2 Air Motor Handgun
01.03 No. 2 Air Motor Handgun
01.03 No. 2 Air Motor Handgun
01.03 No. 2 Air Motor Handgun
Item #
Item #
Item #
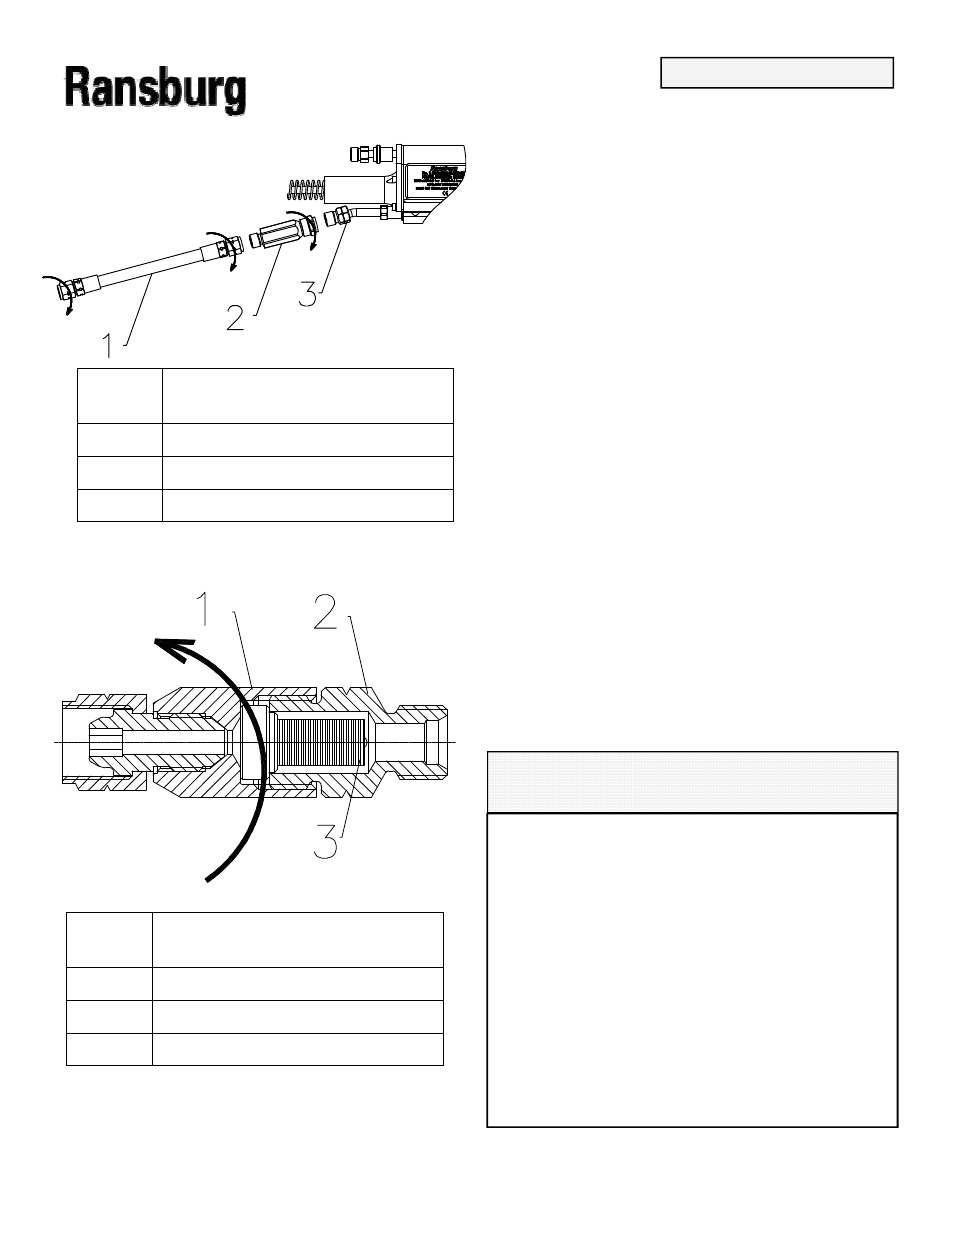
Item # Description
Description
Description
Description
1
1
1
1
Fluid Hose
Fluid Hose
Fluid Hose
Fluid Hose
2
2
2
2
Fluid Filter
Fluid Filter
Fluid Filter
Fluid Filter
3
3
3
3
Fluid Inlet Fitting
Fluid Inlet Fitting
Fluid Inlet Fitting
Fluid Inlet Fitting
Figure 17: Fluid Filter Removal
Figure 17: Fluid Filter Removal
Figure 17: Fluid Filter Removal
Figure 17: Fluid Filter Removal
Item #
Item #
Item #
Item # Description
Description
Description
Description
1
1
1
1
Filter Front Housing
Filter Front Housing
Filter Front Housing
Filter Front Housing
2
2
2
2
Filter Rear Housing
Filter Rear Housing
Filter Rear Housing
Filter Rear Housing
3
3
3
3
Paint Filter Element
Paint Filter Element
Paint Filter Element
Paint Filter Element
Figure 18: Fluid Filter Replacement
Figure 18: Fluid Filter Replacement
Figure 18: Fluid Filter Replacement
Figure 18: Fluid Filter Replacement
3. Secure the rear housing of the filter assem-
3. Secure the rear housing of the filter assem-
3. Secure the rear housing of the filter assem-
3. Secure the rear housing of the filter assem-
bly in a vise and with a 3/4
bly in a vise and with a 3/4
bly in a vise and with a 3/4
bly in a vise and with a 3/4----inch wrench con-
inch wrench con-
inch wrench con-
inch wrench con-
nected to the front housing, remove the front
nected to the front housing, remove the front
nected to the front housing, remove the front
nected to the front housing, remove the front
housing (right hand threads).
housing (right hand threads).
housing (right hand threads).
housing (right hand threads).
4. Remove the paint filter element from the rear
4. Remove the paint filter element from the rear
4. Remove the paint filter element from the rear
4. Remove the paint filter element from the rear
housing .
housing .
housing .
housing .
5. If a new paint filter is to be installed, clean
5. If a new paint filter is to be installed, clean
5. If a new paint filter is to be installed, clean
5. If a new paint filter is to be installed, clean
the front housing and rear housing using the
the front housing and rear housing using the
the front housing and rear housing using the
the front housing and rear housing using the
appropriate solvent .
appropriate solvent .
appropriate solvent .
appropriate solvent .
6. If the same paint filter is to used, wash the
6. If the same paint filter is to used, wash the
6. If the same paint filter is to used, wash the
6. If the same paint filter is to used, wash the
paint filter, front housing, and rear housing in
paint filter, front housing, and rear housing in
paint filter, front housing, and rear housing in
paint filter, front housing, and rear housing in
solvent. Use a bristle brush to clean paint from
solvent. Use a bristle brush to clean paint from
solvent. Use a bristle brush to clean paint from
solvent. Use a bristle brush to clean paint from
the metal disk of the paint filter.
the metal disk of the paint filter.
the metal disk of the paint filter.
the metal disk of the paint filter.
7.Secure the rear housing in a vise. Place the
7.Secure the rear housing in a vise. Place the
7.Secure the rear housing in a vise. Place the
7.Secure the rear housing in a vise. Place the
paint filter element into the rear housing metal
paint filter element into the rear housing metal
paint filter element into the rear housing metal
paint filter element into the rear housing metal
disk first.
disk first.
disk first.
disk first.
8. Turn the front housing onto the rear hous-
8. Turn the front housing onto the rear hous-
8. Turn the front housing onto the rear hous-
8. Turn the front housing onto the rear hous-
ing). With a 3/4
ing). With a 3/4
ing). With a 3/4
ing). With a 3/4----inch open end wrench, tighten
inch open end wrench, tighten
inch open end wrench, tighten
inch open end wrench, tighten
the front housing to the rear housing.
the front housing to the rear housing.
the front housing to the rear housing.
the front housing to the rear housing.
9. Connect the filter assembly to the applicator
9. Connect the filter assembly to the applicator
9. Connect the filter assembly to the applicator
9. Connect the filter assembly to the applicator
assembly and the fluid hose to the filter as-
assembly and the fluid hose to the filter as-
assembly and the fluid hose to the filter as-
assembly and the fluid hose to the filter as-
sembly.
sembly.
sembly.
sembly.
NOTE
NOTE
NOTE
NOTE
•
When spraying plural component materials,
When spraying plural component materials,
When spraying plural component materials,
When spraying plural component materials,
the filter assembly should be cleaned as
the filter assembly should be cleaned as
the filter assembly should be cleaned as
the filter assembly should be cleaned as
soon as possible after spraying has been
soon as possible after spraying has been
soon as possible after spraying has been
soon as possible after spraying has been
completed.
completed.
completed.
completed.
•
Ransburg advises keeping extra paint filter
Ransburg advises keeping extra paint filter
Ransburg advises keeping extra paint filter
Ransburg advises keeping extra paint filter
elements on hand. While one is being used,
elements on hand. While one is being used,
elements on hand. While one is being used,
elements on hand. While one is being used,
soak the other in the appropriate solvent and
soak the other in the appropriate solvent and
soak the other in the appropriate solvent and
soak the other in the appropriate solvent and
change the filters out between jobs
change the filters out between jobs
change the filters out between jobs
change the filters out between jobs
.
MAINTENANCE
MAINTENANCE
MAINTENANCE
MAINTENANCE