Needle assembly replacement – Ransburg No. 2 Air Motor Atex Approved Unit 80086-XX User Manual
Page 38
AH
AH
AH
AH----12
12
12
12----01.03 No. 2 Air Motor Handgun
01.03 No. 2 Air Motor Handgun
01.03 No. 2 Air Motor Handgun
01.03 No. 2 Air Motor Handgun
38
38
38
38
5. Reverse the handle assembly so that the
5. Reverse the handle assembly so that the
5. Reverse the handle assembly so that the
5. Reverse the handle assembly so that the
side marked “X” is up (Reference Figure 21).
side marked “X” is up (Reference Figure 21).
side marked “X” is up (Reference Figure 21).
side marked “X” is up (Reference Figure 21).
Insert trigger, making sure that the curved lower
Insert trigger, making sure that the curved lower
Insert trigger, making sure that the curved lower
Insert trigger, making sure that the curved lower
tip of the trigger is pointed away from the han-
tip of the trigger is pointed away from the han-
tip of the trigger is pointed away from the han-
tip of the trigger is pointed away from the han-
dle and the thrust washer is to the front of trig-
dle and the thrust washer is to the front of trig-
dle and the thrust washer is to the front of trig-
dle and the thrust washer is to the front of trig-
ger.
ger.
ger.
ger.
6. Insert the roll pin through the hole and into
6. Insert the roll pin through the hole and into
6. Insert the roll pin through the hole and into
6. Insert the roll pin through the hole and into
the trigger pivot hole.
the trigger pivot hole.
the trigger pivot hole.
the trigger pivot hole.
7. With a small hammer, gently drive the roll pin
7. With a small hammer, gently drive the roll pin
7. With a small hammer, gently drive the roll pin
7. With a small hammer, gently drive the roll pin
into the bottom tang, stopping when the roll pin
into the bottom tang, stopping when the roll pin
into the bottom tang, stopping when the roll pin
into the bottom tang, stopping when the roll pin
is about 2.3 mm (3/32”) from the face of the
is about 2.3 mm (3/32”) from the face of the
is about 2.3 mm (3/32”) from the face of the
is about 2.3 mm (3/32”) from the face of the
tang.
tang.
tang.
tang.
Needle Assembly Replacement
Needle Assembly Replacement
Needle Assembly Replacement
Needle Assembly Replacement
1. Complete steps 1 through 4 of "Trigger Re-
1. Complete steps 1 through 4 of "Trigger Re-
1. Complete steps 1 through 4 of "Trigger Re-
1. Complete steps 1 through 4 of "Trigger Re-
placement" in the "Maintenance" section.
placement" in the "Maintenance" section.
placement" in the "Maintenance" section.
placement" in the "Maintenance" section.
2. Remove the spring retainer with a 1/ 4
2. Remove the spring retainer with a 1/ 4
2. Remove the spring retainer with a 1/ 4
2. Remove the spring retainer with a 1/ 4----inch
inch
inch
inch
open end wrench and slide the needle assem-
open end wrench and slide the needle assem-
open end wrench and slide the needle assem-
open end wrench and slide the needle assem-
bly out of the handle. It is not necessary to re-
bly out of the handle. It is not necessary to re-
bly out of the handle. It is not necessary to re-
bly out of the handle. It is not necessary to re-
move the two lock nuts and the thrust washer .
move the two lock nuts and the thrust washer .
move the two lock nuts and the thrust washer .
move the two lock nuts and the thrust washer .
3. If the needle packing is to be replaced, refer
3. If the needle packing is to be replaced, refer
3. If the needle packing is to be replaced, refer
3. If the needle packing is to be replaced, refer
to "Needle Packing Replacement" in the
to "Needle Packing Replacement" in the
to "Needle Packing Replacement" in the
to "Needle Packing Replacement" in the
"Maintenance" section.
"Maintenance" section.
"Maintenance" section.
"Maintenance" section.
4. Insert new or rebuilt needle assembly into
4. Insert new or rebuilt needle assembly into
4. Insert new or rebuilt needle assembly into
4. Insert new or rebuilt needle assembly into
the handle and with the 1/4
the handle and with the 1/4
the handle and with the 1/4
the handle and with the 1/4----inch open end
inch open end
inch open end
inch open end
wrench turn the spring retainer in about four
wrench turn the spring retainer in about four
wrench turn the spring retainer in about four
wrench turn the spring retainer in about four
turns.
turns.
turns.
turns.
5. Reinstall all removed parts per instructions in
5. Reinstall all removed parts per instructions in
5. Reinstall all removed parts per instructions in
5. Reinstall all removed parts per instructions in
the “Maintenance Section”.
the “Maintenance Section”.
the “Maintenance Section”.
the “Maintenance Section”.
Needle Assembly Rebuild
Needle Assembly Rebuild
Needle Assembly Rebuild
Needle Assembly Rebuild
1. Complete steps 1 through 3 of "Needle As-
1. Complete steps 1 through 3 of "Needle As-
1. Complete steps 1 through 3 of "Needle As-
1. Complete steps 1 through 3 of "Needle As-
sembly Replacement" in the "Maintenance"
sembly Replacement" in the "Maintenance"
sembly Replacement" in the "Maintenance"
sembly Replacement" in the "Maintenance"
section.
section.
section.
section.
2. Remove lock nuts and thrust washer.
2. Remove lock nuts and thrust washer.
2. Remove lock nuts and thrust washer.
2. Remove lock nuts and thrust washer.
3. Unscrew spring retainer from spring housing
3. Unscrew spring retainer from spring housing
3. Unscrew spring retainer from spring housing
3. Unscrew spring retainer from spring housing
with a 1/4
with a 1/4
with a 1/4
with a 1/4----inch open end wrench. Remove the
inch open end wrench. Remove the
inch open end wrench. Remove the
inch open end wrench. Remove the
spring retainer from the spring housing.
spring retainer from the spring housing.
spring retainer from the spring housing.
spring retainer from the spring housing.
4. Remove the spring, eyelet, and needle from
4. Remove the spring, eyelet, and needle from
4. Remove the spring, eyelet, and needle from
4. Remove the spring, eyelet, and needle from
the spring housing.
the spring housing.
the spring housing.
the spring housing.
5. Wash all parts in solvent and inspect all com-
5. Wash all parts in solvent and inspect all com-
5. Wash all parts in solvent and inspect all com-
5. Wash all parts in solvent and inspect all com-
ponents for damage and wear. Examine the
ponents for damage and wear. Examine the
ponents for damage and wear. Examine the
ponents for damage and wear. Examine the
needle carefully and replace if worn, pitting,
needle carefully and replace if worn, pitting,
needle carefully and replace if worn, pitting,
needle carefully and replace if worn, pitting,
bent, or broken. Replace any questionable
bent, or broken. Replace any questionable
bent, or broken. Replace any questionable
bent, or broken. Replace any questionable
parts.
parts.
parts.
parts.
6. Install snap ring onto needle. Slide eyelet,
6. Install snap ring onto needle. Slide eyelet,
6. Install snap ring onto needle. Slide eyelet,
6. Install snap ring onto needle. Slide eyelet,
large diameter first, onto threaded end of
large diameter first, onto threaded end of
large diameter first, onto threaded end of
large diameter first, onto threaded end of
needle. Install spring over threaded end of
needle. Install spring over threaded end of
needle. Install spring over threaded end of
needle. Install spring over threaded end of
needle and down over small diameter of eye-
needle and down over small diameter of eye-
needle and down over small diameter of eye-
needle and down over small diameter of eye-
let.
let.
let.
let.
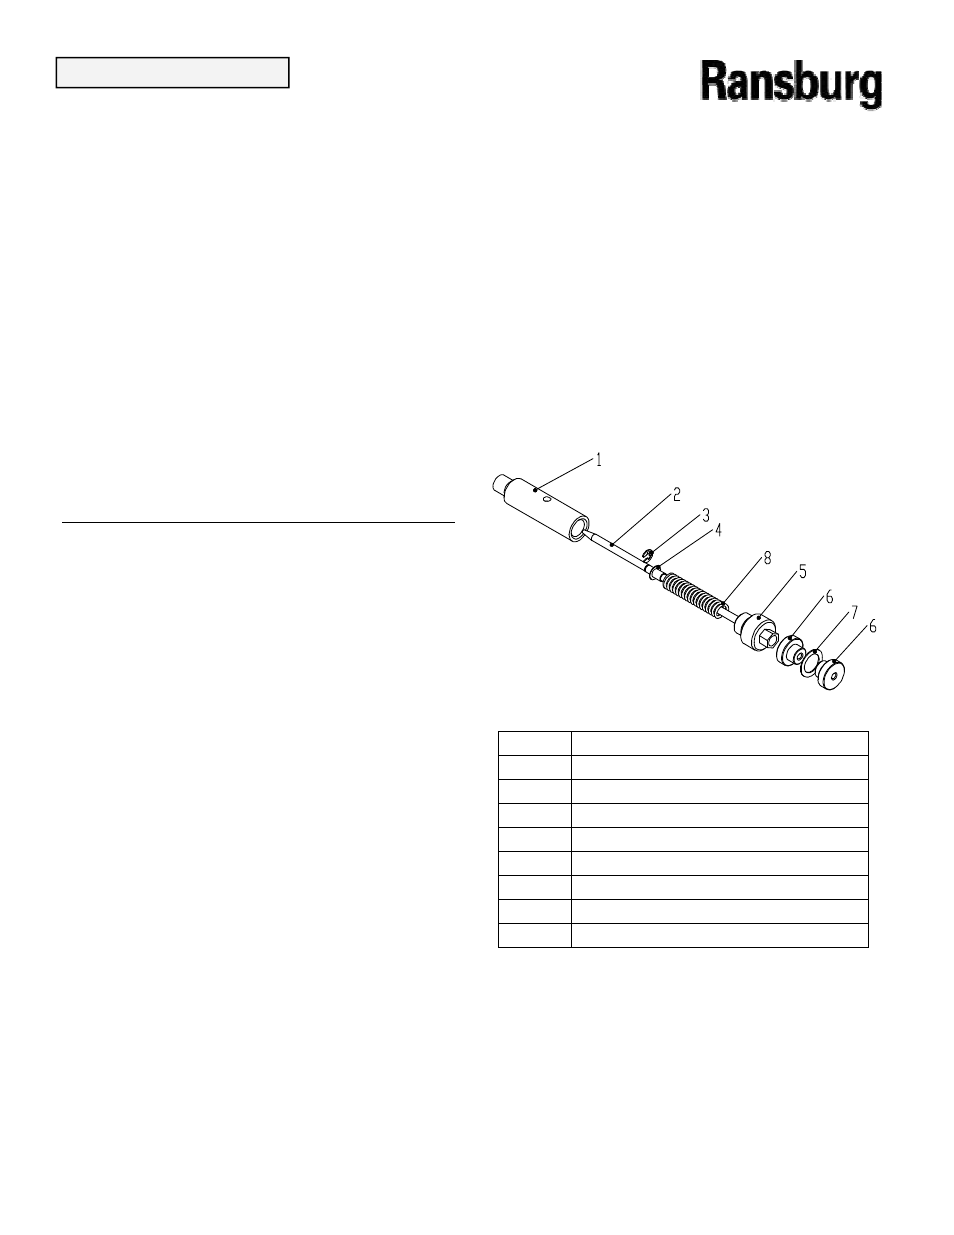
Figure 22: Needle Assembly Diagram
Figure 22: Needle Assembly Diagram
Figure 22: Needle Assembly Diagram
Figure 22: Needle Assembly Diagram
ITEM
ITEM
ITEM
ITEM
DESCRIPTION
DESCRIPTION
DESCRIPTION
DESCRIPTION
1
1
1
1
HOUSING, SPRING
HOUSING, SPRING
HOUSING, SPRING
HOUSING, SPRING
2
2
2
2
NEEDLE, No.2 HAND GUN
NEEDLE, No.2 HAND GUN
NEEDLE, No.2 HAND GUN
NEEDLE, No.2 HAND GUN
3
3
3
3
EXTERNAL RETAINING RING
EXTERNAL RETAINING RING
EXTERNAL RETAINING RING
EXTERNAL RETAINING RING
4
4
4
4
EYELET, #5
EYELET, #5
EYELET, #5
EYELET, #5
5
5
5
5
RETAINER, SPRING
RETAINER, SPRING
RETAINER, SPRING
RETAINER, SPRING
6
6
6
6
NUT,LOCK
NUT,LOCK
NUT,LOCK
NUT,LOCK
7
7
7
7
WASHER, PLASTIC THRUST
WASHER, PLASTIC THRUST
WASHER, PLASTIC THRUST
WASHER, PLASTIC THRUST
8
8
8
8
SPRING,COMPRESSION
SPRING,COMPRESSION
SPRING,COMPRESSION
SPRING,COMPRESSION
MAINTENANCE
MAINTENANCE
MAINTENANCE
MAINTENANCE