Ransburg No. 2 Air Motor Atex Approved Unit 80086-XX User Manual
Page 39
39
39
39
39
AH
AH
AH
AH----12
12
12
12----01.03 No. 2 Air Motor Handgun
01.03 No. 2 Air Motor Handgun
01.03 No. 2 Air Motor Handgun
01.03 No. 2 Air Motor Handgun
7. Insert needle, with previously installed
7. Insert needle, with previously installed
7. Insert needle, with previously installed
7. Insert needle, with previously installed
components, into spring housing (tapered
components, into spring housing (tapered
components, into spring housing (tapered
components, into spring housing (tapered
end first). Push needle into the spring hous-
end first). Push needle into the spring hous-
end first). Push needle into the spring hous-
end first). Push needle into the spring hous-
ing until snap ring bottoms out.
ing until snap ring bottoms out.
ing until snap ring bottoms out.
ing until snap ring bottoms out.
8. Install spring retainer, small threaded di-
8. Install spring retainer, small threaded di-
8. Install spring retainer, small threaded di-
8. Install spring retainer, small threaded di-
ameter first, onto needle. Holding the spring
ameter first, onto needle. Holding the spring
ameter first, onto needle. Holding the spring
ameter first, onto needle. Holding the spring
housing in one hand, compress spring until
housing in one hand, compress spring until
housing in one hand, compress spring until
housing in one hand, compress spring until
spring retainer contacts the spring housing .
spring retainer contacts the spring housing .
spring retainer contacts the spring housing .
spring retainer contacts the spring housing .
While compressing the spring, screw spring
While compressing the spring, screw spring
While compressing the spring, screw spring
While compressing the spring, screw spring
retainer into the spring housing. Screw the
retainer into the spring housing. Screw the
retainer into the spring housing. Screw the
retainer into the spring housing. Screw the
spring retainer into the spring housing until
spring retainer into the spring housing until
spring retainer into the spring housing until
spring retainer into the spring housing until
it bottoms.
it bottoms.
it bottoms.
it bottoms.
9. To install the needle assembly, refer to
9. To install the needle assembly, refer to
9. To install the needle assembly, refer to
9. To install the needle assembly, refer to
steps 3 through 6 of "Needle Assembly Re-
steps 3 through 6 of "Needle Assembly Re-
steps 3 through 6 of "Needle Assembly Re-
steps 3 through 6 of "Needle Assembly Re-
placement" in the "Maintenance" section.
placement" in the "Maintenance" section.
placement" in the "Maintenance" section.
placement" in the "Maintenance" section.
Needle Packing Replacement
Needle Packing Replacement
Needle Packing Replacement
Needle Packing Replacement
1. Complete steps 1 and 2 under "Needle
1. Complete steps 1 and 2 under "Needle
1. Complete steps 1 and 2 under "Needle
1. Complete steps 1 and 2 under "Needle
Assem b ly
Re pla cem en t"
in
th e
Assem b ly
Re pla cem en t"
in
th e
Assem b ly
Re pla cem en t"
in
th e
Assem b ly
Re pla cem en t"
in
th e
"Maintenance" section.
"Maintenance" section.
"Maintenance" section.
"Maintenance" section.
2. Mount an 8 mm (5/16
2. Mount an 8 mm (5/16
2. Mount an 8 mm (5/16
2. Mount an 8 mm (5/16----inch) drill bit verti-
inch) drill bit verti-
inch) drill bit verti-
inch) drill bit verti-
cally in a vise.
cally in a vise.
cally in a vise.
cally in a vise.
3. Place the handle opening over the drill bit
3. Place the handle opening over the drill bit
3. Place the handle opening over the drill bit
3. Place the handle opening over the drill bit
tip and insert until the bit tip contacts pack-
tip and insert until the bit tip contacts pack-
tip and insert until the bit tip contacts pack-
tip and insert until the bit tip contacts pack-
ing.
ing.
ing.
ing.
4. Rotate the handle assembly until the drill
4. Rotate the handle assembly until the drill
4. Rotate the handle assembly until the drill
4. Rotate the handle assembly until the drill
bit bites into the packing. Lift the handle as-
bit bites into the packing. Lift the handle as-
bit bites into the packing. Lift the handle as-
bit bites into the packing. Lift the handle as-
sembly (to withdraw the packing). Make
sembly (to withdraw the packing). Make
sembly (to withdraw the packing). Make
sembly (to withdraw the packing). Make
sure all bits of old packing are removed.
sure all bits of old packing are removed.
sure all bits of old packing are removed.
sure all bits of old packing are removed.
Wash housing with solvent.
Wash housing with solvent.
Wash housing with solvent.
Wash housing with solvent.
5. Place the new packing (Item 52) on the
5. Place the new packing (Item 52) on the
5. Place the new packing (Item 52) on the
5. Place the new packing (Item 52) on the
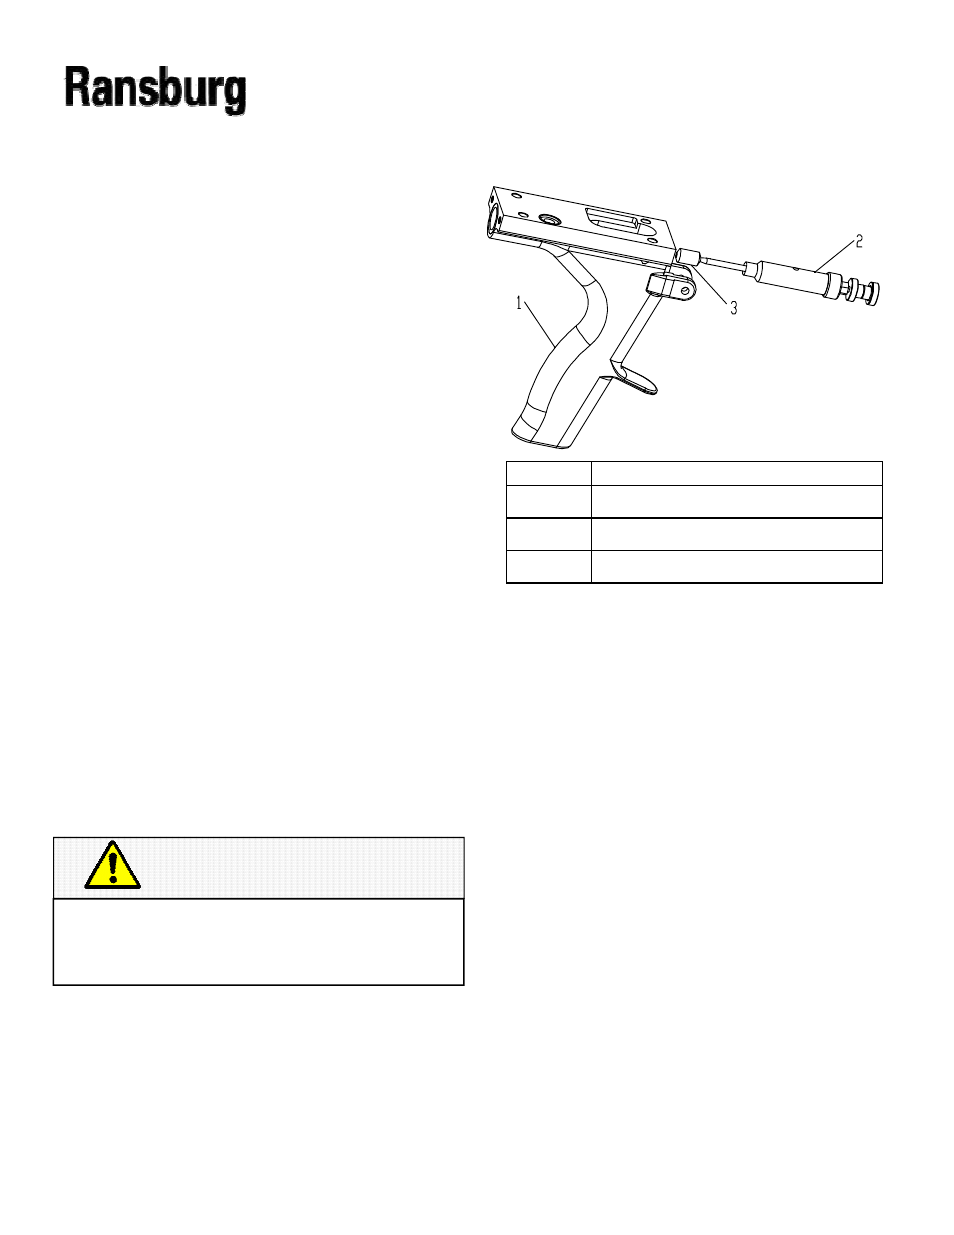
needle assembly (see Figure 23).
needle assembly (see Figure 23).
needle assembly (see Figure 23).
needle assembly (see Figure 23).
6. To install the needle assembly, with nee-
6. To install the needle assembly, with nee-
6. To install the needle assembly, with nee-
6. To install the needle assembly, with nee-
dle packing, refer to steps 4 through 6 under
dle packing, refer to steps 4 through 6 under
dle packing, refer to steps 4 through 6 under
dle packing, refer to steps 4 through 6 under
"Needle Assembly Replacement" in the
"Needle Assembly Replacement" in the
"Needle Assembly Replacement" in the
"Needle Assembly Replacement" in the
"Maintenance" section.
"Maintenance" section.
"Maintenance" section.
"Maintenance" section.
C A U T I O N
C A U T I O N
C A U T I O N
C A U T I O N
Scoring or chewing of the metal packing
Scoring or chewing of the metal packing
Scoring or chewing of the metal packing
Scoring or chewing of the metal packing
seat in handle may cause permanent
seat in handle may cause permanent
seat in handle may cause permanent
seat in handle may cause permanent
dam
dam
dam
dam----age, requiring handle replacement.
age, requiring handle replacement.
age, requiring handle replacement.
age, requiring handle replacement.
Item #
Item #
Item #
Item # Description
Description
Description
Description
1
1
1
1
HANDLE ASSEMBLY
HANDLE ASSEMBLY
HANDLE ASSEMBLY
HANDLE ASSEMBLY
2
2
2
2
NEEDLE ASSEMBLY
NEEDLE ASSEMBLY
NEEDLE ASSEMBLY
NEEDLE ASSEMBLY
3
3
3
3
NEEDLE PACKING
NEEDLE PACKING
NEEDLE PACKING
NEEDLE PACKING
Figure 23: Needle Packing Assembly
Figure 23: Needle Packing Assembly
Figure 23: Needle Packing Assembly
Figure 23: Needle Packing Assembly