Screen settings, Control panel > screen, Settings – TANDBERG 1700 MXP User Manual
Page 69: Control panel > screen settings, Control panel > screen set, Tings, Touch tones snapshot camera presets
D 13954.01
MAY 2006
TANDBERG 1700
MXP
USER GUIDE
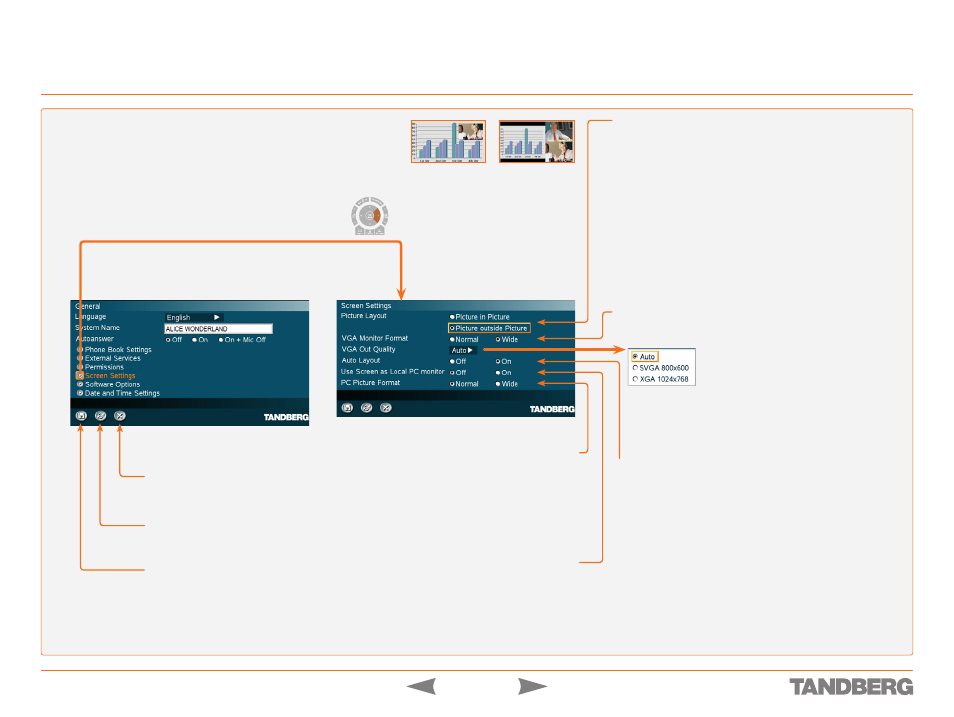
Screen Settings
Control Panel > General Settings
CANCEL
Select this icon and press
OK
to leave the menu undoing any
changes.
RESTORE DEFAULTS
Select this icon and press
OK
to restore the default settings.
SAVE
Select this icon and press
OK
to leave the menu putting
changes into effect.
AUTO LAYOUT
On
If
Auto Layout
is
ON
the system will change layouts automati-
cally depending on the number of participants in a call and if
you have a dual video stream or not.
Off
If
Auto Layout
is
OFF
there will be no automatic layout
changes during a call. All desired layout changes must be
done manually with the
Layout
button.
Note!
When receiving low resolution images (176 × 144 pixels or
less) the screen will automatically adjust to a smaller view to give
optimum quality experience.
USE SCREEN AS LOCAL PC MONITOR
Use the
Selfview
button of the Remote Control to switch from
local PC display to standard conference layout.
If Local PC Display is
ON
you will be able to have
Local PC displayed both outside and within a call.
If Local PC Display is
OFF
you will not be able to see a Local
PC image.
PICTURE LAYOUT
The
Picture Layout
is related to the
Layout
button on the remote
control and it can be used at any time to change the screen lay-
out. For wide screen systems POP mode is recommended. You
will get optimized picture layouts for wide screen by pressing
the
Layout
button on the remote.
Picture in Picture (PIP).
Pressing the
Layout
button on the remote
will result in an extra picture in smaller view (Picture in Picture).
Press the
Layout
button to move it around in the corners of the
screen and finally hide it. Pressing and holding
Layout
for 1 sec-
ond will hide the small picture directly from any position.
Picture outside Picture (POP).
Press the
Layout
button to see
the images side-by-side, e.g. 1+1 layout, where the far end and
near end are displayed as images of equal size. Press again to
see a 1+2 layout and a 1+3 layout and finally back to fullscreen.
VGA MONITOR FORMAT
To fully leverage your wide screen display, set the
VGA Monitor For-
mat
to wide.
Normal
is 4:3 format, while
Wide
is 16:9 format.
Picture-in-Picture
example
Picture-outside-
Picture example
VGA OUT QUALITY
Auto.
VGA output format will be optimized
depending on video source format, refresh rate
and EDID information available.
Formats available.
SVGA (800×600) @ 75 Hz,
XGA (1024×768 @ 60/75 Hz, and
WXGA (1280×768) @ 60 Hz.
PC PICTURE FORMAT
Takes effect only when
VGA Monitor Format
is set to
Wide
.
Use this setting to determine if you want your PC presenta-
tions to be shown stretched in full screen, or with correct
aspect ratio using part of the widescreen display. With the
VGA Out Quality
set to
Auto
the presentation will be of the
best possible quality supported by the monitor.
Normal
is 4:3 format,
Wide
is 16:9 format.
Touch tones
Snapshot
Camera Presets