Keri Systems BioPointe Users Manual User Manual
Page 71
Appendix B – Configuring the ADAM 4520
70
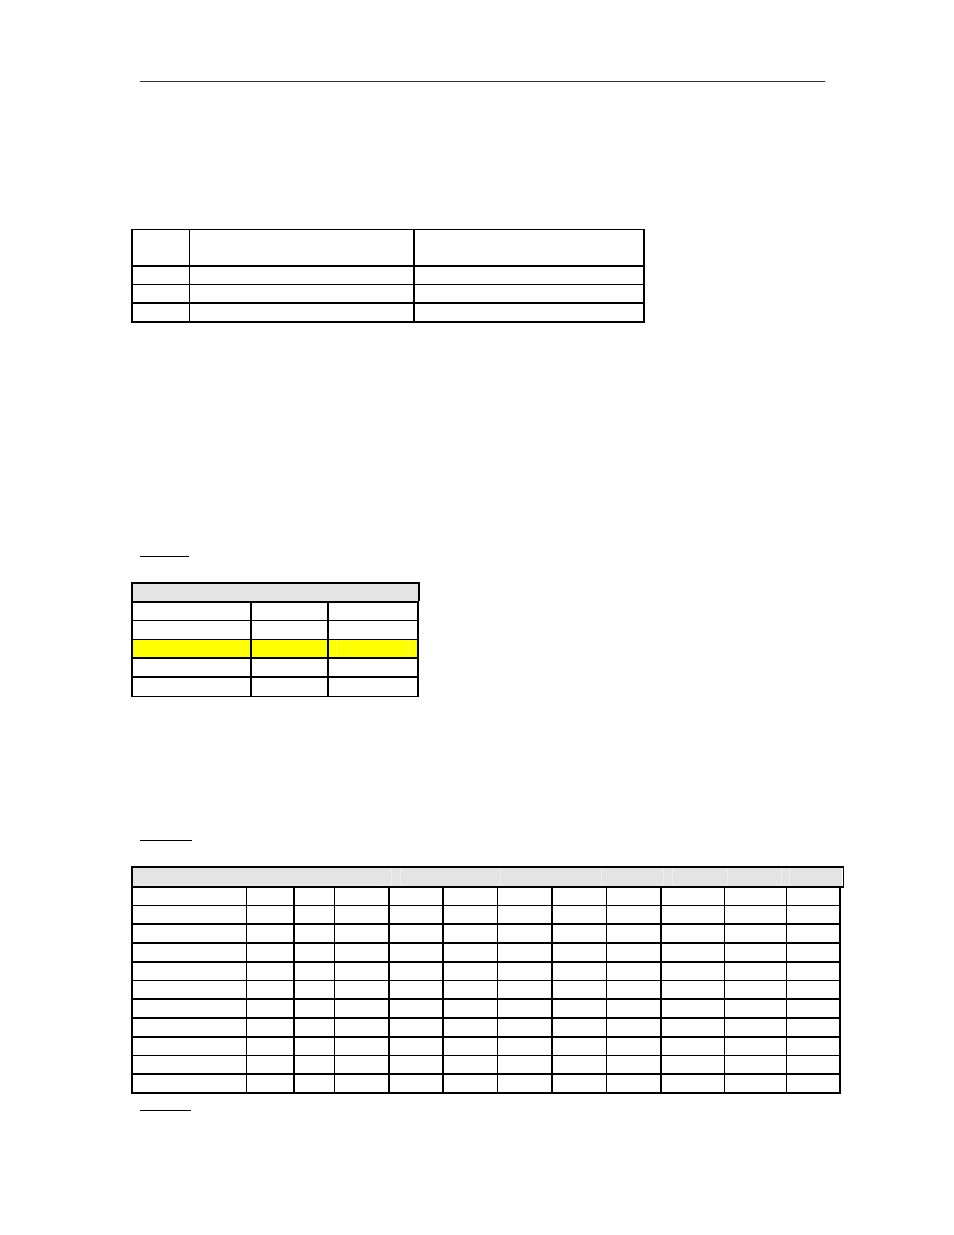
RS232 Cable Connection
The table below shows the pin to pin connection between the RS232 port of the ADAM Converter module and
the PC’s Com port.
ADAM 4520 (D-SUB 9-pin male
connector)
PC (Com Port 1) (D-SUB 9-pin
female connector)
Tx
2
2
Rx
3
3
GND
5
5
Switches and Jumper Settings
The following tables illustrate the possible switch settings for the ADAM Converter when you open up the
module.
You will find that in the Converter board, there are 2 switch settings. One of it is labeled as SW1 while the
other is labeled as SW2. SW1 controls the data format settings.
BioPointe uses the 10 bits data format (8 data bits, no parity, 1 stop bit and 1 start bit). Hence, you will need to
set SW1 to the 10 bits data format (Table 1).
Table 1:
ADAM 4520 Data Format Settings (SW1)
Data Format
1
2
9 bits
-
-
10 bits
ON
-
11 bits
-
ON
12 bits
ON
ON
SW2 controls the baud rate settings and the communication mode used (whether RS422 and RS485). If you
are using RS422, you need only to on the RS-422 switch (Sw 10), leaving the rest of the switches at the
OFF position. If you are using RS485 however, turn off the RS-422 switch (Sw 10), and turn on the switch
for the desired baud rate. Take note the baud rate you set on the module must be the same as that
configured at the device and that used at the host program (Table 2).
Table 2:
ADAM 4520 Baud Rate Settings (SW2)
Baud Rate
Sw
1
2
3
4
5
6
7
8
9
10
RTS control
1
ON -
-
-
-
-
-
-
-
-
1200 bps
2
-
ON
-
-
-
-
-
-
-
-
2400 bps
3
-
-
ON
-
-
-
-
-
-
-
4800 bps
4
-
-
-
ON
-
-
-
-
-
-
9600 bps
5
-
-
-
-
ON
-
-
-
-
-
19.2 Kbps
6
-
-
-
-
-
ON
-
-
-
-
38.4 Kbps
7
-
-
-
-
-
-
ON
-
-
-
57.6
Kbps
8
-
- - - - - - ON
- -
115.2
Kbps
9
-
- - - - - - - ON
-
RS-422
10
-
- - - - - - - - ON
Legend -= OFF 13–2