02 system troubleshooting guide, 02 system troubleshooting guide -2 – Tweco 500SP PowerMaster Automation User Manual
Page 70
POWERMASTER 400SP, 500SP AUTOMATION
7-2
March 16, 2007
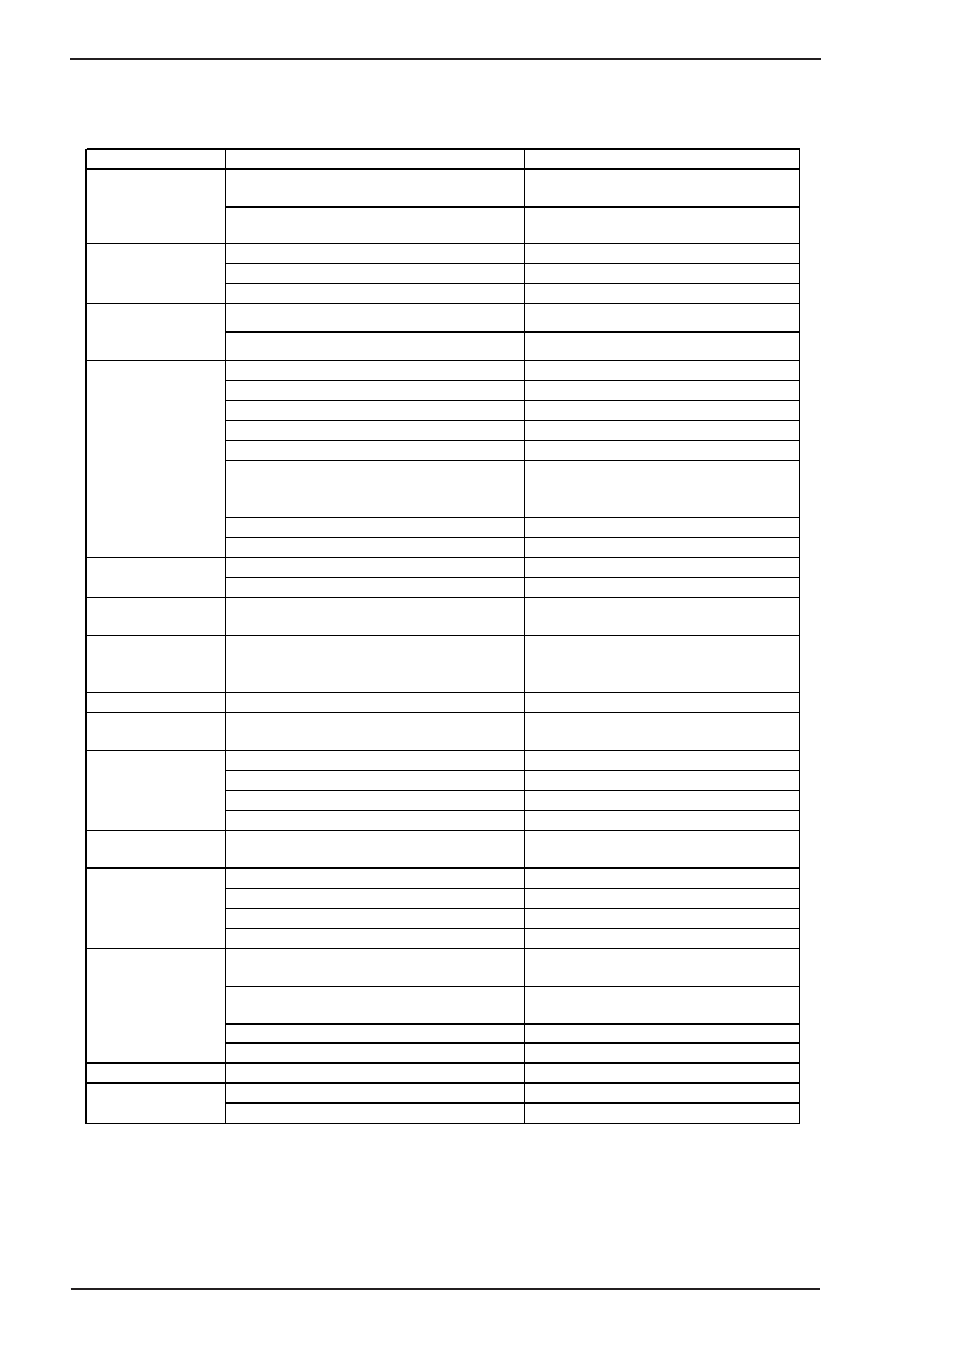
7.02 System Troubleshooting Guide
Symptom
Cause
Remedy
Insufficient coolant through flow due to pollution in
coolant
Flush the coolant hoses of the torch in opposite
direction
Contact tip is not tight or the wrong size for the wire
used
Check it
Nut of the torch hose is not tight
Tighten it
No connection of the control cable in the torch hose Check and change if necessary
Overload of the unit and thermal protection operates Allow unit to cool down at no load
Wire electrode is tight at the spool
Check and change if necessary
Burr at the wire beginning
Cut burr from end of wire
Wrong contact pressure at the wire-feed rolls
Adjust it as described in the manual
Torch defective
Check and change if necessary
No intermediate guide or is dirty
Install or clean the intermediate guide
Bad quality of welding wire
Check and change if necessary
Rust formation on the welding wire
Check and change if necessary
Torch liner is dirty inside
Disconnect the torch from the machine, unscrew
the contact tip and clean the liner with
compressed air
Torch liner is defective
Check and change if necessary
Motor brake adjusted too strong
Adjust as described in the manual
Duty cycle overloaded
Allow the machine to cool down
Poor cooing of internal unit parts
Check the air in and outlet
Cooler, hoses or pump
are damaged
Frozen systems due to low concentration of
recommended coolant in re-circulator
Contact the nearest service facility
Arc or short circuit
between contact tip and
gas nozzle
Spatter built up inside the gas nozzle
Remove it with special pliers
Unstable arc
Wrong diameter contact tip or worn out
Change contact tip
The
Control Panel is
completely blank
Primary power phase missing
Check the unit at another power outlet. Check
power cable and mains fuses/circuit breakers
Gas cylinder empty
Replace it
Defective torch
Check and replace it
Gas regulator dirty or defective
Check and replace it
Valve of gas cylinder defective
Replace the gas cylinder
Shielded gas switches
not off
Valve of gas cylinder dirty or does not close
Remove torch and gas regulator and clean it
with compressed air
Incorrect setting of shielded gas
Adjust as described in the manual
Dirty gas regulator
Check valve
Torch, gas hose blocked or not air-tight
Check and change if necessary
Shielded gas is blown away from draught
Avoid draught
Phase missing
Check the unit at another power outlet. Check
power cable and mains fuses/circuit breakers
Poor Work lead connection
Ensure good electrical contact between Work
clamp and workpiece
Work lead not plugged in right
Fasten work lead by turning the plug to the right
Defect torch
Repair or replace it
Hot plug of work lead
Plug was not tightened by turning to the right
Check
Wire rolls do not fit the wire diameter
Install correct wire rolls
Wrong contact pressure at wire feeder
Adjust as described in the manual
Torch too hot
No function when torch
button is pressed
Irregular wire feeding
or wire welds to the
contact tip
Irregular wire feeding
or no wire feeding
Higher wire wear out at
wire-feeding unit
Unit switches off
No shielded gas
Not enough shielded
gas
Decreased welding
performance