Care and use manual – Waters XTerra and XTerra Prep Columns User Manual
Page 2
[ Care and Use ManUal ]
XTerra Columns
2
II. COLUMN INSTALLATION
a. Connecting the Column to the HPLC Instrument
Handle the column with care. Do not drop or hit the column on a
hard surface as it may disturb the bed and affect its performance.
1. Correct connection of 1/16” outer diameter stainless steel tub-
ing leading to and from the column is essential for high-quality
chromatographic results.
2. When using standard stainless steel compression screw fittings,
it is important to ensure proper fit of the 1/16” outer diameter
stainless steel tubing. When tightening or loosening the
compression screw, place the 5/16” wrench on the compression
screw and the other 3/8” wrench on the hex head of the column
endfitting.
Note: If one of the wrenches is placed on the column flat during
this process, the endfitting will be loosened and leak.
3. If a leak occurs between the stainless steel compression screw
fitting and the column endfitting, a new compression screw
fitting, tubing and ferrule must be assembled.
4. An arrow on the column identification label indicates correct
direction of solvent flow.
NOTE: It is important to realize that extra column peak broaden-
ing can destroy successful separation. The choice of appropriate
column connectors and system tubing is discussed in detail
below.
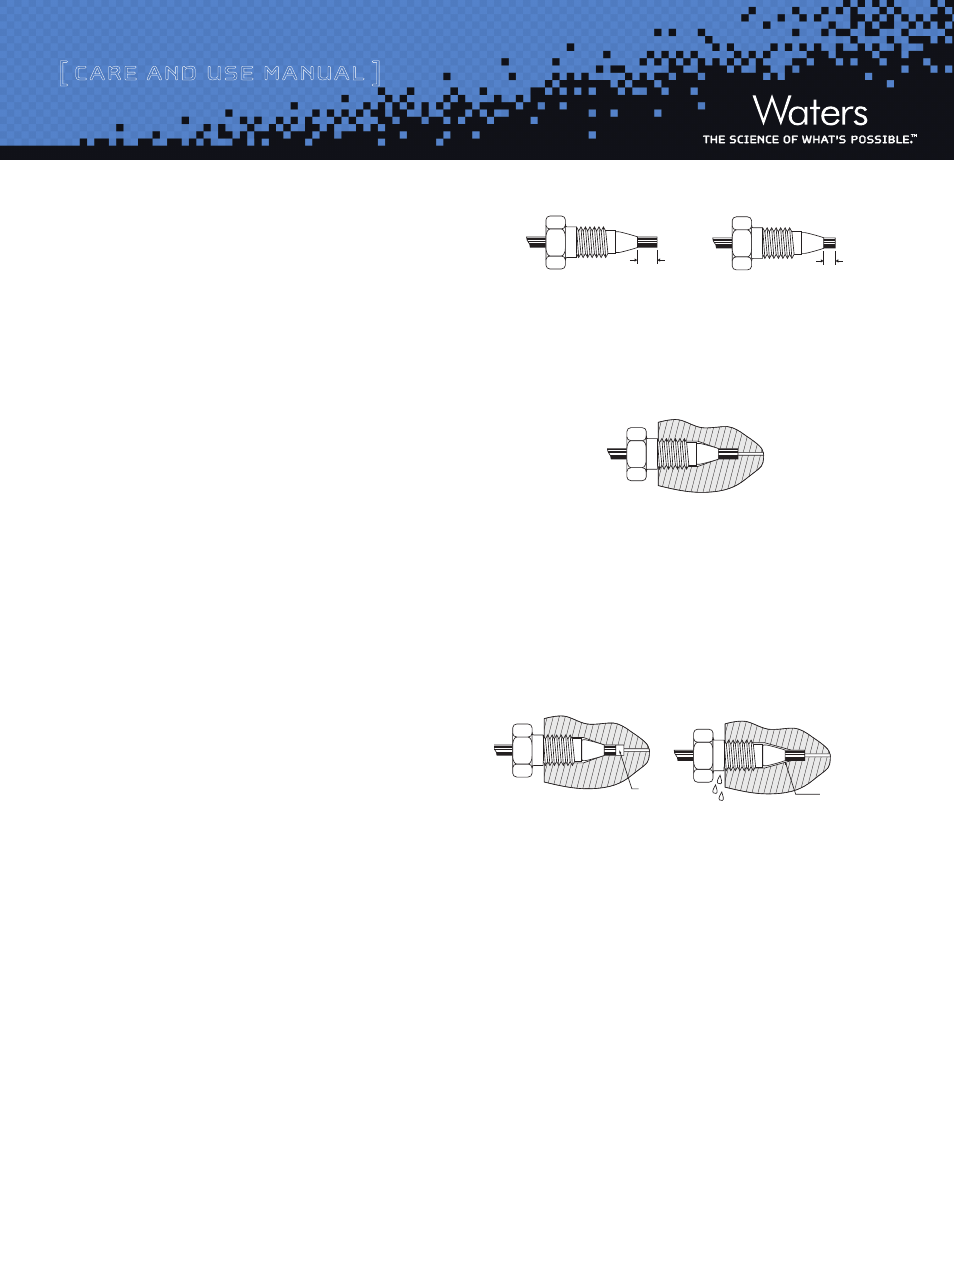
b. Column connectors and system tubing considerations
Due to the absence of an industry standard, various column manu-
facturers have employed different styles of chromatographic column
connectors. The chromatographic performance of your separation
can be negatively affected if the style of your column endfittings do
not match the existing instrumentation tubing ferrule setting. This
page explains the difference between Waters style and Parker style
endfittings, which vary in the required length of the tubing protruding
from the ferrule. The XTerra column is equipped with Waters style
endfittings which require a 0.130” ferrule depth (see next section
for setting ferrule depth). If you are presently using a non-Waters
style column, it is critical that you reset the ferrule depth for optimal
performance.
c. The proper tubing/column connection
Tubing touches the bottom of the column endfitting, with no void
between them.
A void appears if a tube with Parker ferrule setting is connected to a
Waters style column
The presence of a void in the flow stream down grades the column
performance. There is only one way to fix the problem: Cut the end
of the tubing with the ferrule, put a new ferrule on the tubing and
make the connection. Before tightening the screw, make sure that the
tubing bottoms out in the endfitting of the column.
Void
Gap
If tubing with a Waters style ferrule setting is connected to a column
with Parker style endfitting, the end of the tubing will bottom out
before the ferrule reaches its proper sealing position. This will leave
a gap creating a leak. There are two ways to fix the problem:
1. Just tighten the screw a little bit more. The ferule moves
forward, and reaches the sealing surface. Do not overtighten
because this may end in breaking the screw.
2. Cut the tubing, put a new ferrule on it and make the connection.
An alternative is to replace the conventional compression screw
fitting with an all-in-one PEEK
TM
fitting (Waters P/N PSL613315)
that allows you to reset the ferrule depth. Another approach is to
use a Keystone, Inc. Slipfree
®
fitting to always ensure the correct fit.
The finger-tight Slipfree connectors automatically adjust to fit all
compression screw type fittings without the use of tools.
0.090 inches
Waters Ferrule Setting
Parker Ferrule Setting
Figure 1: Waters and Parker Ferrule Types
Figure 3: Parker Ferrule in a Waters Style Endfitting (left) & Waters Fer-
rule in a Parker Style Endfitting (right)
Figure 2: Proper Tubing/Column Connection