Care and use manual – Waters Protein-Pak PW Ion-Exchange Column User Manual
Page 2
[ Care and Use ManUal ]
Protein-Pak PW Ion-Exchange Columns
2
II. PRePaRaTION fOR OPeRaTION
a. Steel Column Installation
Remove the end plugs from your column with a 5/16” wrench and save them
for storage when the column is removed from the system. The column outlet
is indicated by an arrow on the label (showing the direction solvent should
flow). Tighten the fittings 1 /4 to 1 /2 turn.
Note: Do not overtighten, this will damage the fitting seat.
A properly prepared and assembled compression fitting in good condition is
all that is required.
Follow the next four steps of this procedure if tubing cutting is required
to connect a new steel column or to improve the end connections on your
existing fittings.
1. Using a file with a cutting edgescribe the circumference of the tubing
at the desired break.
2. Grasp the tubing on both sides of the scribe mark with cloth-covered
pliers (to prevent marring the tube surface) and gently work the tube
back and forth until it separates.
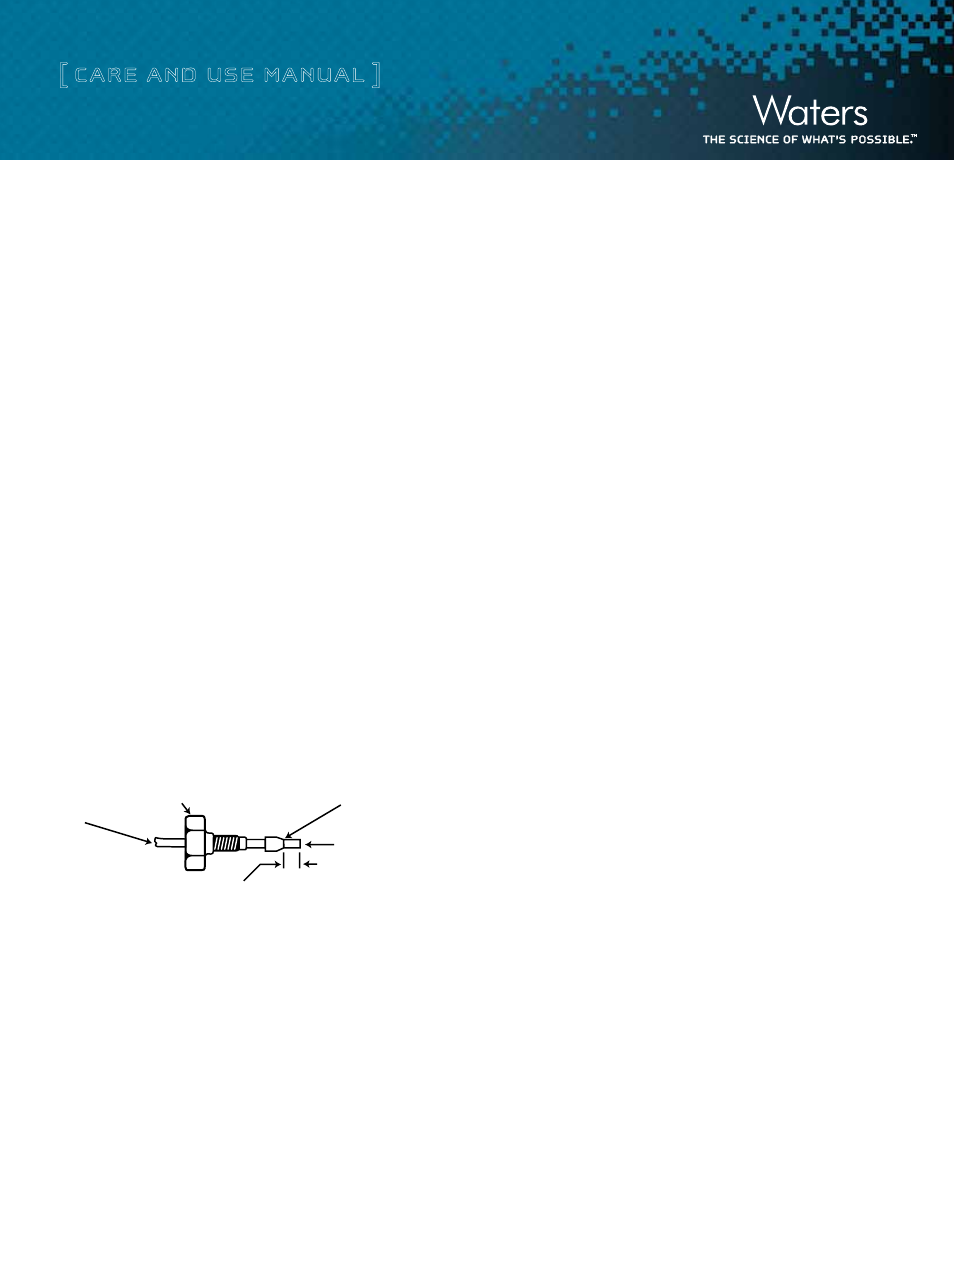
3. File the ends smooth and assemble as shown.
Figure 1: Ferrule and Compression Assembly
Note: Proper positioning of the ferrule in the fitting seat will prevent forma-
tion of unwanted dead volume which could result in sample mixing.
4. Slide the compression fitting, followed by the ferrule (large end of the
taper first) over the tube. Be certain to bottom the tube in the fitting
seat which is used to assure a leak-free connection.
Note: Attach a union in place of the column and flush the lines free of
microparticulate before attaching the column
b. Glass Column Installation
Install the pre-packed Protein-Pak PW series of ion exchange glass
columns on any HPLC or medium-pressure system. Refer to the
appropriate operator’s manual for installation information. Refer to
Table 6 for part numbers and specific adapter information. Install the
columns in a vertical position for optimum performance.
Cautions
•
When using preparative columns (AP-2 and AP-5) at elevated flow
rates, do not exceed the pressure limits of the column. Use a detector
flow cell configuration which will accommodate higher flow rates
without generating excessive backpressure
• Non-metallic fittings should be hand-tightened only. Overtightening
does not improve performance and may damage the threaded parts. If
leakage occurs, check for damage to the threaded parts, ferrules, and
0-rings, or for foreign matter on the sealing surfaces.
• Do not adjust the piston on the column while there is flow through the
column. This could result in damage to the glass column and 0-rings.
See the Waters Advanced Purification Glass Column Care & Use Manual for
details.
c. Solvent Requirements
Protein-Pak DEAE-5PW and SP-5PW are shipped in distilled water. After
running the columns return them to distilled water for overnight storage. The
organic concentration is limited to no more than 20%.
d. Buffers
Protein-Pak columns are stable in normal salt buffer solutions such as
sodium sulfate, ammonium acetate, ammonium formate, phosphate buffers,
tris acetate and acetate buffers. Concentrations in aqueous solutions of less
than 1M are recommended. Maintain buffers used during analysis between
pH 2-12. Buffers containing halide ions for example, sodium chloride can be
used, but care should be taken to thoroughly flush the column with distilled
water after use.
e. Equilibration
A necessary step to successful use of your new column is the initial solva-
tion (or wetting) of the column. Purge the column for 15 minutes at 1 ml/
min with the starting buffer. Equilibration between the eluent (buffer) and
packing is established when a stable baseline can be produced. If your result
is unsatisfactory repeat the equilibration process.
COMPRESSION SCREW OR NUT
TUBE
FERRULE
END MUST BE STRAIGHT
AND SMOOTH TO ACHIEVE
MAXIMUM COLUMN EFFICIENCY
CRTITICAL DISTANCE TO BE DETERMINED BY
EACH APPLICATION (UNION, COLUMN FITTING ETC.)