Front panel controls and indications, Front panel operations, Creating a tie – Extron Electronics MKP 2000 User Manual
Page 17: Local operation
MKP 2000 Remote Control Panel • Local Operation
MKP 2000 Remote Control Panel • Local Operation
Local Operation
3-2
Front Panel Controls and Indications
MKP 2000
4
5
6
1
2
3
7
8
9
BACK
0
CANCEL
INPUT
OUTPUT
TAKE
2
6
3
5
4
1
7
BACK
0
CANCEL
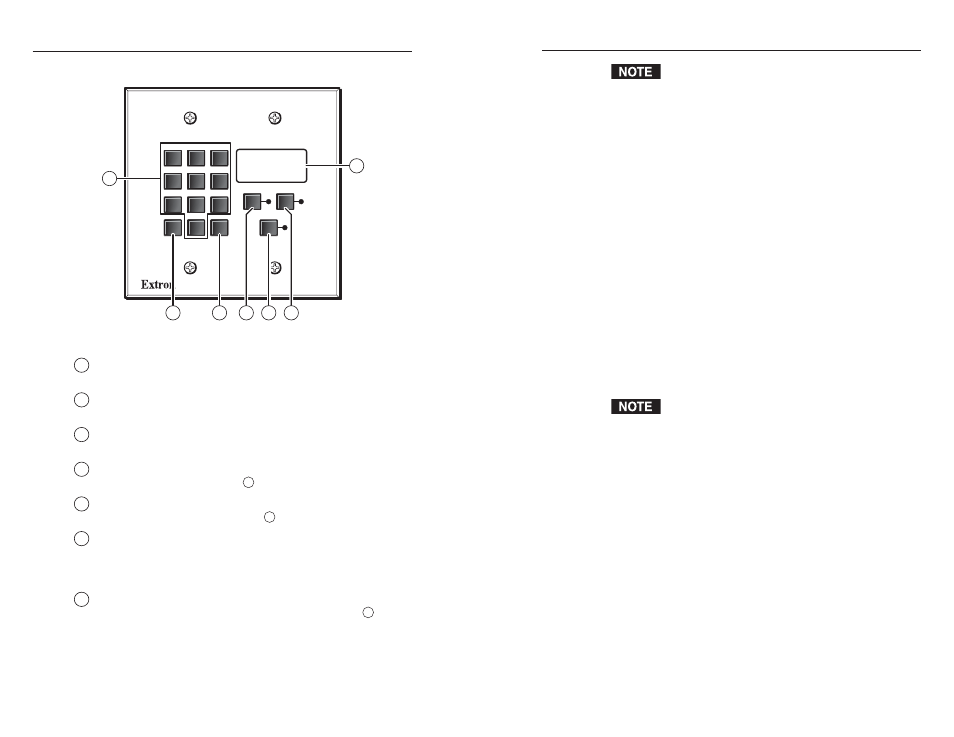
Figure 3-1 — MKP 2000 controls and indicators
1
0, 1 through 9 buttons
— Allow you to enter an input or output
when you create a tie.
2
Back button —
Deletes the least-significant digit (first digit on
the right) of an entered input or output number.
3
Cancel button —
Clears the LED display to 000, erasing any
number that you have entered or any error message.
4
Input button —
Allows you to specify that the next number you
enter with the numeric keys (
1
) is an input.
5
Output button —
Allows you to specify that the next number
you enter with the numeric keys (
1
) is an output.
6
Take button —
Confirms the potential tie that you have created
with the input and output selection. This button is the
equivalent of the Enter button on the matrix switcher’s front
panel.
7
LED display —
Shows the input or output number that was
most-recently entered using the MKP’s numeric keys (
1
). In
certain modes, it can also show the various IP addresses
programmed into the MKP.
The LED display shows the most recent input or output
number entered on the numeric keys only. Ties created
using other devices (other MKPs, a PC or control
system, or the matrix switcher’s front panel) are not
shown in the LED display.
Front Panel Operations
Creating a tie
To tie an input to an output,
1
.
Press the Input button to specify that the next number
entered is an input number.
•
The Input LED lights.
•
The LED display shows the last input selected from
this MKP.
•
The last selected output is locked (unable to be
changed; assigned as the output to which the entered
input is tied unless a different output is assigned [see
steps 3 and 4]).
2
.
Use the numeric keys to select the desired input.
•
The LED display shows the input that you enter.
•
The Take LED blinks.
If you press the Take button now, the selected input is
tied to the locked output.
3
.
Press the Output button to specify that the next number
entered is an output number.
•
The Output LED lights.
•
The LED display shows the last output selected from
this MKP.
•
The last selected input is locked (unable to be
changed; assigned as the output to which the entered
input is tied unless a different input is assigned [see
steps 1 and 2]).
4
.
Use the numeric keys to select the desired output.
•
The LED display shows the output that you enter.
•
The Take LED blinks.
5
.
Press the Take button to confirm the change.
•
The Take LED goes out.
•
The LED display shows the last output that was tied
from this MKP.
3-3