EastWest Hollywood Orchestra Opus Edition Virtual Instrument Plug-In (Download) User Manual
Page 184
HOLLYWOOD ORCHESTRA OPUS EDITION
<
CHAPTER 5: PERFORM
184
<
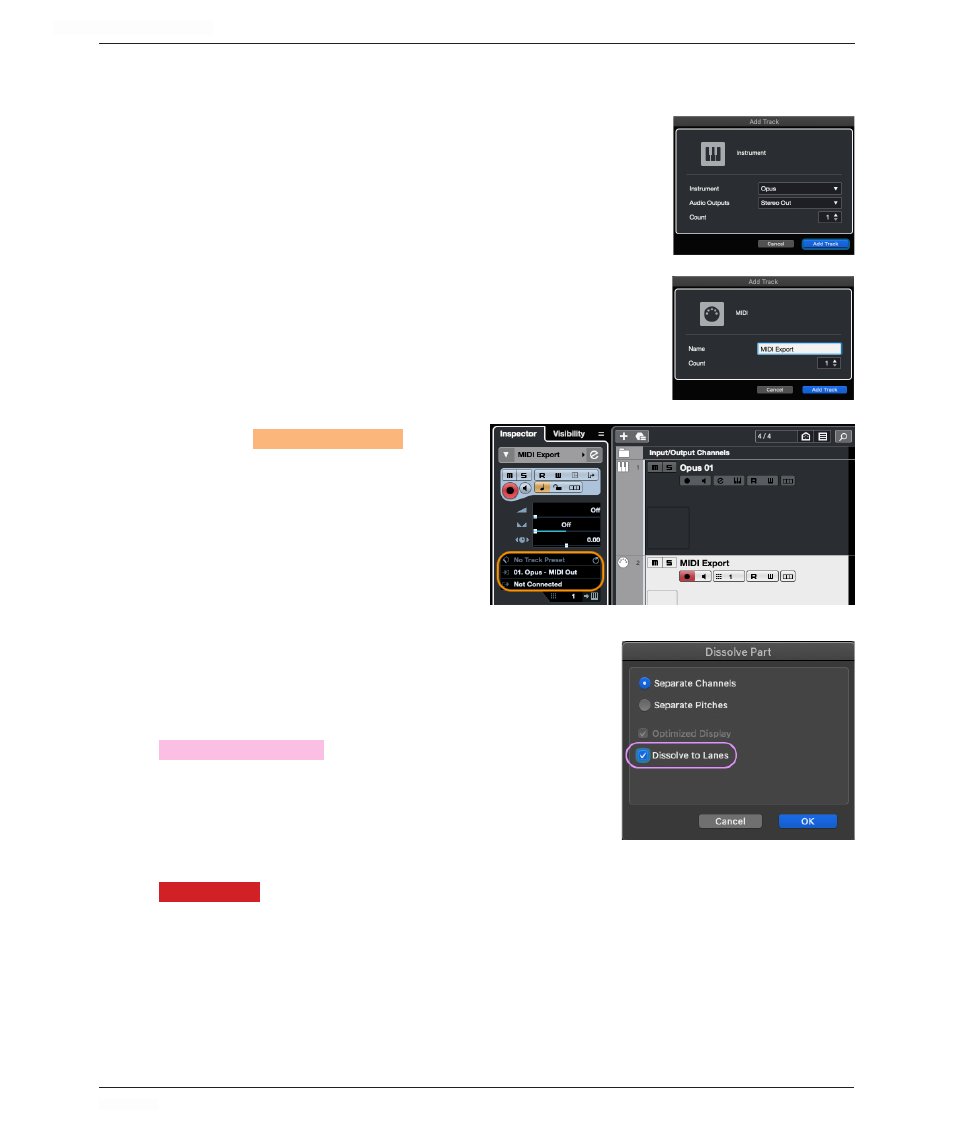
Cubase 11
Follow the instructions below to recording the MIDI output from Hollywood Orchestrator
onto separate MIDI channels in Cubase 11.
1. Go to Project > Add Track > Instrument, and in the Add
Track window, select Opus from the instrument menu and click
‘Add Track’.
2. In Opus, follow the instructions in previous sections of
this chapter to load Hollywood Orchestrator, and in the Preset
Browser, load an Ostinato or Score preset.
3. Record a simple chord progression on the instrument track
(the MIDI will be recorded as you played it into Cubase).
4. Go to Project > Add Track > MIDI, and enter a name for the
MIDI track (we’ll use the name ‘MIDI Export’), then click the
‘Add Track’ button.
5. Set the
MIDI INPUT
SELECTION
on the
track created in Step 4 to receive MIDI
from the Opus instrument track (‘01
Opus - MIDI Out’).
6. Record enable the MIDI Export
track created in Step 4, and playback
the sequence to record the MIDI
(export) from the Opus instrument
track that has a Hollywood Orchestrator preset loaded.
7. The final step is to split the MIDI, which contains
all MIDI channels merged into a single MIDI clip, into
separate clips. Simply select the MIDI clip, then go
to MIDI > Dissolve Part. In the options, check the
DISSOLVE TO LANES
OPTION
, then click ‘OK’.
8. Now that the merged MIDI clip has been separated
into separate lanes based on it’s MIDI channel, these
clips can be transferred to other instruments in your
project to play alongside Hollywood Orchestrator.
PLEASE NOTE:
The MIDI clips are named after the original MIDI track name (in this
example, ‘MIDI Export’), followed by the MIDI channel number. This corresponds to the
MIDI channels of the instruments loaded in Opus.