Get ready to build – Top Flite TOPA0110 User Manual
Page 8
“Photos of Violett T-33 main landing gear and
suggested 1/4" plywood aft mounting rail.”
a. They are very low profile and can be
buried in the wing deeply enough to leave room
for outer doors.
b. They lock down in a position that is angled.
Therefore, they compensate for some of the
dihedral in the P-51 wing.
c. They have a pivot block strut hole diameter
that directly accepts Robostruts when shimmed
with a piece of K&S brass 13/32" O.D. tubing.
d. They do not have an uplock and therefore
can pull the strut and tire farther than 90 degrees
and fully into the wheel wells.
e. Use 5/8" I.D. Robart air cylinders mounted
inboard of the retracts to actuate these units.
These cylinders have enough power to lift and
hold the long strut and heavy tire.
REMEMBER: A retract and strut like this is a
very rigid unit. This gives excellent ground
handling, but requires strong mounts.
2 . 4 - i n c h w h e e l s a r e t h e c l o s e s t t o s c a l e .
However, offset struts to hold 4" wheels may be
hard to find. Robart makes an offset strut to hold
their 3-1/4" wheel, which works well and looks
close to scale. Robart may offer struts for 4"
wheels at some time after this writing.
3. Bob Violett Models has offset door hinges
that are excellent for hinging inner main landing
gear doors. They also offer small scale-looking
air cylinders that are specifically designed for
actuating landing gear doors. The real Mustang’s
i n n e r d o o r s a r e c l o s e d d u r i n g t a k e o f f a n d
landing. When “gear-up” is selected, they open,
allow the wheels to come in, then close again.
Duplicating this action requires either 2-channels,
or a very tricky mechanism. The inner doors on
the real aircraft would often fall open when the
engine was off and hydraulic pressure was lost.
4. The holes for the forward wing mounts may be
drilled so the 1/4-20 nylon bolts are concealed
under the inner doors.
________________________________________
________________________________________
GET READY TO BUILD
1. Unroll the plan sheets. Re-roll the plans
inside out to make them lie flat.
2. Remove all parts from the box. As you do,
figure out the name of each part by comparing it
with the plans and the parts list. Using a felt tip or
ball point pen, write the part name or size on
each piece to avoid confusion later. Use the die-
cut patterns shown on pages 4 and 5 to identify
the die-cut parts and mark them before punching
out. Save all scraps. If any of the die-cut parts
are difficult to punch out, do not force them!
Instead, first cut around the parts with an X-acto
knife. After punching out the die-cut parts, use
your T-Bar or sanding block to lightly sand the
edges to remove any die-cutting irregularities.
3 . A s y o u i d e n t i f y a n d m a r k t h e p a r t s ,
s e p a r a t e t h e m i n t o g r o u p s , s u c h a s f u s e
(fuselage), wing, fin and stab (stabilizer), and
hardware.
BUILD THE TAIL SURFACES
1. Work on a flat surface over the plans
covered with waxed paper. Refer to the plans to
identify the parts and their locations.
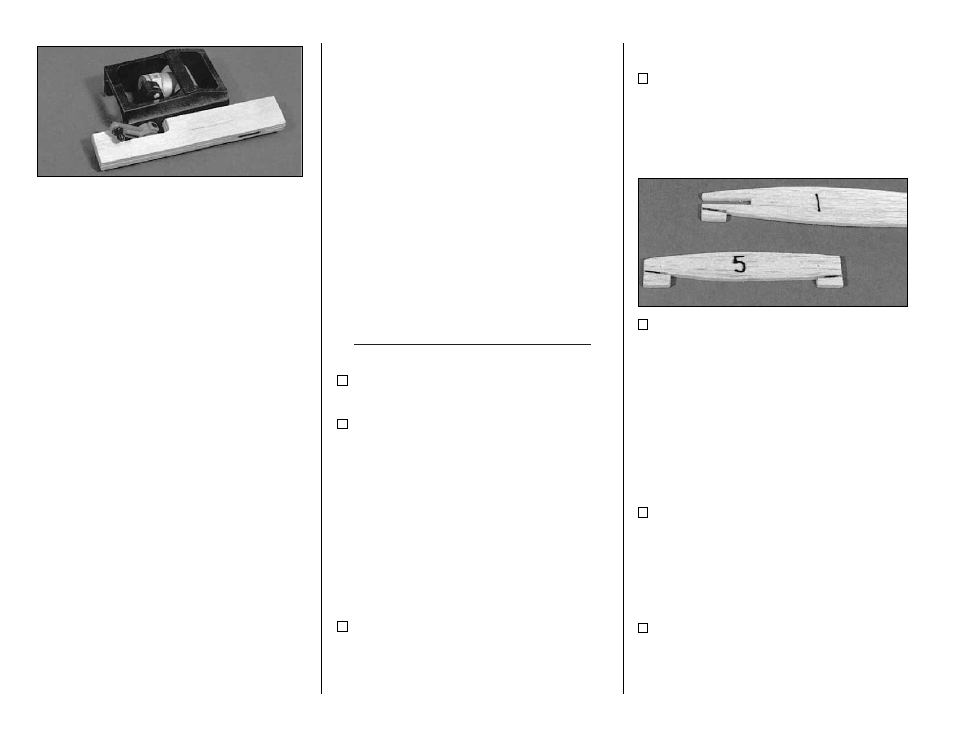
2. Punch out both sets of the die-cut 3/32"
balsa ribs S-1 to S-6. There are jig tabs on the
bottom edges of these ribs. If any of these break
off, carefully glue them back on with thin CA.
Lightly sand any imperfections. You may need to
finish cutting the notch in the forward portion of
S-1 for the Stab Joiner (SJ) with a knife. Using a
pen, mark the extensions of the bottom edge of
the ribs across the fore and aft jig tabs. These
will aid in centering the Leading and Trailing
Edges.
3. The Stab Trailing Edges (TE’s) are die-
cut from 1/4" balsa. Since some crushing may
happen when die-cutting wood of this thickness,
t h e y a r e s u p p l i e d s l i g h t l y l o n g a n d c a n b e
trimmed. Smooth the edges of these pieces with
sandpaper.
4. The stab and fin Leading Edges (LE’s)
are made from the 1/4" x 30" tapered balsa stock.
Cut two pieces about 1/4" longer than the length
shown on the plans for the stab LE.
- 8 -