2 roof curb packages for model series rpb and rpbl, Blower cabinet model rbl, Inside of curb) – Reznor ADFH Option - Installation - Roof Curbs Assembly User Manual
Page 25: Components of roof curb packages, Hardware shipped with the roof curb
Form I-OPT-C, P/N 132900 R17, Page 25
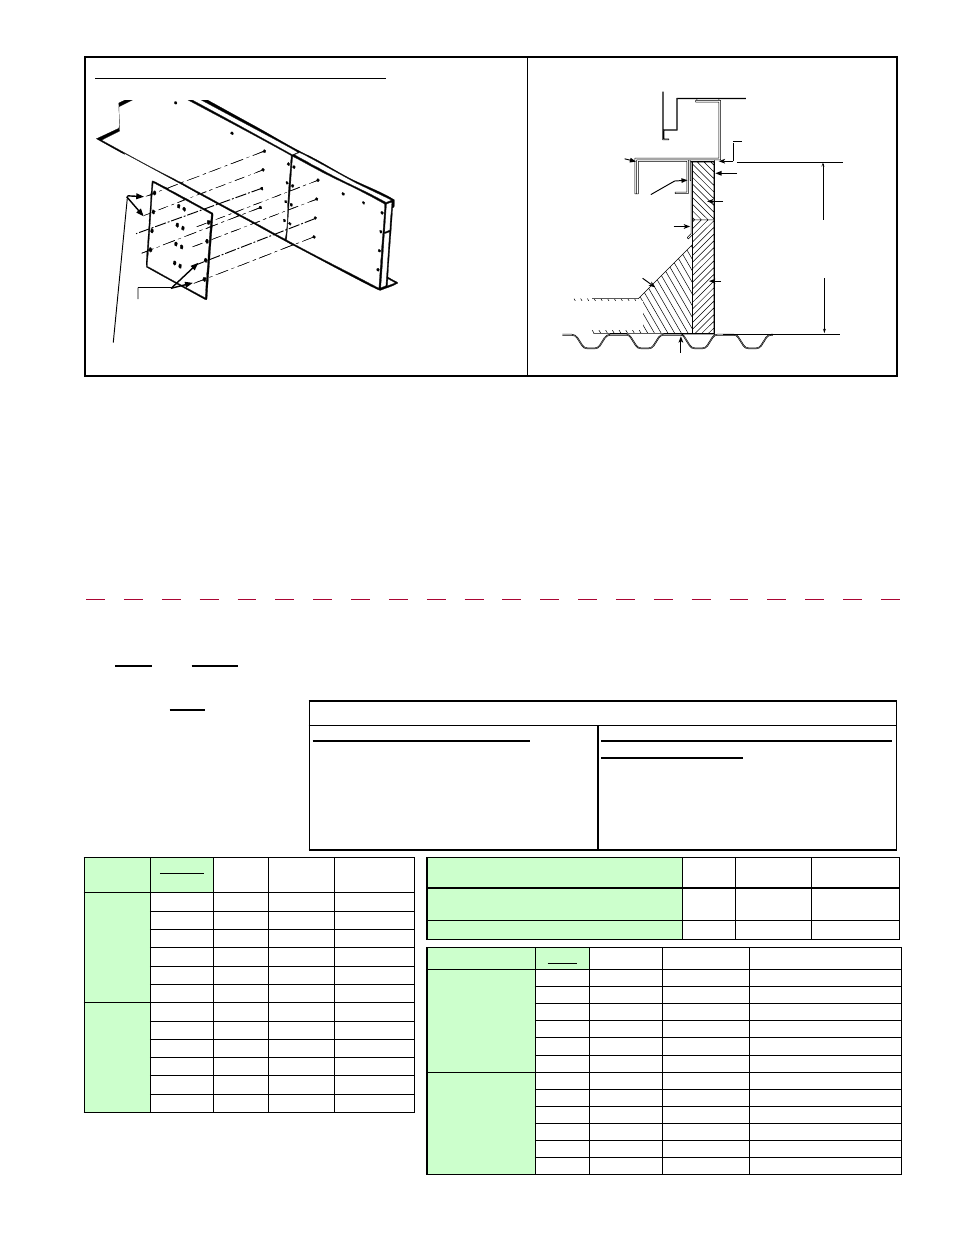
For top 4 holes (2 on each side) at both joints, from inside the curb
insert (4) 5/16 x 1 lag screws and (4) 5/16 lockwashers.
For bottom 4 holes (2 on each side) at both joints, from
outside of the curb insert (4) 5/16-18 x 3/4 long cap screws.
Attach with 5/16 lockwashers and 5/16-18 hex nuts.
(Inside
of Curb)
Curb Cap
Counter Flashing
(by installer)
Cant Strip
(by installer)
MUST be sealed
between curb cap
and roof curb
2 x 6
Wood
Nailer
Insulation
16
(406 mm)
Curb Height
Cabinet
Curb Cap Skirt
Weld, bolt, or lag screw curb to deck structure.
Roof Curb
Curb Cap
Extension
(AHCA, and
AHDA only)
Roofing Felts
(by others)
FIGURE 8B - Curb and Curb Cap Detail
FIGURE 8A (cont'd) - Splicing Detail
(Splicing is
required when the curb sections are two piece.)
COMPONENTS of Roof Curb Packages
Roof curb option selection depends on downturn and/or cooling coil cabinet options
selected with the heating system or blower cabinet. Roof curb option packages include
assembly hardware and four or six factory-assembled curb pieces. Installation hard-
ware and supplies are field-supplied.
5.2 Roof Curb Packages
for Model Series
RPB and RPBL and
Blower Cabinet
Model RBL -
Follow the roof
curb installation
instructions in
Paragraph 5.1.
If there are two side pieces to a side, fasten them with splice plates and hardware as illustrated in the splicing detail
drawing in
FIGURE 8A. Join the corners as illustrated in the corner detail.
3. Check the assembly for squareness. The curb must be adjusted so that the diagonal measurements are equal
within a tolerance of ±1/8” (±3mm).
4. Level the roof curb. To ensure a good weatherproof seal between the unit curb cap and the roof curb, the roof curb
must be leveled in both directions with no twist end to end. Shim as required and secure curb to roof deck before
proceeding with flashing.
5. Install field-supplied flashing.
6. Before placing the unit into position, apply furnished 1/4” x 1-1/4” foam sealant tape to the top surface of the curb,
making good butt joints at corners. The unit must be sealed to the curb to prevent water leakage into the curb area
due to blown rain and capillary action.
Roof Curb Option for Model RBL Blower
Cabinet
Pkg P/N
Curb Side
Assy
Curb Front &
Back Assy
CJ1 - standard cabinet with horizontal
discharge
111944
(2)111940
(2)104657
CJ2 - with downturn plenum AQ5 or AQ8
111381
(2)111385
(2)104657
Roof Curb
Option
for RPB
Series *
Pkg
P/N
Curb Side
Assy
Curb Front &
Back Assy
CJ1 -
blower
and heater
only
125
105215 (2)105221
(2)104652
150, 175
105216 (2)105221
(2)104653
200, 225
105217 (2)105221
(2)104654
250, 300
105218 (2)105221
(2)104655
350
105219 (2)105221
(2)104656
400
105220 (2)105221
(2)104657
CJ2 - with
downturn
plenum
AQ5 or
AQ8
125
104673 (2)104649
(2)104652
150, 175
104674 (2)104649
(2)104653
200, 225
104675 (2)104649
(2)104654
250, 300
104676 (2)104649
(2)104655
350
104677 (2)104649
(2)104656
400
104678 (2)104649
(2)104657
Roof Curb Option
RPBL
Pkg P/N
Curb Side Assy Curb Front & Back Assy
CJ1 - blower and
heater only
400
107251
(2)107257
(2)104657
500, 600
107252
(2)107258
(2)104655
700
107253
(2)107258
(2)104656
800
107254
(2)107258
(2)104657
1050
107255
(2)107259
(2)104656
1200
107256
(2)107259
(2)104657
CJ2 - with
downturn plenum
AQ5 or AQ8
400
107270
(2)107256
(2)104657
500, 600
107271
(2)107257
(2)104655
700
107272
(2)107257
(2)104656
800
107273
(2)107257
(2)104657
1050
107274
(2)107258
(2)104656
1200
107275
(2)107258
(2)104657
*Also applies to these Models with prefix “H”.
Hardware Shipped with the Roof Curb
Corner Hardware & Sealant Tape:
(8) P/N 16247, Cap Screw 5/16"-18x3/4" lg;
(8) P/N 1035, Hex Nut 5/16" - 18;
(8) P/N 16243, Lag Screw 5/16"x1" lg;
(16) P/N 1333, Lockwasher 5/16";
(1) P/N 66302, 1/4"x1-1/4"x50' Sealant Tape
Splicing Plate & Hardware (for curbs with 4
curb side assemblies:
(2) P/N 107260, Splice Plate;
(4) P/N 16243, Lag Screw 5/16"x1" lg;
(16) P/N 1333, Lockwasher 5/16";
(12) P/N 16247, Cap Screw 5/16"-18x3/4" lg;
(12) P/N 1035, Hex Nut 5/16" - 18
- RCB Option - Installation - Roof Curbs Assembly RDB Option - Installation - Roof Curbs Assembly RDC Option - Installation - Roof Curbs Assembly RDCB Option - Installation - Roof Curbs Assembly RDCC Option - Installation - Roof Curbs Assembly RDDB Option - Installation - Roof Curbs Assembly RCC Option - Installation - Roof Curbs Assembly RDDC Option - Installation - Roof Curbs Assembly RECB Option - Installation - Roof Curbs Assembly RECC Option - Installation - Roof Curbs Assembly REDB Option - Installation - Roof Curbs Assembly REDC Option - Installation - Roof Curbs Assembly RDF Option - Installation - Roof Curbs Assembly RDH Option - Installation - Roof Curbs Assembly REH Option - Installation - Roof Curbs Assembly RHH Option - Installation - Roof Curbs Assembly RXH Option - Installation - Roof Curbs Assembly RPB Option - Installation - Roof Curbs Assembly RPBL Option - Installation - Roof Curbs Assembly RPDBL Option - Installation - Roof Curbs Assembly YDSA Option - Installation - Roof Curbs Assembly YDMA Option - Installation - Roof Curbs Assembly YDHA Option - Installation - Roof Curbs Assembly RBL Option - Installation - Roof Curbs Assembly ADF Option - Installation - Roof Curbs Assembly