Models rdh, reh, rhh, and rxh, Typical layout of assembled curb – Reznor ADFH Option - Installation - Roof Curbs Assembly User Manual
Page 21
Form I-OPT-C, P/N 132900 R17, Page 21
Model RHH Configuration * (NOTE: Model RHH requires a roof curb.)
Option Code
RHH
Pkg P/N Curb End (Front & Rear) Assy Curb Side Assy
Model RHH Basic Unit ONLY
CJ8Q
130/180 263910
(2) 261546
(2) 263425
260
263911
(2) 261548
(2) 263425
350
263912
(2) 261549
(2) 263425
Model RHH PLUS 1 optional module - either Downturn Discharge Plenum (AQ5 or
AQ8); OR Mixing Box (MXB1) with horizontal discharge; OR Cooling Coil Cabinet
without Reheat (AU5 or AU6) with horizontal discharge
CJ8R
130/180 263913
(2) 261546
(2) 263426
260
263914
(2) 261548
(2) 263426
350
263915
(2) 261549
(2) 263426
Model RHH PLUS 2 optional modules - either Down Discharge (AQ 5 or AQ8) AND
Mixing Box OR Cooling Coil Cabinet without Reheat (AU 5 or 6); OR Mixing Box
AND Cooling Coil Cabinet without Reheat (AU 5 or 6) with horizontal discharge
CJ8S
130/180 263916
(2) 261546
(2) 263427
260
263917
(2) 261548
(2) 263427
350
263918
(2) 261549
(2) 263427
Model RHH PLUS 3 optional modules - either Down Discharge Plenum (AQ5 or AQ8)
AND Mixing Box (MXB1) AND Cooling Coil Cabinet without Reheat (AU5 or AU6)
CJ8T
130/180 263919
(2) 261546
(2) 263428
260
263920
(2) 261548
(2) 263428
350
263921
(2) 261549
(2) 263428
Model RHH PLUS 1 optional module - Cooling Coil Cabinet with Reheat (AU7) with
horizontal discharge
CJ8U
130/180 263922
(2) 261546
(2) 263429
260
263923
(2) 261548
(2) 263429
350
263924
(2) 261549
(2) 263429
Model RHH PLUS 2 optional modules - Cooling Coil Cabinet with Reheat (AU7)
AND Down Discharge Plenum (AQ5 or AQ8) OR Mixing Box (MXB1) with horizontal
discharge
CJ8V
130/180 263925
(2) 261546
(2) 263430
260
263926
(2) 261548
(2) 263430
350
263927
(2) 261549
(2) 263430
Model RHH PLUS 3 optional modules - Cooling Coil Cabinet with Reheat (AU7) AND
Down Discharge Plenum (AQ5 or AQ8) AND Mixing Box (MXB1)
CJ8W
130/180 263928
(2) 261546
(2) 263431
260
263929
(2) 261548
(2) 263431
350
263930
(2) 261549
(2) 263431
Installation Instructions
for Roof Curbs for
PreevA
®
Models RDH,
REH, RHH, and RXH
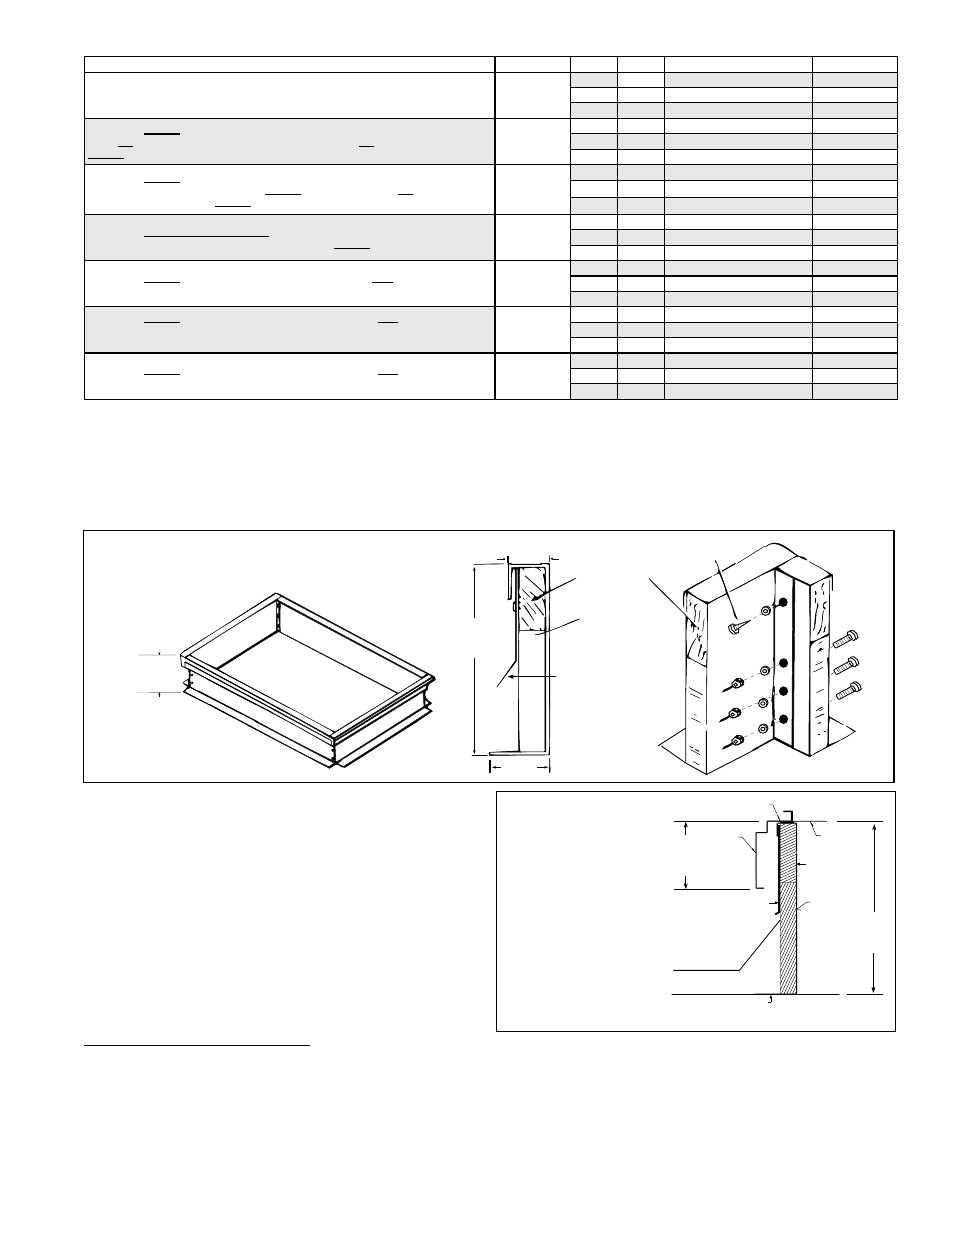
1. Refer to the curb assembly drawings (FIGURE 7A) and the curb drawing and
dimensions (
FIGURE 7B and FIGURE 7C).
2. Position curb end rails and curb side rails as shown in the typical layout and in
FIGURE 7A. Join the corners as illustrated in the corner detail.
3. Check the assembly for squareness. The curb must be adjusted so that the
diagonal measurements are equal within a tolerance of ±1/8” (±3mm).
FIGURE 7A - Curb Assembly for
Models RDH, REH, RHH, and RXH
16
(406mm)
Typical
Layout of
Assembled Curb
16
(406mm)
1-7/8(48mm)
4
(102mm)
2 x 6 Wood
Nailer
1-1/2 x 3 lb
Fiberglass
Flashed by the
installer (flashing
must be under
lip of curb)
Lag Screw
and Washer
Cap
Screws
Curb
Section
Corner Detail
4. Level the roof curb. To ensure a good weatherproof
seal between the unit curb cap and the roof curb, the
roof curb must be leveled in both directions with no
twist end to end. Shim as required and secure curb to
roof deck before proceeding with flashing (See Curb
Detail in
FIGURE 7B).
5. Install field-supplied flashing.
6. Before placing the unit into position, apply furnished
1/4” x 1-1/4” foam sealant tape to the top surface of the
curb, making good butt joints at corners. The unit must
be sealed to the curb to prevent water leakage into the
curb area due to blown rain and capillary action.
Unit
Bottom
MUST be sealed between
curb cap and roof curb
Unit
Base
Wood
Nailer
Insulation
6-1/4
(159mm)
Counter Flashing
(by installer)
Roofing Felts and Cant
Strip (by installer)
Weld, bolt or lag screw curb to deck structure.
16
(406mm)
FIGURE 7B -
Curb and Curb
Cap Detail -
Models RDH,
REH, RHH,
and RXH
IMPORTANT Installation Notes:
Model RHH - The area enclosed by the roof curb MUST be left open.
Models RDH, RXH, REH - The area enclosed by the roof curb must comply with clearance to combustible materials.
If roof is constructed of combustible materials, the area within the curb must be either ventilated, left open, or covered
with non-combustible material which has an "R" value of at least 5.0. If the area within the curb is left open, higher
radiated sound levels may result.
All Models - To minimize sound transfer and prevent air and water leakage, the top surface of the curb MUST be sealed.
- RCB Option - Installation - Roof Curbs Assembly RDB Option - Installation - Roof Curbs Assembly RDC Option - Installation - Roof Curbs Assembly RDCB Option - Installation - Roof Curbs Assembly RDCC Option - Installation - Roof Curbs Assembly RDDB Option - Installation - Roof Curbs Assembly RCC Option - Installation - Roof Curbs Assembly RDDC Option - Installation - Roof Curbs Assembly RECB Option - Installation - Roof Curbs Assembly RECC Option - Installation - Roof Curbs Assembly REDB Option - Installation - Roof Curbs Assembly REDC Option - Installation - Roof Curbs Assembly RDF Option - Installation - Roof Curbs Assembly RDH Option - Installation - Roof Curbs Assembly REH Option - Installation - Roof Curbs Assembly RHH Option - Installation - Roof Curbs Assembly RXH Option - Installation - Roof Curbs Assembly RPB Option - Installation - Roof Curbs Assembly RPBL Option - Installation - Roof Curbs Assembly RPDBL Option - Installation - Roof Curbs Assembly YDSA Option - Installation - Roof Curbs Assembly YDMA Option - Installation - Roof Curbs Assembly YDHA Option - Installation - Roof Curbs Assembly RBL Option - Installation - Roof Curbs Assembly ADF Option - Installation - Roof Curbs Assembly