Elecraft PX3 Owner's Manual User Manual
Page 7
7
The Basics
TAP AND HOLD: Most PX3 switches have two functions, similar to the KX3.Tap (press
briefly) to activate the function labeled on the switch. Hold (press for 1/2 second) activates the
function labeled below the switch. In the text, tap functions are shown like this:
D I S P
while a
hold function is shown like this:
AV E R AG E
. Additional typographical conventions are shown
on the previous page.
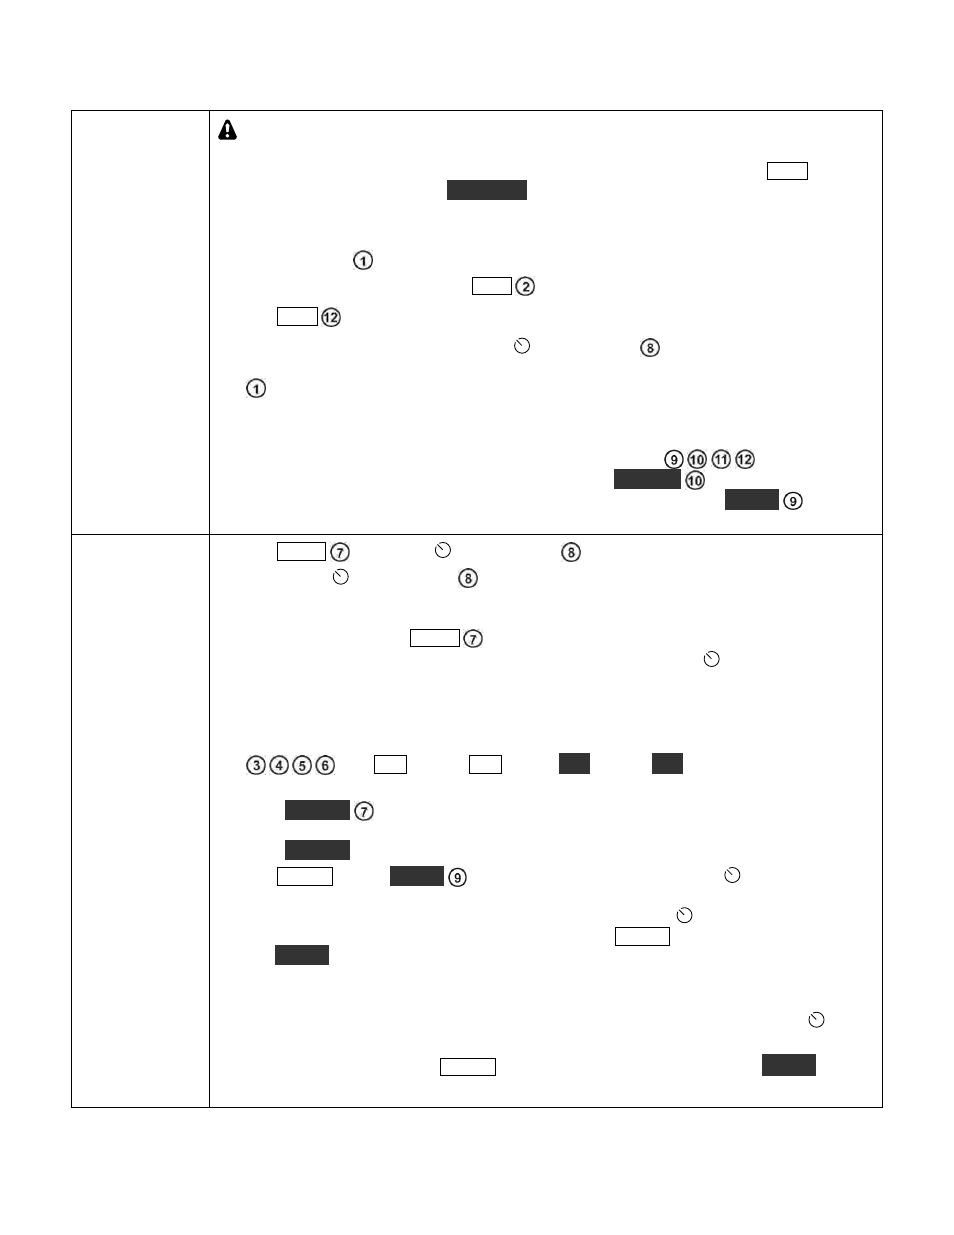
The controls and indicators shown in Figure 1 are identified by the circled numbers in the
following text (e.g.
refers to the display screen).
Apply power to the PX3 and tap
P W R
to turn it on.
Tap
D I S P
to cycle between spectrum and waterfall display modes (Page 15).
Activating many functions enables the
SELECT
knob
so you can adjust the
parameter associated with the function. The current parameter value is shown on the screen
. You can exit and save the parameter by tapping the same key a second time, even for
hold functions.
For hold functions, you can also hold the key a second time to exit parameter-entry mode.
Holding the four keys along the right edge of the front panel
,
,
,
,
a second time
de-activates the function itself. For example, holding
C E N T E R
a second time returns
the display center frequency to the transceiver frequency and holding
M K R B
a second
time turns off marker B.
Other
Features
Tap
M E N U
and use the
SELECT
knob
to scroll through the menu.
Tapping the
SELECT
knob
while the menu is active causes the currently-selected
menu function to execute. For example, select
LCD Brt
from the menu and tap the knob.
The knob now adjusts the brightness of the LCD display backlight. Tap the knob again to
exit the selection or tap
M E N U
to select a different menu item. Some menu items are
toggle functions. Instead of changing the parameter by turning the
SELECT
knob, it
changes automatically whenever the knob is tapped. The new value is displayed briefly
near the top of the spectrum display. Menu items are listed on page 28.
As you become familiar with the menu options, you may find that you want to adjust
certain items frequently. You can assign up to eight menu items to the function keys
,
,
,
. Tap
F N 1
through
F N 4
or hold
F N 5
through
F N 8
to assign the function key
to a menu item while the menu item is displayed.
Hold
L AB E L S
to display the labels you have assigned to the switches (page 15). They
are displayed at the bottom of the screen, just above the function keys (Pages 12 and 13).
Hold
L AB E L S
again to toggle the labels off.
Tap
M K R A
or hold
M K R B
to turn on marker A or B. Rotate the
SELECT
knob to
place the selected marker at a desired frequency on the display. Markers may be used to
measure the frequency of an interesting signal and tapping the
SELECT
knob will QSY
(change the frequency of) the KX3 to that frequency.
M K R A
controls the KX3's VFO A
and
M K R B
controls VFO B. The marker colors match the corresponding VFO cursors to
emphasize the correspondence. Whichever marker is currently selected is the one that
causes the KX3 to QSY (Page 12).
To return from the last QSY to the original frequency ("undo" function), hold the
SELECT
knob pushbutton while the marker is selected.
To turn off the markers, tap
M K R A
while marker A is selected or hold
M K R B
while
marker B is selected.