E-flite PT-19 450 ARF User Manual
Page 37
37
E-flite PT-19 ARF Assembly Manual
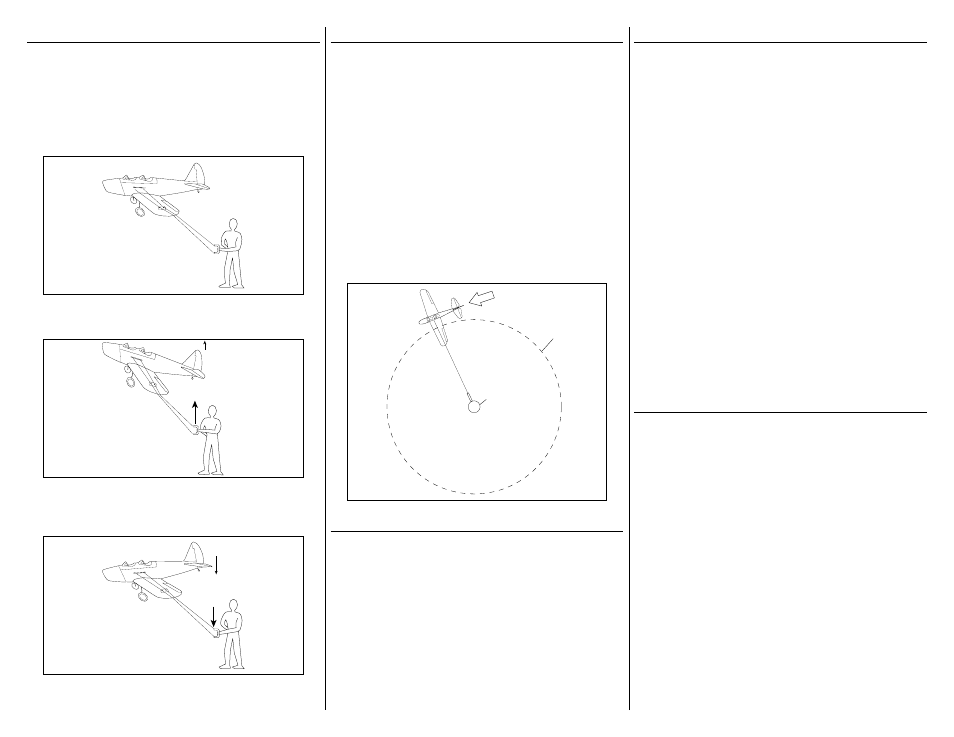
MANEUVERING
Just for refreshers, we want to demonstrate the correct
control technique for control line flying. You will want
to hold the handle straight out from your body and
give control input by moving your arm up and down.
Very slight wrist movements will come into play, but the
major control part is by full arm movement.
To fly level keep your arm straight and horizontal.
Neutral
To climb, move your arm upward which will cause the
elevator to give an up command to the model.
Up
To descend, move your arm downward which will
cause the elevator to give a down command to the
model.
Down
TAKEOFF
With your helper holding the model and the battery
hatch removed, position the plane where the wind is
at the tail of the model for takeoff. Plug the battery
in and wait for the speed control to initialize. Once
complete, have your helper/holder push the button
down on the timer to set the run time for the flight.
Once set, your helper will install the hatch and you are
ready for takeoff. Have your helper hold the model
with the nose pointed slightly outside of the circle. The
pilot should be ready to step back to maintain line
tension immediately following release. Once the model
is rolling along, apply a small amount of up elevator to
have the model rise from the ground. Once in the air,
level off at an altitude of 6–15 feet above the ground.
As you fly, try some simple up and down commands to
get used to your PT-19.
Wind Direction
Pilot
Flight Path
FLYING
During the flight you may wish to perform some basic
aerobatic maneuvers. Using a combination of your
straight arm technique as described earlier and very
small wrist movements, you can begin your maneuvers.
Practice and try one maneuver at a time. Ensure you
place all maneuvers with the wind at your back to
maintain line tension. If during any time of the flight
you notice a decrease in pull from the model, this is
an indication of reduced line tension and the pilot
must step back immediately to regain tension. Failure
to do so may cause you to lose control of your model
possibly resulting in a crash and damage to the model.
LANDING
When the timer is at the end of the flight cycle it will
cycle power very quickly to let you know you have
less than 20 seconds until it shuts down. Once this
occurs, you will want to position the aircraft to a level
flight position approximately 6–10 feet above the
ground. As the motor slows down, gradually descend
to touchdown. Keep in mind the line tension is very
important during this phase of flight. If the model is
flying into the wind (or with the wind in your face)
you may need to step back quickly to maintain line
tension until touchdown. Once you have landed, have
your helper pick up the model and take it back to your
takeoff spot. During this time, try to keep the lines
taut so not to snag them on the ground and cause
any kinks which could fail at a later time. Unplug the
battery and you have completed your flight.
This is where it all started over 75 years ago in the
world of model aviation. If you grew up with a blue
and yellow PT-19 as most of us did, we believe this
model should help you relive some of those great
memories of yesteryear. We hope you enjoy the PT-19
in both Radio Control and Control Line format as much
as we do.
Happy flying!
FIRST FLIGHTS
Remember, it does not take large movements to fly
a control line airplane. For the first couple of flights,
concentrate on keeping your wrist and forearm locked
into a position and move your hand up and down
at the elbow. This will provide the needed amount
of control movement while stabilizing the airplane
and leading to a very successful flight. If you start
by moving your wrist up and down, the airplane will
respond very rapidly and it could result in damage.
Take your time and relearn the skills you used to have
… and you’ll have a blast again!