The kramer rc configuration main window – Kramer Electronics RC-8iR User Manual
Page 29
The Kramer RC Configuration Main Window
25
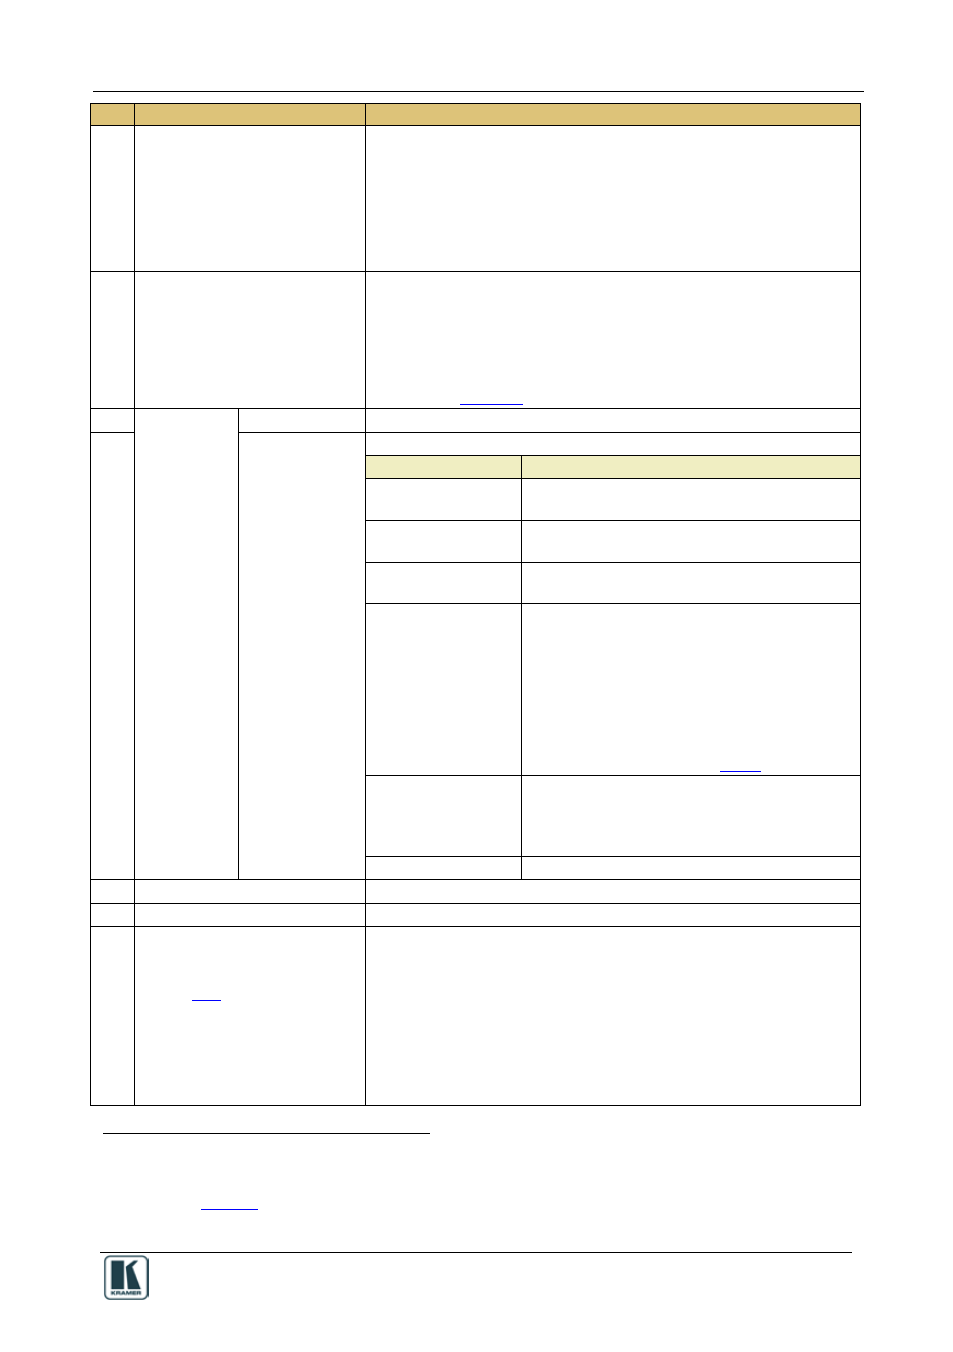
#
Feature
Function
6
Front Panel Tab
Shows the layout of the RC buttons according to the device type
selected, with the labels on the button. Click to Select a button to
configure, modify, read, or delete its macro.
When the button is:
• Blue, it is assigned a macro
• Green, it is selected
• Gray, it is not assigned a macro
7
Event Macros Tab
By default, two event macros are assigned and can have commands
added to them:
Startup – a series of commands to be executed when the machine is
turned on
Inactivity timeout – a series of commands to be executed after a set
amount of inactivity time (during which no button is pressed) has
expired (see
8
Button Area
Label Text Box
Select a button and type the required button label
9
Behavior Drop
Down Box
Assign the button response to press and release actions
Button Definition
Behavior
Activate on Release
(default)
The macro is executed upon releasing the button
Activate while
Pressed
The macro is activated and repeated for as
long as the button is pressed
Hold for 2 seconds
Press and hold the button for 2 seconds to
execute the macro
Toggle 1-2-3-4
Cycling macro behavior:
The button can be assigned with up to 4
different macros. Each time it is pressed, the
next macro in the set will be activated in a cyclic
fashion
, provided the Automatic Advance box
is checked (the default). If the automatic
advance button is not checked, the macros will
advance only as part of a macro sequence in a
different button (see section
Toggle Press-
Release
Dual macro behavior:
One macro is activated when pressing the
button and the other is activated when
releasing the button
Disabled
The button is disabled
10 Write Configuration Button
Press to write the configuration of all the buttons to the device
11 Read Configuration Button
Press to read the configuration of all the buttons from the device
12 Response querying Area
(shows after checking this option
in the configuration menu, see
section
Enabled for RS-232, RS-485 and Ethernet communication
Wait for response Check Box – check for the command to wait for a
response before continuing with the macro
Max. … Seconds– type the response wait timeout in seconds (from
0 to 999 seconds)
Check for specific response Check Box – specify an exact response
to wait for (otherwise any response will do)
If there is no response or the response doesn’t match, the button will
flash and the macro will be aborted
1 The Button area appears only after selecting a button in the Front Panel tab
2 The number of toggle states can be determined (from 1 to 4). The selected number of toggle states appears above the Button
Macro area (see
3 This button is enabled only when a device is connected to the PC. Otherwise it is disabled