Your video matrix switcher – Kramer Electronics VS-3232V User Manual
Page 10
KRAMER: SIMPLE CREATIVE TECHNOLOGY
Your Video Matrix Switcher
6
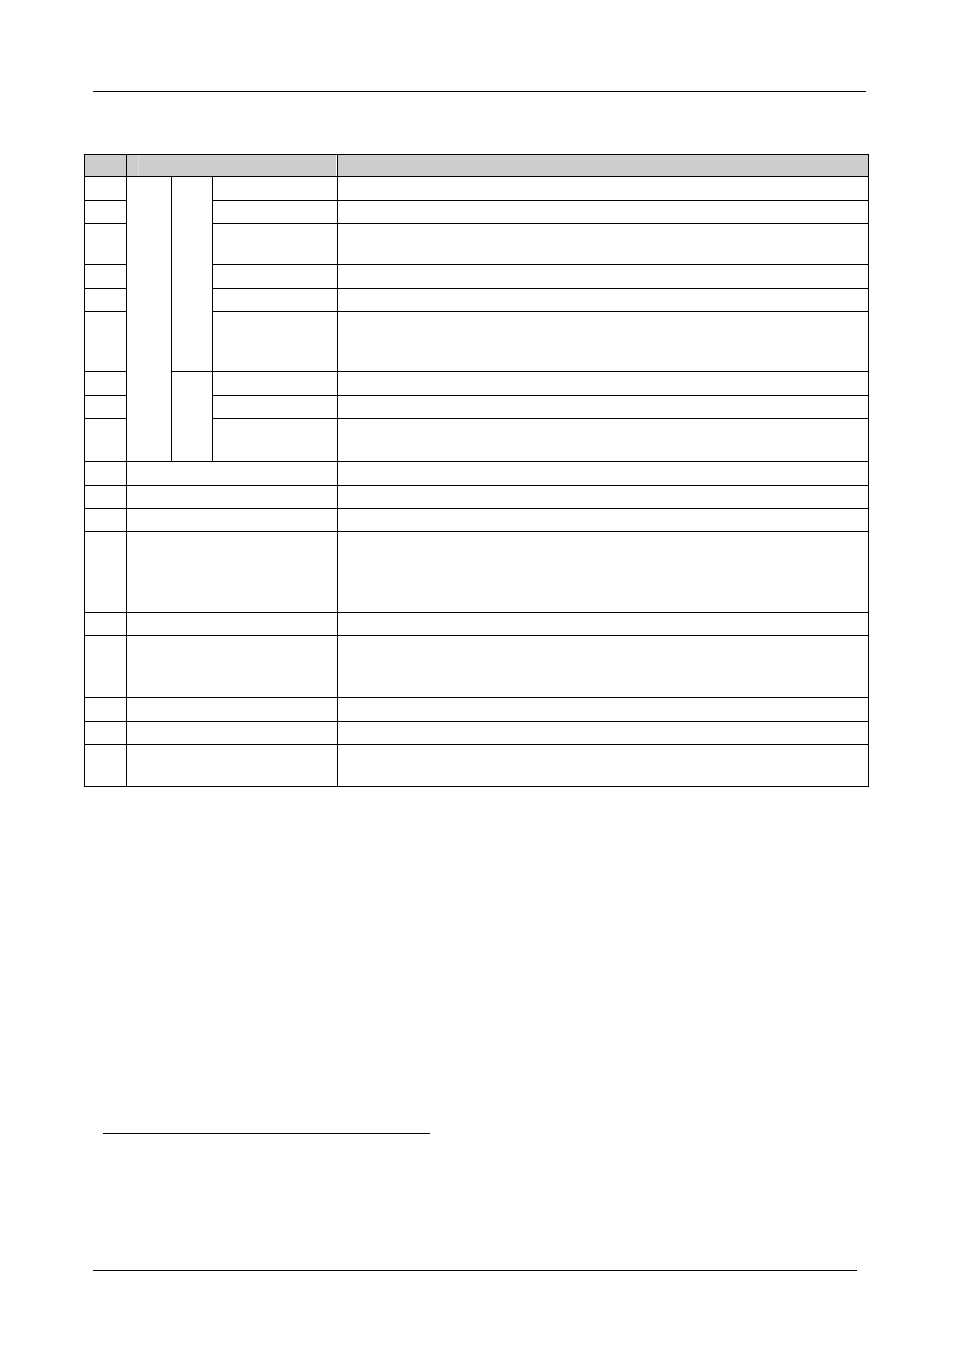
Table 1: Front Panel VS-3232V 32x32 Video Matrix Switcher Features
#
Feature
Function
1
ESC
Press to exit the current operation
2
STO
1
Press to store the current setting in the non-volatile memory
3
ALL
1
Press
ALL
followed by an input number to connect that input to all the
outputs
4
OFF
1
Press OFF followed by an output number to disconnect that output
5
RCL
1
Press to recall a setup from the non-volatile memory
6
M
en
u
B
ut
to
ns
ENT
Press to complete the input-output setup when using a one-digit number
instead of two digits
2
.
Press to enter the options in a setup menu
7
(Forward)
Press to shift the content of the display to the left
3
8
(Backward)
Press to shift the content of the display to the right
3
9
D
ou
bl
e-
fu
nc
tio
n
S
el
ec
to
r B
ut
to
ns
A
re
a
B
ut
to
n
La
be
ls
Digits from
0 to 9
Select the output to which the input is switched and select the input to
switch to the output
10
FOLLOW
Button
Press to enter the Follow mode in the multi-switcher configuration
11
BREAKAWAY
Button
Press to enter the Stand-Alone mode in the multi-switcher configuration
12
DEFAULT SETUP
Button
Press to recall the default setup (UNITY setting), see section 8.5
13
INPUTS/OUTPUTS
LCD
Display
Displays the outputs (in the upper row, below the OUTPUTS label)
switched to the selected inputs (in the lower row, above the INPUTS
label).
Displays user interface messages and configuration menu items
14
LOCK
Button
Toggle
4
to lock/unlock the front panel buttons
15
MENU
Button
Press once to enable the ALL, OFF STO and RCL buttons
Press twice to enter the configuration menu
When in the configuration menu, press to browse through the menu items
16
TAKE
Button
Used to confirm and complete setup and switching
17
Power Switch
Illuminated switch for turning the unit ON or OFF
18
IR Receiver
The red LED is illuminated when receiving signals from the Kramer Infra-
red remote control transmitter
1 This button is enabled and illuminated after pressing the MENU button
2 For example, to enter input 5, you can either press 0, 5 or 5, ENT
3 Since the LCD display is large enough to show only 13 cross-points out of a total of 32
4 Press and hold the LOCK button for about two seconds to toggle