Karcher WPD 100 T AC User Manual
Page 18
-
5
The operator menu comprises the following
functions:
–
Setting time and date.
–
Setting the operating hours.
–
Setting the hygienising parameters for
the automatic hygienisation.
–
Manual triggering of the hygienising
–
Filter rinsing of the Active Pure filter
(AC).
–
Filter rinsing of the Hy Protect filter
(UF).
–
Display of remaining filter life
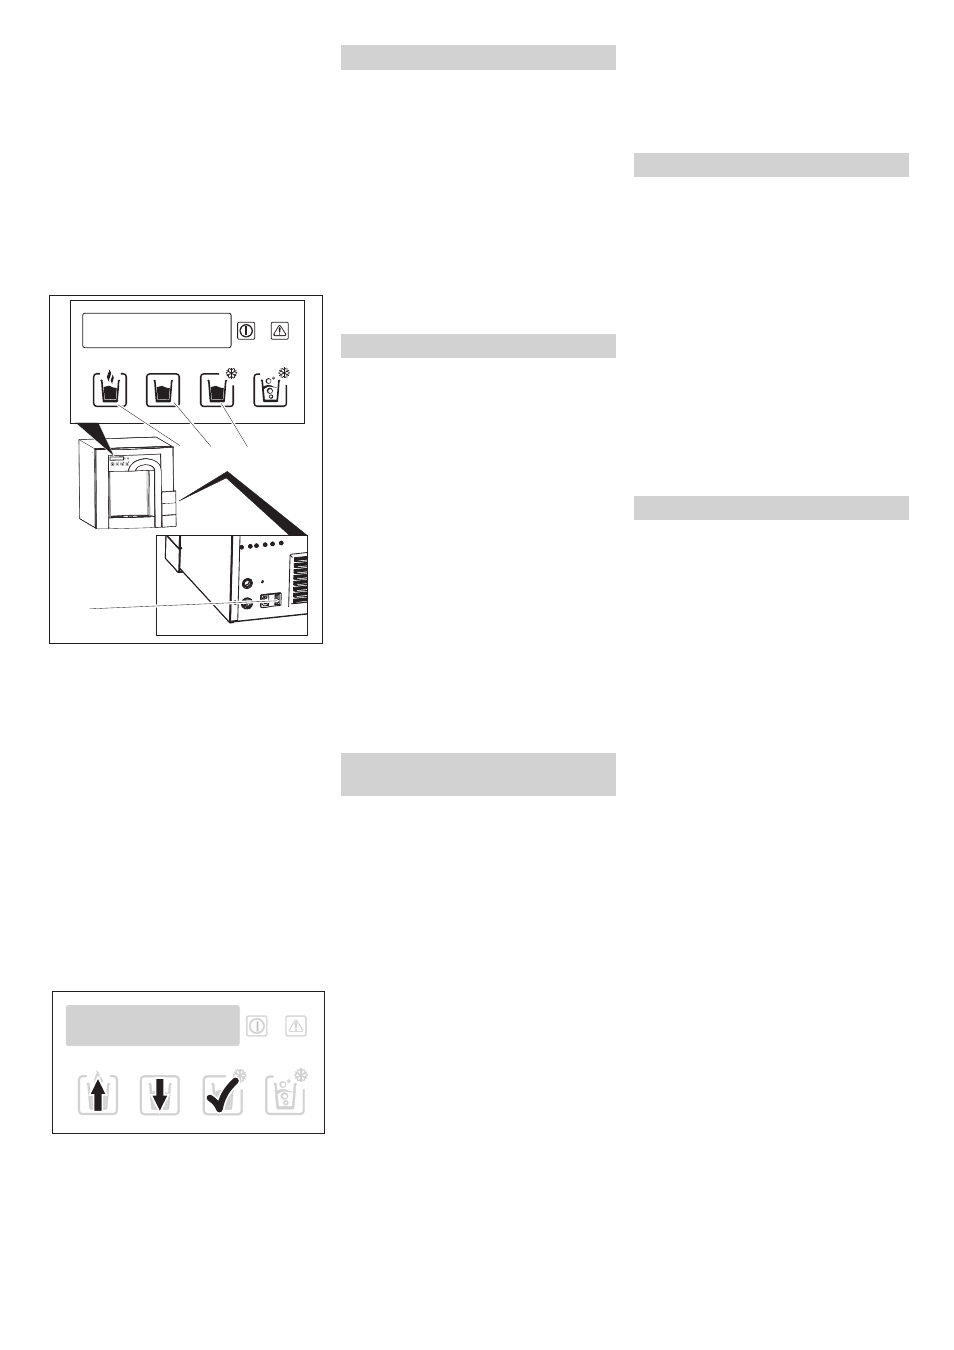
1 Button for hot water *
2 Button for uncooled water
3 Button for cooled water
4 Power switch
* Not visible on the operating panel with ap-
pliances without hot water dispensing, but
still functionable in the operator's menu.
Set the appliance switch to "0".
wait for approx. 5 seconds
Switch the WPD 100 on via the device
switch and press the sensor button to
request cold water within two seconds
(as soon as the display has a blue back-
light). The display switches to the user
menu.
–
Button for hot water: Forward
–
Button for uncooled water: Reverse
–
Button for cooled water: SET
Open the operator menu (see "operator
menu").
After the display "Time/Date" appears,
select the value to be changed with the
button for cooled water.
Set the selected value with the buttons
for uncooled and hot water.
Select the next value with the button for
cooled water and set it with the keys for
uncooled and hot water.
If the menu item "Operating times" is
reached, forward to the end of the oper-
ator menu using the button for hot water
repeatedly.
When the appliance is not operated, it is in
the "power save" mode. No water will be
dispensed while the appliance is in "power
save" mode.
Open the operator menu (see "operator
menu").
Press the button for hot water.
The display shows "Operating times".
Press the button for cooled water.
Search for the tag to be set using the
buttons for uncooled and hot water.
1 = Monday...7 = Sunday.
Activate the time adjustment by press-
ing the button for cooled water.
Select the value to be set with the but-
ton for cooled water and set it with the
keys for uncooled and hot water.
If the menu item "Disinfection" is
reached, forward to the end of the oper-
ator menu using the button for hot water
repeatedly.
Note:
For appliances with automatic rinse, it
makes sense to set the start time of the hy-
gienisation to 3 hours prior to the planned
start of use.
Open the operator menu (see "operator
menu").
Press the button for hot water twice.
Press the button for cooled water to set
the start day and start time.
Select the value to be set with the but-
ton for cooled water and set it with the
keys for uncooled and hot water.
Activate the adjustment by pressing the
button for cooled water.
Press the button for hot water to skip
the setting "Interval".
Note
The hygienisation takes place automatical-
ly in regular intervals. An extension of the
interval set up after consulting the custom-
er for the initial startup is not permitted with-
out the express written approval by
KÄRCHER.
During the hygienising process, the display
shows the condition "Service operat." as
well as the current temperatures. This tem-
perature display is only of importance to the
KÄRCHER service department.
Press the button for hot water to skip
the manual start of the hygienising
process.
or
A manual start of the hygienising is re-
quired after the initial startup, after the ap-
pliance has been out of service for more
than 4 days or after the filter is changed.
Press the button for cold water to skip
the hygienising process.
Press the button for hot water to change
the display "No" to "Yes".
Press the button for cold water to start
the hygienising process.
Note
A manual start of the hygienisation is only
required if an additional hygienisation is
necessary.
The hygienisation process lasts approx. 1
hour. During this time, no water can be dis-
pensed from the appliance.
Caution
Risk of water damage due to splashing wa-
ter. For automatic rinse, properly install the
drip plate and the grid.
Note:
If there is an automatic rinsing and hygeni-
sation (option), the rinsing process will take
place automatically. If the device is
equipped with a dripping pan drain (option),
the wastewater flows directly into the sewer
or the container in the support leg via the
dripping pan. If your device does not have
this option installed, you must execute the
rinsing process as described in the follow-
ing.
After every hygenising procedure, the de-
vice prompts you to rinse: The message
"Flush Program Start" appears on the dis-
play.
Remove the drip pan.
Place the included rinse cup under the
water drain.
To start the rinse process, press the
button for cooled water for 5 seconds.
The display shows: Flush Program Rem.
time xxx s“.
If the rinse cup is full, press the button
"cooled water" to end the dispensing of
water.
Empty the rinse cup and place it back
under the water drain.
Press the button "cooled water" again
to continue the rinsing cycle. Once the
rinse cup is full again, repeat this proce-
dure until the remaining time has
elapsed.
The appliance is initialised automatically
and is ready to operate at that point.
Open operator menu
Button assignment in the operator menu
1
2
3
4
Set time/date
Setting the operating times
Setting the start time for hygienisa-
tion
Manual hygienising
Rinsing after hygienising
18
EN