Lcr 600 setup, Lcr 600 setup overview – Liquid Controls LCR 600 Setup & Op User Manual
Page 22
22
lcr 600 Setup
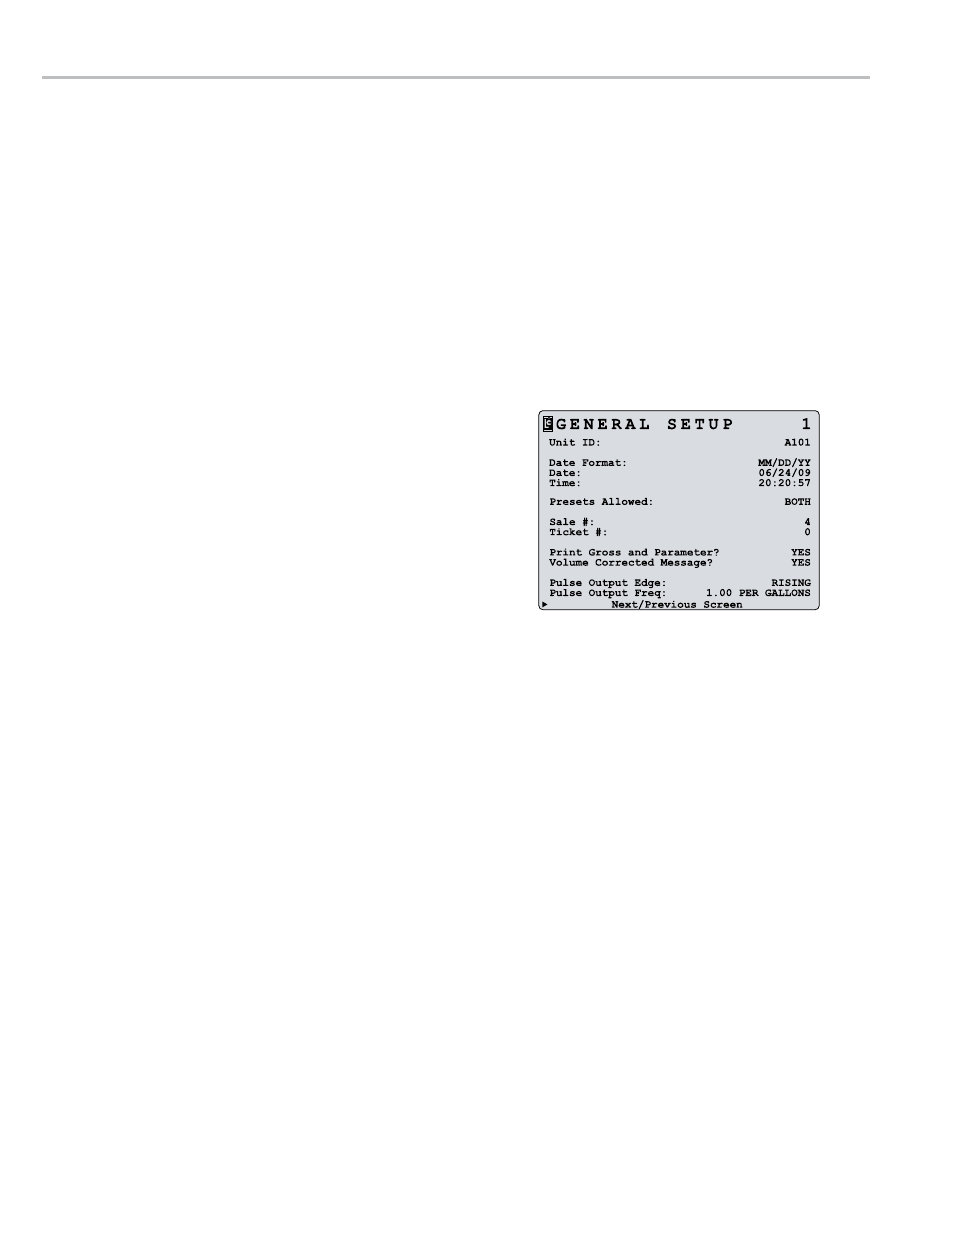
general Setup 1
Unit Id:
(fE)
c - u
A number used to identify the driver, location, or truck
designated to the LCR 600.
date Format:
(LB)
c - u
The format in which the date will be displayed and printed.
MM/DD/YY • DD/MM/YY
date:
(fE)
c - u
The date in the selected date format. Enter two digits for the
day or month, a backslash ( or decimal point), two digits for
the month or day, a backslash, and two digits for the year.
Time:
(fE)
c - u
The time of LCR 600’s internal clock. The time is kept by the LCR 600 and printed on the delivery tickets. Enter the
current hour, minutes, and seconds in military time, for example 13:01:15 for 1:01:15 PM.
Presets Allowed:
(LB)
c - u - l
Limits or allows preset options in the Delivery Screens.
None
disables all presetting
Gross
enables only gross presetting
Net
enables only net presetting
Both
enables gross and net presetting
Sale #:
(fE)
c
The number of transactions processed by the LCR 600. Any number entered in this field will restart the count and
begin at the entered number. 0-999999 range.
Ticket #:
(fE)
c
The number of tickets printed by the LCR 600, including multiple and duplicate tickets. Any number entered will restart
the count and begin at the entered number. 1-999999 range. If a 0 is entered, the ticket # will not print on the delivery
ticket and the value will not increment.
Print Gross and Parameter?
(LB)
c
Determines if the gross volume and compensation parameter—if the product is temperature compensated—is printed
on the ticket.
Volume Corrected Message?
(LB)
c
Determines if the message noting that the delivery volume has been corrected to a base temperature is printed on the
ticket, for example “Gallons corrected to 60.0ºF”
lcr 600 Setup overview
Before using the LCR 600 to deliver fuel, it must be setup to fit its specific application requirements.
a complete lcr 600 Setup Should
1. Configure the LCR 600 to all existing input and output components.
2. Calibrate the meter system for Weights and Measures approval.
3. Enter user information and preferences.
4. Enter all data needed to run the LCR 600 POS upgrade (optional).
The simplest and most comprehensive method of accomplishing these four tasks is to go through each field in each
setup screen and make the necessary changes. Start with the General Setup and move down the Configuration
Menu list through the System Setup, Calibration Setup, and Setup POS screens. The following pages provide an
explanation of each field in these screens, calibration instructions, and instructions for setting up the LCR 600 POS.