Section 15, Pro850 operation – Clear-Com BS850 (Last time buy) User Manual
Page 61
58
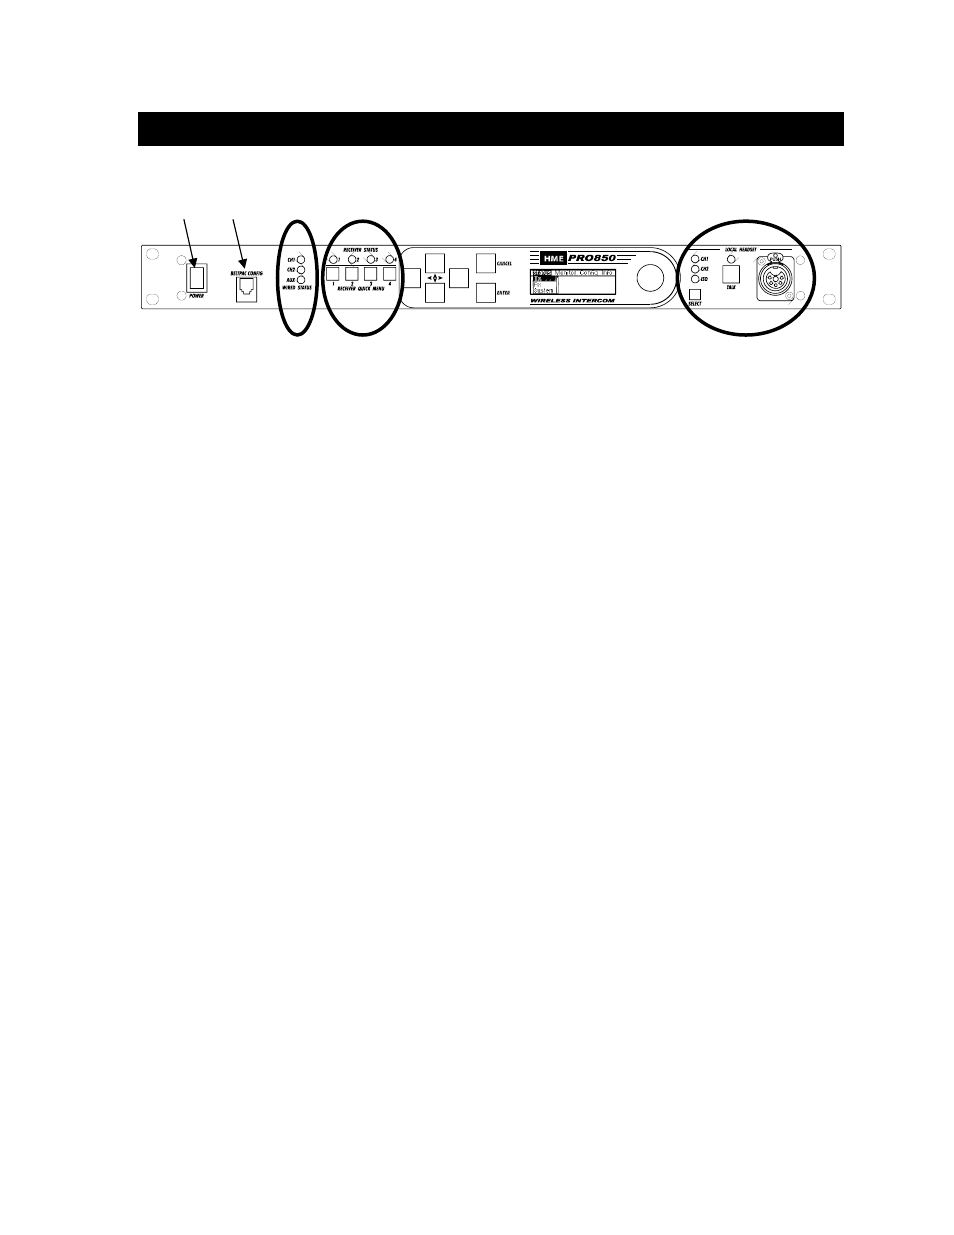
Uses of Base Station Front-Panel Controls, Indicators and Connectors
1. Power
Switch
Press the upper part of the switch to turn the power on. A red light on the switch will be lit when
the base station power is on. Press the lower part of the switch to turn the power off. The red
light will go off.
2. Beltpac Configuration Connector
After Beltpac configuration settings have been made in the base station, plug one end of the
enclosed RJ10 interconnect cable into this connector, and plug the other end into the RMT
receptacle on the bottom of a Beltpac to upload the settings into the Beltpac. Repeat this to
upload settings for each Beltpac to be used. CAUTION: Be sure not to turn the Beltpac power
off and on again while it is connected to the base station. If this does happen, unplug the cable
and cycle the Beltpac power again.
3. Wired Status Indicator Lights
CH1
and CH2 lights:
If a 4-wire intercom channel is enabled, the respective CH1/CH2 light will blink when the
PRO850 is sending audio on that intercom line.
If a 2-wire interface channel is enabled, the respective CH1/CH2 light will be on steady when
the user is not talking. When the user is talking, the light will be on steady and blinking off.
Aux
light:
The Auxiliary light indicates use of the ISO+ mode. When ISO+ is on, the AUX light will be on
steady. When someone is talking on the ISO channel, the light will be on steady, blinking off.
4. Receiver Status Indicators and Buttons
RECEIVER STATUS
lights 1 – 4:
Steady red
if the respective receiver squelch is turned down, or if it is receiving a signal
(squelch is open).
Blinking
amber
when the respective receiver is receiving status update from a Beltpac.
Steady
green
when the Beltpac user is talking through the receiver.
Blinking red or green
if the Beltpac being received has a low battery condition.
RECEIVER QUICK MENU
buttons 1 – 4:
When pressed, squelch and audio controls for the respective receiver are provided immediately
on the display screen.
5. Local Headset Connector and Controls
Plug your local headset connector into the receptacle at the right end of the PRO850 front panel.
Use the SELECT button to choose communication channels CH1, CH2, CH1 and CH2 together,
or ISO. The respective indicator light above the button will remain lit for the selection you make.
Press and release the TALK button quickly to “latch on” for open communication. Press and
release the button again quickly to “latch off.”
Press and hold the TALK button for more than one second for momentary communication. In this
mode, the selected channel will remain open only as long as you are pressing the TALK button.
SECTION 15. PRO850 OPERATION
1 2 3 4
5