2 – names and functions of parts, Top panel – Teac DR-44WL Reference Manual User Manual
Page 6
6
TASCAM DR-44WL
2 – Names and functions of parts
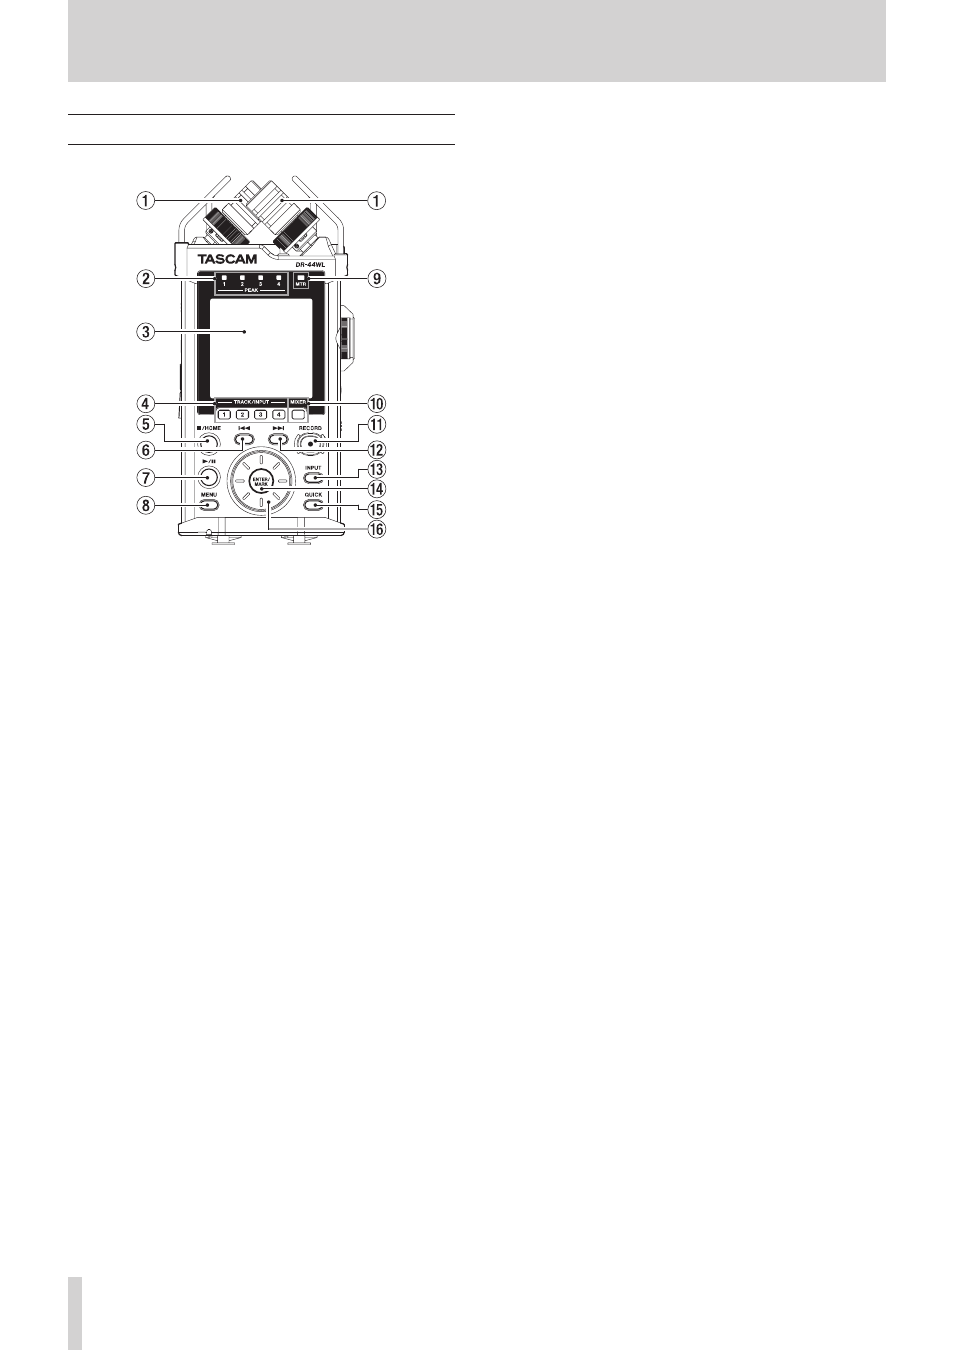
Top panel
1
Built-in stereo microphone
This is a directional stereo and electret condenser micro-
phone.
2
PEAK indicator
Lights (red) when the input volume is too high (−2 dB).
3
Display
Displays a variety of information.
4
TRACK/INPUT button
During recording standby (4 CH mode) or when stopped
(MTR mode), press this button to select the channel (track)
to record.
When the
INPUT
LEVEL
setting screen pops up, press
this button to select the channel (track) for adjusting the
input level.
When the
INPUT
SETTING
screen is displayed, press
this button to show the track for setting.
5
8/HOME button
If you want to pause, press the button again.
Press this button during pause time to return to the
beginning of the file.
Press this button during recording or recording standby to
cause the recording to stop.
To return to the Home screen, press this button in any screen
display. Use this button to select “NO” to a confirmation
message.
6
. button
During playback or when stopped in the middle of a file,
press to return to the beginning of the file.
When the IN and OUT points are set between the current
position and the end of the playback file, pressing this
button skips to those points.
If you press this button when a track is stopped at its
beginning, the unit will skip to the beginning of the previous
track.
Press and hold this button to search backwards.
Press this button while pressing and holding the ENTER/
MARK button to return to the previous mark.
On the setting screens, use this button to move the cursor
left.
On the
BROWSE
screen, press this button to move up a
level.
7
7/9 button
To start playback in the Home screen, press this button while
in stop mode.
If you want to pause, press the button again.
When a file or folder is selected on the
BROWSE
screen,
press this button to return to the Home screen and play the
file or the first file in the folder from the beginning.
8
MENU button
When the Home screen is displayed, press this button to
open the
MENU
screen.
Press this button to return to the
MENU
screen from the
various setting screens.
9
MTR indicator
Lights up when the operation mode is in MTR mode.
0
MIXER button
Press this button to open the
MIXER
screen.
When the
MIXER
screen is open, press this button to
return to the Home screen.
q
RECORD button/REC indicator
When you press this button during stop mode, the REC
indicator flashes and the DR-44WL will go into recording
standby mode.
When you press this button during the recording standby
mode, the REC indicator lights and the DR-44WL starts
recording.
When you press this button during recording, the REC
indicator flashes.
When in MTR mode, stopped or playing back, press this
button to start recording.
w
/ Fast forward button
Press this button in playback or stop mode to skip to the
next track.
When the IN and OUT points are set between the current
position and the end of the playback file, pressing this
button skips to those points.
Press and hold this button for fast forward search.
On the setting screens, use this button to move the cursor
right.
Press this button while pressing and holding the ENTER/
MARK button to move forward to the next mark.
On the
BROWSE
screen, press this button to move down
a level. If a file is selected, the file is loaded and the unit
returns to the Home screen.
e
INPUT button
Press this button to open the
INPUT
SETTING
screen.
When the
INPUT
SETTING
screen is open, press this
button to return to the Home screen.
r
ENTER/MARK button
Use this button to confirm selections or select “YES” to a
confirmation message.
Press this button during recording to add a mark manually.
(see “Manual cue marking during recording” on page 26)
While pressing and holding this button during playback,
press the . button to return to the previous mark or
press the / button to move forward to the next mark.
(see “Moving to the cue mark position” on page 27)
When the
PLAY
FUNCTION
screen is open, use this
button to set the IN (start) and OUT (end) points of the
interval that you want to set for loop playback. When the IN
(start) and OUT (end) points are already set, press this button
to clear the IN and OUT points.