Procedure for dehydrating the system, Start-up procedures initial check, Installation – Carrier 30HH User Manual
Page 18
Attention! The text in this document has been recognized automatically. To view the original document, you can use the "Original mode".
INSTALLATION
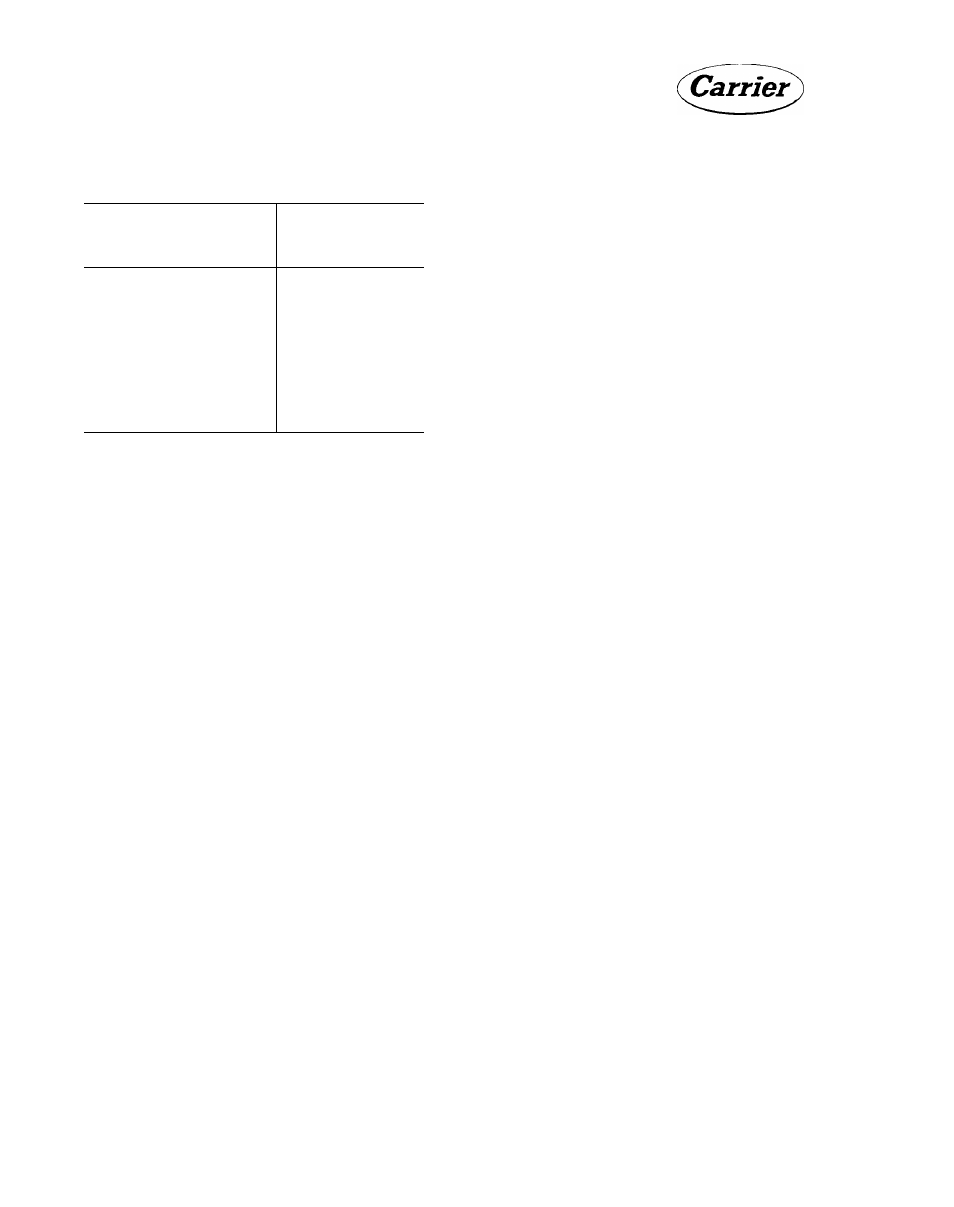
Table 7 - Vapor Pressures of Water
Temperature, degrees F
Observed on Vacuum
indicator
Absolute
Pressure
Inches of Mercury
70
0.739
60
0.522
55
0.436
50
0.363
45
0.300
40
0.248
35
0.204
32
0.180
NOTE:
To determine the vacuum in inches of
mercury
subtract
the
absolute
pressure
from the barometer reading.
seal of the indicator is not designed to support
a long run of connecting tubes. Fasten the tubes
to supports to prevent damage.
Use
only
distilled
water
in
the
indicator.
Be
sure the wick is clean. Oil or dirt on the wick
causes
erroneous
readings.
To
prevent
loss
of
oil
from
the
vacuum
pump
and
contamination
of the indicator;
1.
install a shut-off valve in the suction line at
the vacuum pump.
2.
Install a shut-off valve in the suction line at
the vacuum indicator.
3.
When shutting off the pump, close the indi
cator valve, the pump valve and turn off the
pump in that sequence.
Procedure for Dehydrating the System
1.
Connect the pump and vacuum indicator to
the system. Put a ’’jumper" line between the
high and low side so that the pump will draw
a vacuum on all portions of the system. Open
the
compressor
shut-off
valves.
Start
the
pump.
2.
Open the indicator connection shut-off valve
occasionally
and
take
a
reading.
Keep
the
valve open at least three minutes for each
reading. (Keep the valve closed at all other
times to decrease the amount of water the
pump
must
handle
and
hasten
dehydration.)
When the pressure in the system drops to a
value corresponding to the vapor pressure of
the
water
in
the
indicator,
the
temperature
will start to drop. In the example shown in
Fig.
25,
the
ambient
temperature
and
the
temperature of the water in the indicator is
60 F. Starting at 60 F and 0 time the temper
ature of the water in the indicator remains
at 60 F until the pressure in the system is
pulled down to the pressure corresponding to
the saturation temperature of the water (60 F).
At this point the moisture in the system will
start
to
boil.
The
temperature
drops
slowly
until the free moisture is removed (35 F).
Dehydration is nearly completed at this point
provided
the
ambient
temperature
remains
at 60 F or higher. If the ambient temperature
were lower than 60 F ice might form before
moisture removal is complete.
3.
Continue the dehydrating operation until the
vacuum indicator shows a reading of 35 F
which
corresponds
to
a
pressure
of
0.204”
Hg absolute. This may take several hours. It
may be advantageous to run the pump all
night.
4.
With the pump still running, open the system
at a point furthest from the pump and admit
air thru the drier. Close system and repeat
steps 2 and 3. Vapor left in the system is
thus
greatly
diluted
and
almost
completely
removed by double dehydration.
5.
After evacuation, turn off the pump suction
valve
and
break
the
vacuum
by
admitting
refrigerant.
START-UP PROCEDURES
initial Check
Do not attempt to start the ЗОНЫ and HJ Liquid
Chiller
even
momentarily
until
the
following
steps have been completed.
1.
Check all auxiliary components of the instal
lation
such
as
chilled
liquid
circulating
pump, cooling tower if used, air handling
equipment, or other equipment to which the
chiller supplies liquid. Consult the manufac
turer's instructions.
2.
Check safety thermostat. See "Safety Ther
mostat
Adjustment"
under
"CHECKING
THE CONTROLS."
3.
Backseat (open) the compressor suction and
discharge shut-off valves. Close the valves
18