Top Flite TOPA0700 User Manual
Page 30
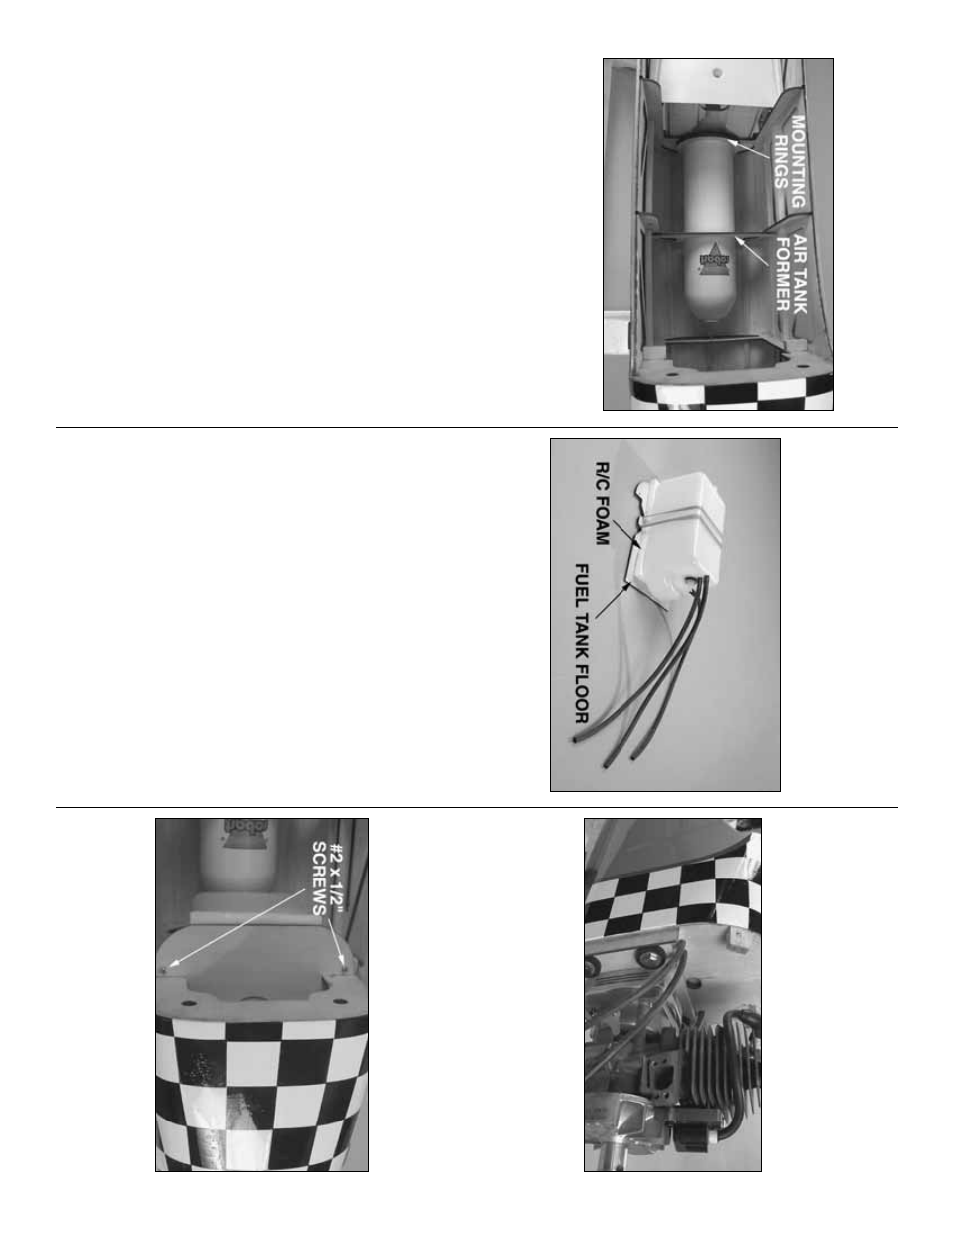
Install the air tank
Ref
er to this photo while installing the air tank.
❏
R1.
Glue together the tw
o 1/8" x 3-3/8" [3 x 85mm]
O
.D
.
plyw
ood
air tank mounting rings
.
Glue the r
ings
to the r
ing that’
s
par
t of the instr
ument panel f
o
rmer
.
❏
R2.
There should be tw
o pieces of air line
remaining that are appro
ximately 24" [610mm] long.
Connect one of the pieces to the air tank.
Slip the
1/8" [3mm] plyw
ood
air tank f
ormer
around the air
tank, then place the assemb
ly in the fuselage
.
Use
medium CA to per
manently glue the air tank f
o
rmer
to
F-3
as sho
wn, or if y
ou pref
er to mak
e the air tank
remo
v
a
b
le
, use #2 scre
ws (not included) to hold the
air tank f
o
rmer to F-3.
❏
R3.
Use a f
e
w dabs of R
TV silicone or epo
xy to
glue the air tank into position.
Install the fuel tank
Note:
The included Great Planes 32 oz.
[960cc] fuel
tank is suitab
le f
or both gasoline and glo
w fuel.
Ref
er to this photo while preparing the fuel tank.
❏
1.
Assemb
le the fuel tank using the hardw
are and
included fuel-pic
kup line that goes inside the tank.
Be
cer
tain the clunk cannot contact the bac
k of the tank.
Otherwise
, it ma
y become stuc
k abo
v
e
the fuel le
v
e
l
and discontin
ue fuel flo
w causing the engine to quit.
Note:
The fuel tank setup in the man
ual uses three
lines
.
T
he line connected to the fuel pic
k
up in the tank
goes to the carb
uretor
.The line connected to the fitting
on the top of the tank is f
o
r fueling and defueling.
The
line connected to the middle fitting on the tank (which
m
ust be dr
illed out with a 5/64" [2mm] dr
ill) is the v
ent
line
.
A
three-line setup eliminates the requirement f
or a
fuel filler v
alv
e
.
If y
ou pref
er to use a filler v
alv
e
, a tw
o-
line setup ma
y be used.
❏
2.
Dr
ill 3/32" [2.4mm] holes through the mar
k
s
near the aft edge of the plyw
ood
fuel tank floor
.
Use
tw
o #64 r
u
b
ber bands to hold the fuel tank to the fuel
tank floor with a sheet of 1/4" or 1/2" [6 or 13mm] R/C
foam in betw
een.
❏
3.
Connect the e
x
ter
nal fuel lines to the tank—use
silicone fuel line f
o
r glo
w
engines and use neoprene
fuel line f
or gasoline engines
.
Lea
v
e
the lines e
xtr
a
long so that the
y can be guided through the fire
w
all.
The lines will be cut to the correct length later
.
❏
4.
Dr
ill holes through the fire
w
a
ll f
or the fuel lines
.
The siz
e of the holes will depend on the siz
e of the
fuel line y
ou are using.
Be cer
tain to dr
ill the holes so
that the lines will not interf
ere with the engine or
engine mount and so the
y will not become kink
ed
behind the fire
w
all.
❏
5.
Fit the fuel tank with the fuel tank floor in the
fuselage while guiding the fuel lines through the holes
.
Note that the
fr
ont
of the fuel tank k
e
ys into the
gr
oo
ve
betw
een the balsa stic
ks on the bac
k of the fire
w
all.
❏
6.
While y
ou still remember
, wr
ite the name of
each fuel line (“carb
,”
“v
ent,
”
“fueling,
”) on the fire
w
all
near the hole where the line comes out.
This w
a
y
y
ou’ll kno
w where the lines go when it’
s time to
connect them.
❏
7.
Using the holes near the aft end of the fuel tank
floor as a guide
, dr
ill 1/16" [1.6mm] holes through the
small hardw
ood b
loc
ks that suppor
t the rear of the
floor
.
F
asten the floor to the b
loc
ks with tw
o #2 x 1/2"
[13mm] scre
ws and #2 w
ashers
.
- 30
-