Top Flite TOPA0700 User Manual
Page 12
❏❏
14.
Place the hatch co
v
ers with the ser
v
os in
the wing.
Be cer
tain the hatch co
v
ers are positioned
correctly as sho
wn in the photos bac
k at step 5.
Dr
ill
six 1/16" [1.6mm] e
v
enly spaced holes through the
hatch co
v
ers into the wing.
Enlarge the holes
in the
hatc
h co
ver
s onl
y
with a 3/32" [2.4mm] dr
ill.
❏❏
15.
Connect a 24" [610mm] ser
v
o
e
xtension
wire to the aileron ser
v
o
.
Cut one of the pieces of 3"
[75mm] heat shr
ink tubing supplied with this kit in
half
.
Slip the tubing o
v
er the connection betw
een the
ser
v
o
and the e
xtension wire
, then carefully shr
ink
the tubing b
y
heating with a heat gun.
❏❏
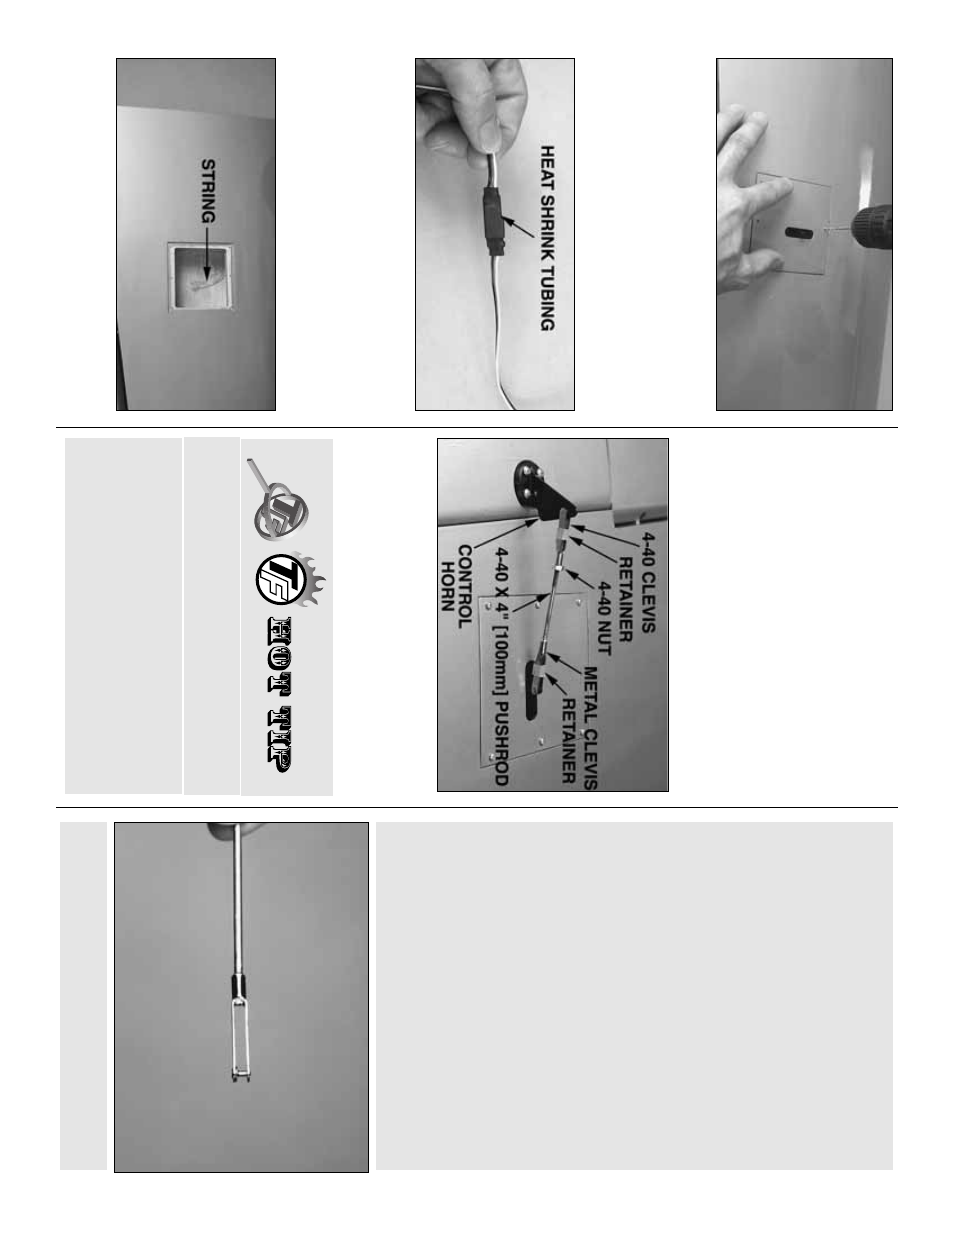
16.
Use the str
ing in the wing to pull the aileron
wire through the wing.
Mount the aileron hatch with
six #2 x 3/8" [9.5mm] scre
ws
.
❏❏
17.
Guide the flap ser
v
o
wire through the wing
alongside the aileron ser
v
o
wire
.
M
ount the flap
hatch with six more #2 x 3/8" [9.5mm] scre
ws
.
❏
18.
Mount the aileron and flap ser
v
os and hatches
in the r
ight wing the same w
a
y.
Hook up the ser
v
o
s
Do the left ailer
on fir
st.
❏❏
1.
Ref
err
ing to the photo abo
v
e
, cut the
ailer
o
n
pushr
od
to the correct length, then solder it to a
large
, non-threaded metal cle
vis using the
techniques descr
ibed in the f
ollo
wing
Hot Tip
.
This is what a proper
ly soldered cle
vis looks lik
e—
shin
y solder with good flo
w
, no b
lobs
, flux remo
ved.
2.
Apply a f
e
w drops of solder
ing flux to the end
of the pushrod, then use a solder
ing iron or a
torch to heat it.
“Tin”
the heated area with
silver solder
(GPMR8070) b
y
applying the
solder to the end.
The heat of the pushrod
should melt the solder—not the flame of the
torch or solder
ing iron—thus allo
wing the
solder to flo
w
.
The end of the wire should be
coated with solder all the w
a
y around.
3.
Place the cle
vis on the end of the pushrod.
Add
another drop of flux, then heat and add solder
.
The same as bef
ore
, the heat of the par
ts
being soldered should melt the solder
, thus
allo
wing it to flo
w
.
Allo
w the joint to cool
natur
ally without disturbing.
A
v
oid e
xcess
b
lobs
, b
ut mak
e
cer
tain the joint is thoroughly
soldered.
The solder should be shin
y,
not
rough.
If necessar
y,
reheat the joint and allo
w
to cool.
4.
Immediately after the solder has solidified, b
u
t
while it is still hot, use a cloth to quic
kly wipe
off the flux bef
ore it hardens
.
Impor
tant:
After
the joint cools
, coat with oil to pre
v
ent r
ust.
Note:
Do not use the acid flux that comes with
silv
er solder f
o
r electr
ical solder
ing.
1.
Use denatured alcohol or other solv
ent to
thoroughly clean the pushrod.
Roughen the
end of the pushrod with coarse sandpaper
where it is to be soldered.
HO
W T
O
SOLDER
- 12
-