Install the flap controls – Top Flite TOPA0410 User Manual
Page 42
- 42 -
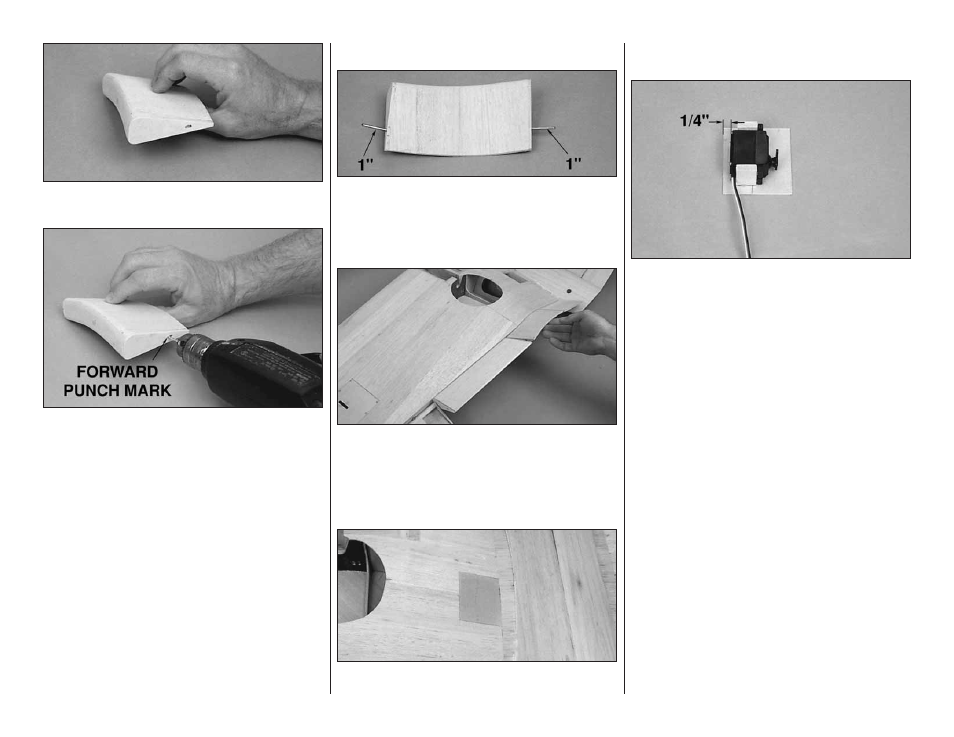
❏ ❏ 11. Use a sanding bar to sand the LE and flap skins
flush with the plywood flap ends.
❏ ❏ 12. Drill a 3/32" [2.4mm] hole through the flap end
ribs and flap torque rod blocks using the previously drilled
holes as a guide.
❏ ❏ 13. Install the hinges in the middle flap and wing as
previously done with the inboard and outboard flaps.
❏ ❏ 14. Temporarily install the middle flap on the wing.
Rotate the middle flap down noting where the flap LE
interferes with the wing TE ( between the hinges). The flap
LE will need to be rounded more in this area to clear the TE.
❏ ❏ 15. With all three flaps temporarily installed tightly
against the TE of the wing, sand the TE of the flaps so
that they are aligned. The middle flap will be slightly
curved at the TE.
❏ 16. Return to step 1 of Build The Middle Flaps and
build the other middle flap.
INSTALL THE FLAP CONTROLS
❏ ❏ 1. Cut 4" [101.6mm] from the non-threaded end of
two 4-40 x 12" [304.8mm] threaded pushrods. Cut both
4" [101.6mm] pushrods in half. Temporarily install a 2"
[50.8mm] flap torque rod in each end of the middle flap.
The rods should protrude out approximately 1" [25.4mm]
at both ends of the flap.
❏ ❏ 2. Assemble all three flaps with the flap torque rods
inserted into the slots of the inboard and outboard flap
slots. Temporarily install the assembly on the wing. Slowly
lower the flaps, checking that the flaps do not pull away
from the TE of the wing. If they do, you may need to
increase the radius on the LE of the flaps or enlarge the
slot in the inboard and outboard flaps.
❏ ❏ 3. Position the die-cut 1/16" [1.6mm] plywood flap
servo hatch in position on the bottom wing skin. Trace the
outline of the hatch onto the wing skin and carefully cut
out the bay, fitting the hatch into place.
❏ ❏ 4. Position the flap servo on the hatch so that the
bottom of the servo is 1/4" [6.4mm] from the edge of the
hatch. Drill several 1/16" [1.6mm] holes approximately
3/16" [4.8mm] deep into one end of the 5/16" x 3/4" x 7/8"
basswood servo mounting blocks. Roughen the servo
hatch where the mounting block will be attached. Apply
30-minute epoxy to the end of the mounting blocks,
making sure to pack epoxy into the 1/16" [1.6mm] holes.
Clamp the blocks to the hatch until the epoxy cures.
Important: Since both flap servo arms must move in the
same direction, when assembling the second flap servo
hatch, make sure the servo is mounted on the same side
of the hatch as the first one.
❏ ❏ 5. After the epoxy cures, drill a 1/16" [1.6mm] pilot
hole through the hatch into the center of each servo
mounting block. Countersink the holes in the flap servo
hatch. Secure each block to the hatch with #2 x 3/8" flat
head sheet metal screws.
❏ ❏ 6. Insert a 1/32" (.8mm] or 1/16" [1.6mm] temporary
shim between the servo and the plywood hatch. Drill 1/16"
[1.6mm] pilot holes and mount the servo to the mounting
blocks. Remove the shim and mark the top of the hatch in
line with the servo arm.
❏ ❏ 7. Tape the flap servo hatch in position and drill 1/16"
[1.6mm] pilot holes in each corner of the hatch and into
the hatch rails. Remove the hatch and countersink the
holes in the hatch for #2 x 3/8" flat head sheet metal
screws. Secure the hatch to the hatch rails with #2 x 3/8"
flat head sheet metal screws.