Top Flite TOPA0410 User Manual
Page 18
- 18 -
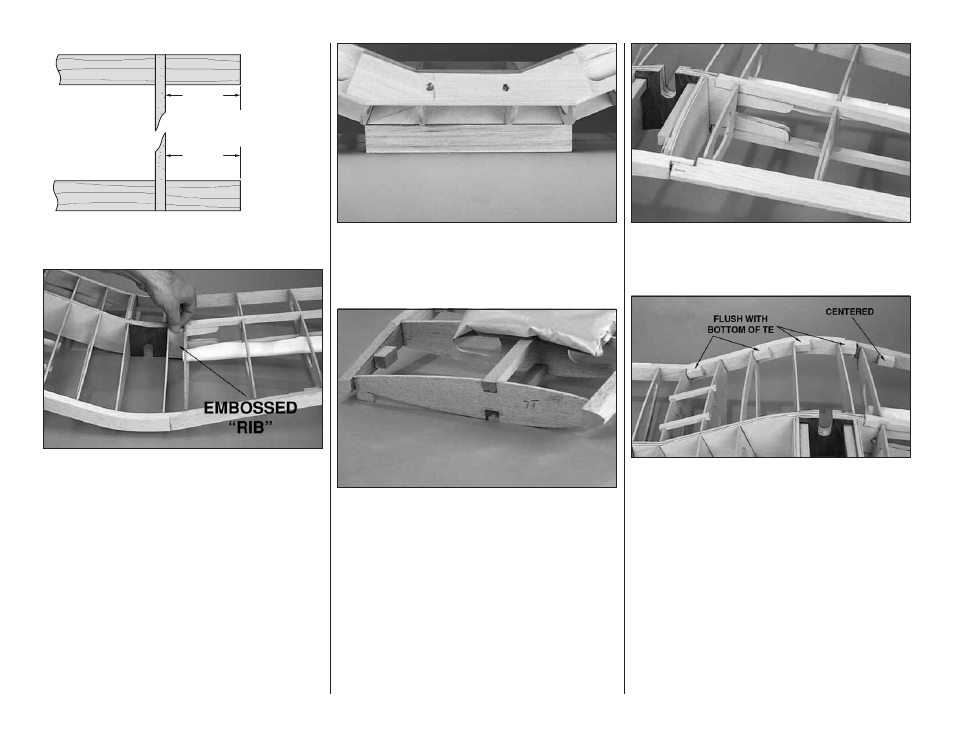
15/16"
[23.8mm]
15/16"
[23.8mm]
Rib T-1
Top Spar
Bottom Spar
❏ ❏ 4. On the wing tip panel, trim both the top and bottom
spar 15/16" [23.8mm] from rib T-1.
❏ ❏ 5. With the embossed “tip” away from the rib, position
the die-cut 1/8" [3.2mm] plywood wing spacer, next to
the center main spar, against the center section rib R-1.
Slide the wing tip panel onto the center main spar. You
want the wing tip panel and wing center section to both fit
against the spacer. You will need to notch the LE and TE
of the wing center section to fit into the notches in the
wing tip panel LE and TE. The spar in the tip panel may
also need to be trimmed slightly. Sight down the tip panel
spar checking for alignment with the center main spar. If it
is not aligned, trim the LE or TE notches slightly, checking
the alignment often. Important: Remove only small
amounts of wood when trimming. If you remove too much,
it’s impossible to put it back.
❏ 6. Return to step 2 and fit the other wing tip panel to the
wing center section.
❏ 7. Place the wing upside down on your building table
with the 7/8" x 1-1/4" x 9-1/2" balsa dihedral jig block
under the center section, so that the center section is 7/8"
from the building board.
❏ 8. Apply weights to the wing tips so that the T-7 jig tabs
and spar tips are against the building table. Align the LE
and TE joints trimming if needed to relieve any stresses.
Make sure the center main spar and tip panel spars are
aligned.
❏ 9. Tack glue the TE and spar joints with CA.
❏ 10. Remove the wing tip weights and look at the entire
wing. Make sure there are no twists in the wing. If there
are any problems, pop loose the wing joints and realign
them.
❏ 11. Pop the tacked glue joints loose and apply
30-minute epoxy to all the joints between the wing center
section and wing tip panels. Use clamps to hold the joints
tight at the spar and T-pins to hold the LE and TE together.
❏ 12. Install the 1/2" x 1/2" balsa hinge point
reinforcement blocks at the locations shown on the wing
plan. The hinge blocks should be flush with the bottom of
the TE along the flaps.
❏ 13. Mark the hinge block locations on the aft edge of
the TE to make it easier finding them after the wing
is sheeted.
❏ 14. Sand the top and bottom of the wing even. Any high
spots will cause you to sand through the wing skins after
they are applied. It is important to have an even structure
if you want a smooth skin. Important: Do not remove the
jig tab on rib T-7 until after the bottom of the wing tip panel
is skinned.
❏ 15. Sand the center section LE and TE to blend with the
outer wing panels.
❏ 16. Sand the LE and TE’s to blend them into the ribs.