Build the outboard flaps – Top Flite TOPA0410 User Manual
Page 38
- 38 -
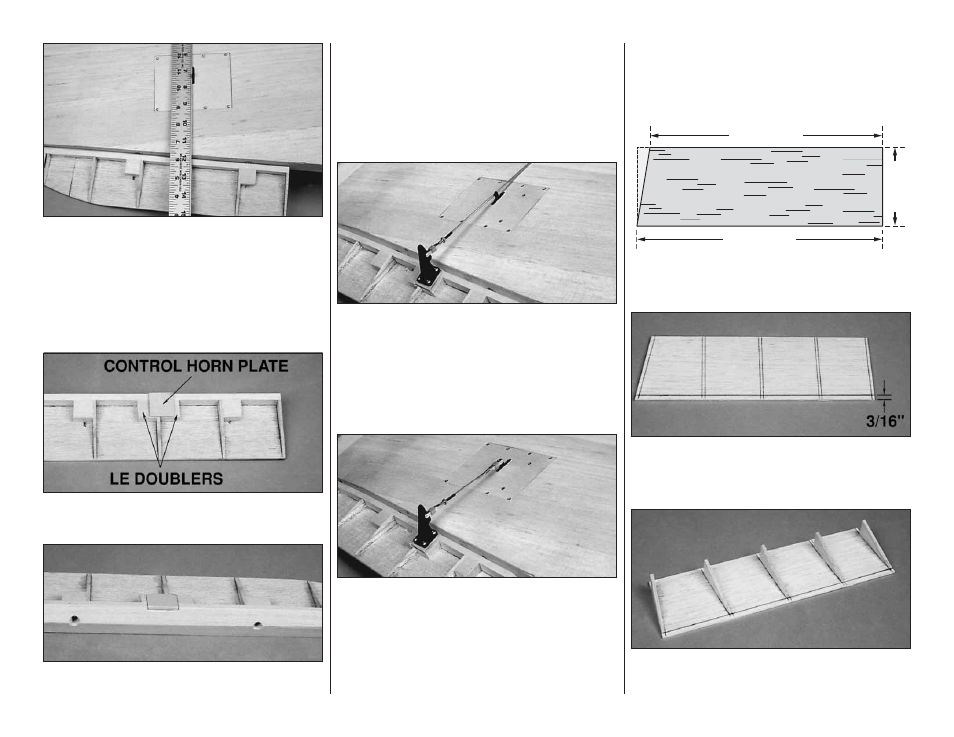
❏ ❏ 18. Reinstall the aileron on the wing. Place a
straightedge against the servo arm, parallel with the slot
in the servo hatch and mark the control horn location on
the LE of the aileron.
❏ ❏ 19. From the 1/2" x 1/2" [12.7mm x 12.7mm] balsa
stick, glue a LE doubler at the control horn location.
Remove the aileron and glue a LE doubler to the other
side of the aileron, at the same location. Trim and sand
the blocks flush with the aileron ribs.
❏ ❏ 20. Center the die-cut 1/8" [3.2mm] plywood control
horn plate on the mark, flush with the edge of the LE
taper. Mark the outline of the plate on the aileron.
❏ ❏ 21. Cut a 1/8" deep recess for the control horn plate.
The plate must fit flush with the top of the ribs and LE.
❏ ❏ 22. Cut a recess for the control horn plate on the
other side of the aileron.
❏ ❏ 23. Use epoxy to glue the control horn plates to the
ailerons.
❏ ❏ 24. Thread a 4-40 nut onto a 4-40 x 12" [4-40 x
304.8mm] threaded pushrod. Slide a silicone clevis
retainer onto the rod followed by a 4-40 threaded metal
clevis screwed on at least 14 turns.
❏ ❏ 25. Attach the metal clevis at the second hole from
the bottom on a heavy-duty nylon control horn. With the
pushrod aligned with the servo arm, position the control
horn on the aileron control horn plate so that the clevis
holes are aligned with the LE of the aileron. Mark the
control horn mounting holes on the control horn plate. Drill
a 1/8" hole through the aileron at each mark. Attach the
control horn to the aileron with four 4-40 x 1-1/4"
machine screws and a control horn backplate.
❏ ❏ 26. Attach a solder clevis to the outermost hole in
the servo arm. Center the servo arm and the aileron. Cut
the pushrod to the appropriate length. Remove the
pushrod and solder clevis from the wing and use silver
solder to solder the clevis onto the end of the pushrod.
Slide a silicone retainer over the solder clevis and reinstall
the pushrod on the servo arm and control horn.
❏ 27. Return to step 13 and install the other aileron servo.
BUILD THE OUTBOARD FLAPS
❏ ❏ 1. From a 1/2" x 15/16" x 18" balsa stick, cut a 9"
[228.6mm] long outboard flap LE. Save the remaining
piece for the inboard flap.
8-7/8" [225.4mm]
3" [76.2mm]
9-3/8" [238.1mm]
❏ ❏ 2. From two 3/32" x 3" x 18" balsa sheets, cut one
outboard flap skin from each sheet. Save the remaining
pieces for the inboard flap.
❏ ❏ 3. Position the flap skin over the outboard flap plan,
align the skin with the TE of the flap and mark the rib
locations on the skin. Draw a line 3/16" [4.8mm] from the
aft edge of the flap skin.
❏ ❏ 4. Glue the die-cut 1/8" [3.2mm] balsa flap ribs in
position, perpendicular to the flap skin aligning the aft edge
of the ribs with the line at the aft edge of the flap skin.