Build the wing – Top Flite TOPA0410 User Manual
Page 14
- 14 -
BUILD THE WING
BUILD THE WING CENTER SECTION
NOTE: The wing root ribs are stamped only with a
number (2 is R-2), the wing tip ribs are stamped with a T
and a number (T4 is T-4).
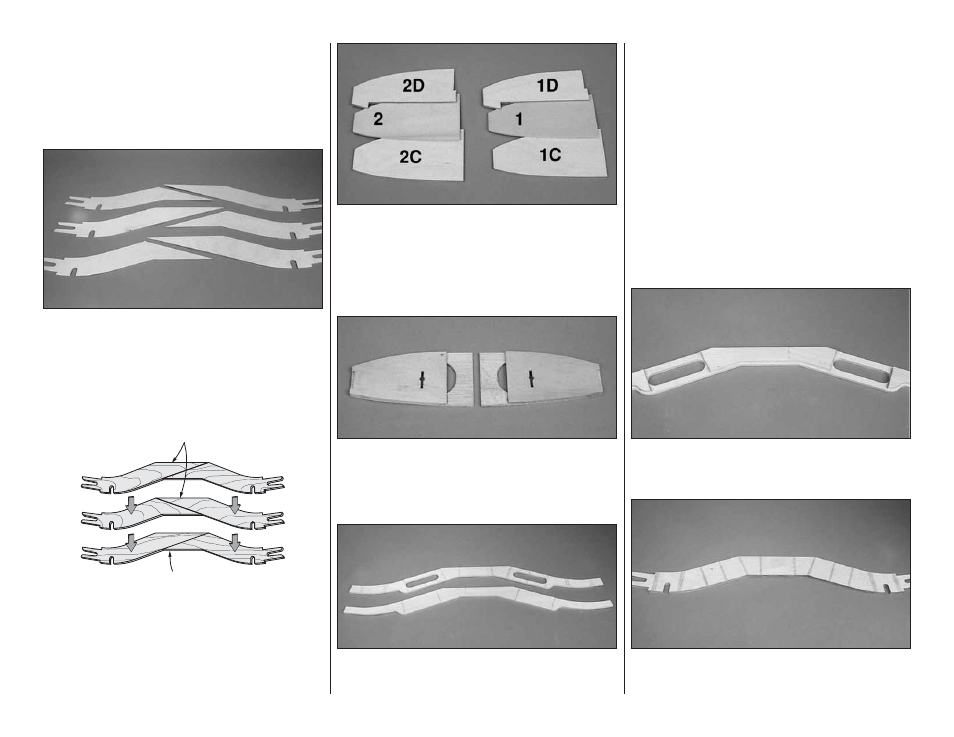
❏ 1. The center section main spar is made of two
die-cut 1/8" [3.2mm] lite plywood pieces (two halves)
glued to the back of four die-cut 1/8" [3.2mm] birch
plywood pieces (four halves).
❏ 2. Lightly sand the surfaces of the six pieces that make
up the center main spar.
Die-Cut 1/8" [3.2mm] Birch Plywood
Center Main Spar
Die-Cut 1/8" [3.2mm] Lite Plywood
Center Main Spar
❏ 3. Use 30-minute epoxy to glue the six center spar
pieces together. Make sure the joints of the birch plywood
spars are opposite each other. The joint of the lite plywood
spar, that is glued to the back, should match the front
birch plywood spar. Use the template on the wing plan to
assure proper alignment. Use weights to hold the
assembly flat on your building table while the epoxy cures.
❏ 4. Use 6-minute epoxy to glue the die-cut 1/8" [3.2mm]
lite ply ribs R-1 between the die-cut 1/8" [3.2mm] birch ply
sub ribs R-1C and R-1D. Also, epoxy the die-cut 1/8"
[3.2mm] lite ply ribs R-2 between the die-cut 1/8" [3.2mm]
birch ply sub ribs R-2C and R-2D. Remove any excess
epoxy using a paper towel dampened with isopropyl alcohol.
Be sure to make a left and a right of each assembly.
❏ 5. Use 6-minute epoxy to glue the die-cut 1/8" [3.2mm]
plywood sub ribs R-6A to the die-cut 1/8" [3.2mm] balsa
ribs R-6. Remove any excess epoxy with a paper towel
dampened with isopropyl alcohol. Be sure to make a left
and a right of each assembly.
❏ 6. Join the die-cut 1/4" [6.4mm] balsa aft center
leading edge pieces at the center, over the template
provided on the plan. Use the plan as a guide to mark the
rib locations on the aft LE. Glue the die-cut 1/4" [6.4mm]
balsa forward center leading edge pieces together at
the center. With the joints opposite each other, glue the aft
LE, centered, on the forward LE. Do not apply glue to
the forward LE between the embossed lines.
Note: On some of the die-cut 1/4" [6.4mm] balsa pieces
the edges may be slightly deformed. This will not affect
the appearance of the wing since the edges will be
sanded to shape later in the building sequence.
❏ 7. Join the die-cut 1/4" [6.4mm] balsa forward center
trailing edge pieces at the center. Glue the die-cut 1/4"
[6.4mm] balsa aft center trailing edge pieces together at
the center. The forward TE is slightly wider than the aft TE.
Use the plan as a guide to mark the rib locations on the
forward TE. With the joints opposite each other, glue the
aft TE, centered, on the forward TE.
❏ 8. After the glue has cured, use a razor saw to cut loose
and remove the area of the forward LE between the
embossed lines.
❏ 9. Position the center main spar over the template on
the wing plan and mark the rib locations on both sides of
the spar.