Top Flite TOPA0410 User Manual
Page 37
- 37 -
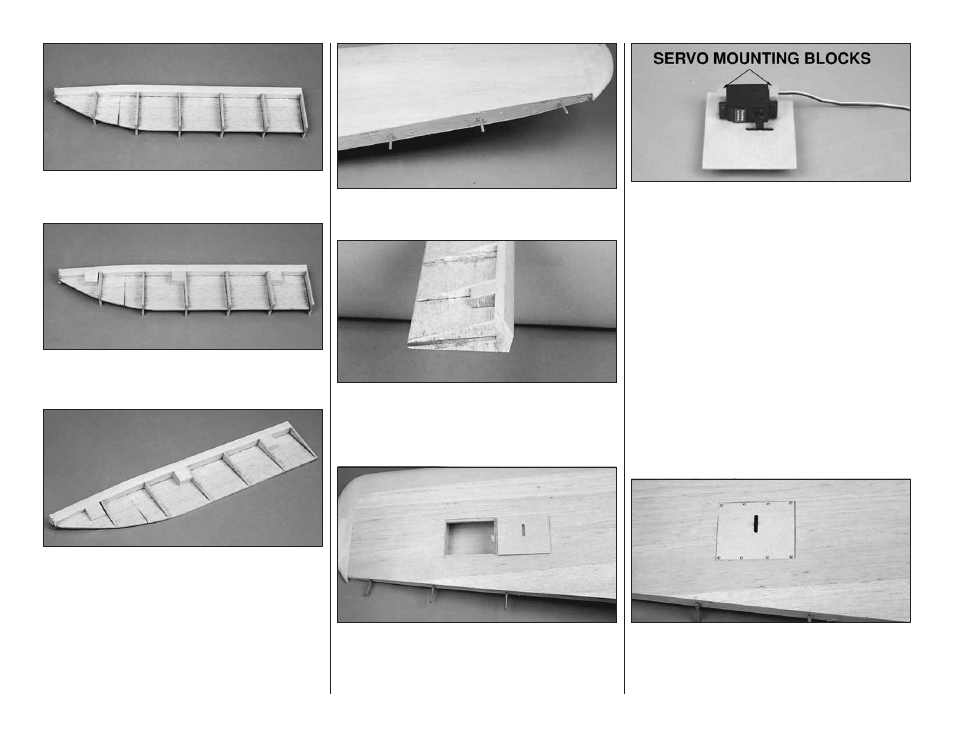
❏ ❏ 5. Cut aileron “ribs” from the 1/8" x 1/2" x 30" balsa
sticks. Glue the ribs to the aileron base at the previously
marked rib locations.
❏ ❏ 6. From the 1/2" x 1/2" [12.7mm x 12.7mm] balsa
stick, cut 3/4" [19mm ) long hinge point backups. Glue the
backups in position as shown on the plan.
❏ ❏ 7. Refer to the photo and the cross-section on the plan
to obtain the shape of the aileron. Use a razor plane and
sanding bar to “rough in” the shape of the aileron. Final
shaping will be done after the aileron is attached to the wing.
❏ ❏ 8. Hold the aileron in position against the TE of the
wing. Mark the hinge locations on the TE of the wing and
the LE of the aileron.
❏ ❏ 9. If you are using Robart Super Hinge Points, drill
3/16" [4.8mm] holes, centered on the TE of the wing and
LE of the aileron at each hinge location.
❏ ❏ 10. Insert the hinge points in the TE of the wing and
test fit the aileron on the wing, adjusting the hinge point
holes as necessary.
❏ ❏ 11. Sand the aileron LE to a “V” shape using the
cross-section on the plans as a guide.
❏ ❏ 12. Use a #11 knife to enlarge the opening of the
hinge points holes slightly to provide clearance for the
hinge pivot. Return to step 1 and build the other aileron.
❏ ❏ 13. Trace the outline of the die-cut 1/16" [1.6mm]
plywood aileron servo hatch accurately onto the wing
sheeting over its location. The hatch should be centered
on the hatch rails and between ribs R-4T and R-5T.
Carefully cut out the bay and fit the hatch into place.
❏ ❏ 14. Position the aileron servo on the hatch so that the
servo arm is centered in the hatch opening. Drill several
1/16" [1.6mm] holes approximately 3/16" [4.8mm] deep
into one end of the 5/16" x 3/4" x 7/8" basswood servo
mounting blocks. Roughen the servo hatch where the
mounting block will be attached. Apply 30-minute epoxy to
the end of the mounting blocks, making sure to pack
epoxy into the 1/16" [1.6mm] holes. Clamp the blocks to
the hatch until the epoxy cures.
❏ ❏ 15. After the epoxy has cured, drill a 1/16" [1.6mm]
pilot hole through the hatch into the center of each servo
mounting block. Countersink the holes to accept a #2 x
3/8" flat head sheet metal screw. We have found that a
Dremel #178 high speed cutter in a drill makes perfect
countersunk holes. Secure each block to the hatch with a
#2 x 3/8" flat head sheet metal screw.
❏ ❏ 16. Insert a 1/32" (.8mm] or 1/16" [1.6mm] temporary
shim between the servo and the plywood hatch. Drill 1/16"
[1.6mm] pilot holes and mount the servo to the mounting
blocks using the servo screws supplied with the radio
system. Remove the shim.
❏ ❏ 17. Tape the aileron servo hatch in position and drill
1/16" [1.6mm] pilot holes at the punch marks on the hatch
and into the hatch rails. Remove the hatch and
countersink the holes in the hatch. Secure the hatch to the
hatch rails with #2 x 3/8" flat head sheet metal screws.