Top Flite TOPA0410 User Manual
Page 23
- 23 -
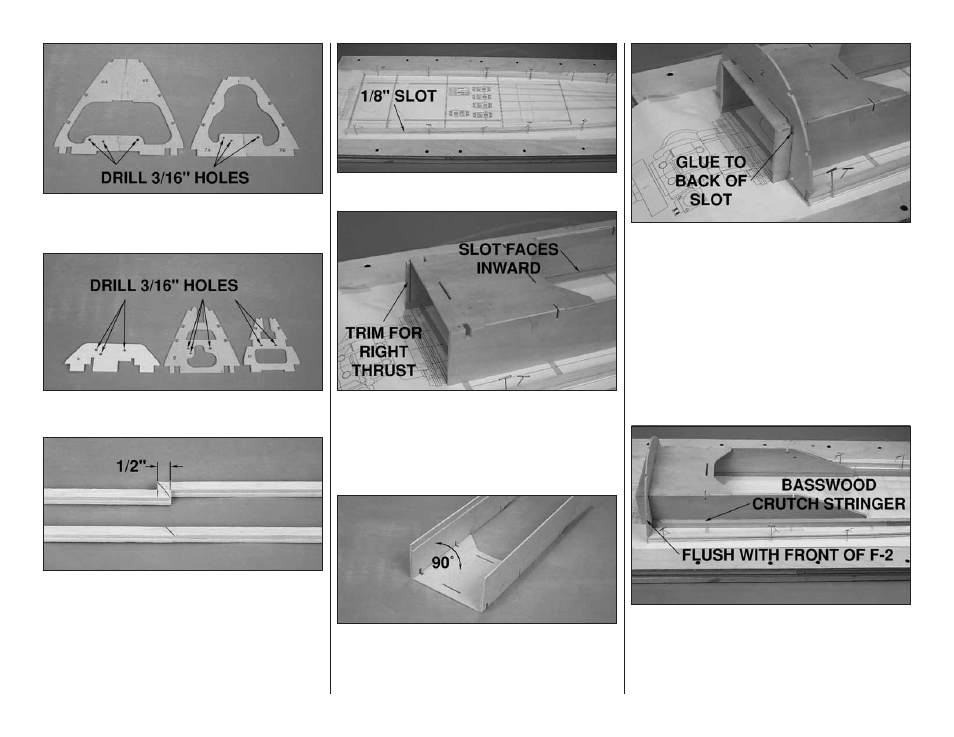
❏ 3. Glue together the die-cut 1/8" [3.2mm] plywood
formers F-6A to F-6B and F-7A to F-7B. Drill 3/16" [4.8mm]
holes through the punch marks at the locations shown.
❏ 4. Drill 3/16" [4.8mm] holes through the punch marks on
the die-cut 1/8" [3.2mm] plywood formers F-8, F-9 and F-10.
❏ 5. Cut one of the 36" [914.4mm] long shaped balsa
main fuselage stringers in half. Place a mark 1/2"
[12.7mm] from the end of a 36" [914.4mm] and an 18"
[457.2mm] main stringer. Tack glue the two stringers
together, overlapping them by 1/2" [12.7mm]. Cut the two
stringers at an angle and glue them together end-to-end.
❏ 6. Place the fuselage top view plan on a flat building
board. Cover the plan with plan protector or wax paper.
❏ 7. Pin the main fuselage stringers, with the 1/8"
[3.2mm] slot facing outward, accurately over the plan.
❏ 8. Position the die-cut 1/8" [3.2mm] plywood fuse
crutch top (FCT) on the upper fuse crutches. The slot at
the bottom of the upper fuse crutches face inward. Note
that the front of the crutch top is angled to the right. The
angle will build in the proper right thrust into the firewall.
Mark the right upper fuse crutch at the front of the crutch
top and trim it to this mark.
❏ 9. Reassemble the fuse crutch and crutch top. Turn the
assembly upside down and use epoxy to glue the fuse
crutch, perpendicular to the crutch top. Make sure the
crutch top is flat against your building board and fully
seated in the fuse crutches.
❏ 10. After the epoxy cures, insert the die-cut 1/8" [3.2)
plywood former F-2 into the slots in the crutch top and
crutch. Position the assembly over the plan. With F-2
perpendicular to the building board, glue F-2 to the crutch
and the main fuse stringers.
NOTE: Some of the formers are not symmetrical and
must be glued in with the proper orientation. The numbers
are embossed on the front of the formers and must be
installed facing the front of the model.
❏ 11. Cut the 3/8" x 1/2" x 30" basswood crutch
stringers to 25" [635.0mm] long and pin them into
position. Save the remaining stringer for use later.
❏ 12. With the crutch assembly flat against the building
board, use epoxy to glue the crutch stringers to the
outside of the crutch, so that the end of the stinger is flush
with the front of F-2. Use clamps and T-pins to hold the
assembly secure until the epoxy cures.