Synchronized editing – Sony SLV-R1000 User Manual
Page 58
Attention! The text in this document has been recognized automatically. To view the original document, you can use the "Original mode".
Editing
Synchronized Editing
If your other VCR has a CONTROL L or S connector, you
can take advantage of a feature called ‘‘Synchronized
Editing". Synchro-Edit controls both VCRs (recording VCR
and playback VCR), and releases the pause when SYNCHRO
EDIT is pressed. To use this function, you must connect the
control cable in addition to connecting the audio and video
cables. There are two types of control cables; the CONTROL
L (REMOTE) cable and the CONTROL S cable. Use the one
corresponding to the type of connector on the VCR.
If you want to make the CONTROL L connection, you must
choose the LANC MODE in the SET UP MENU screen. (For
details, see page 28.) If you want to control another VCR
from this VCR, set the LANC MODE to "M" for this VCR and
"S" for another VCR.
if you want to make the CONTROL S connection, you must
connect the CONTROL S IN of this VCR to the CONTROL S
OUT of other VCR. (For details, see page 59.)
Recording VCR {This VCR)
Control cable
VK-820UC
(not supplied)
Remote or
CONTROL L
(Stereo mini-
mini plug)
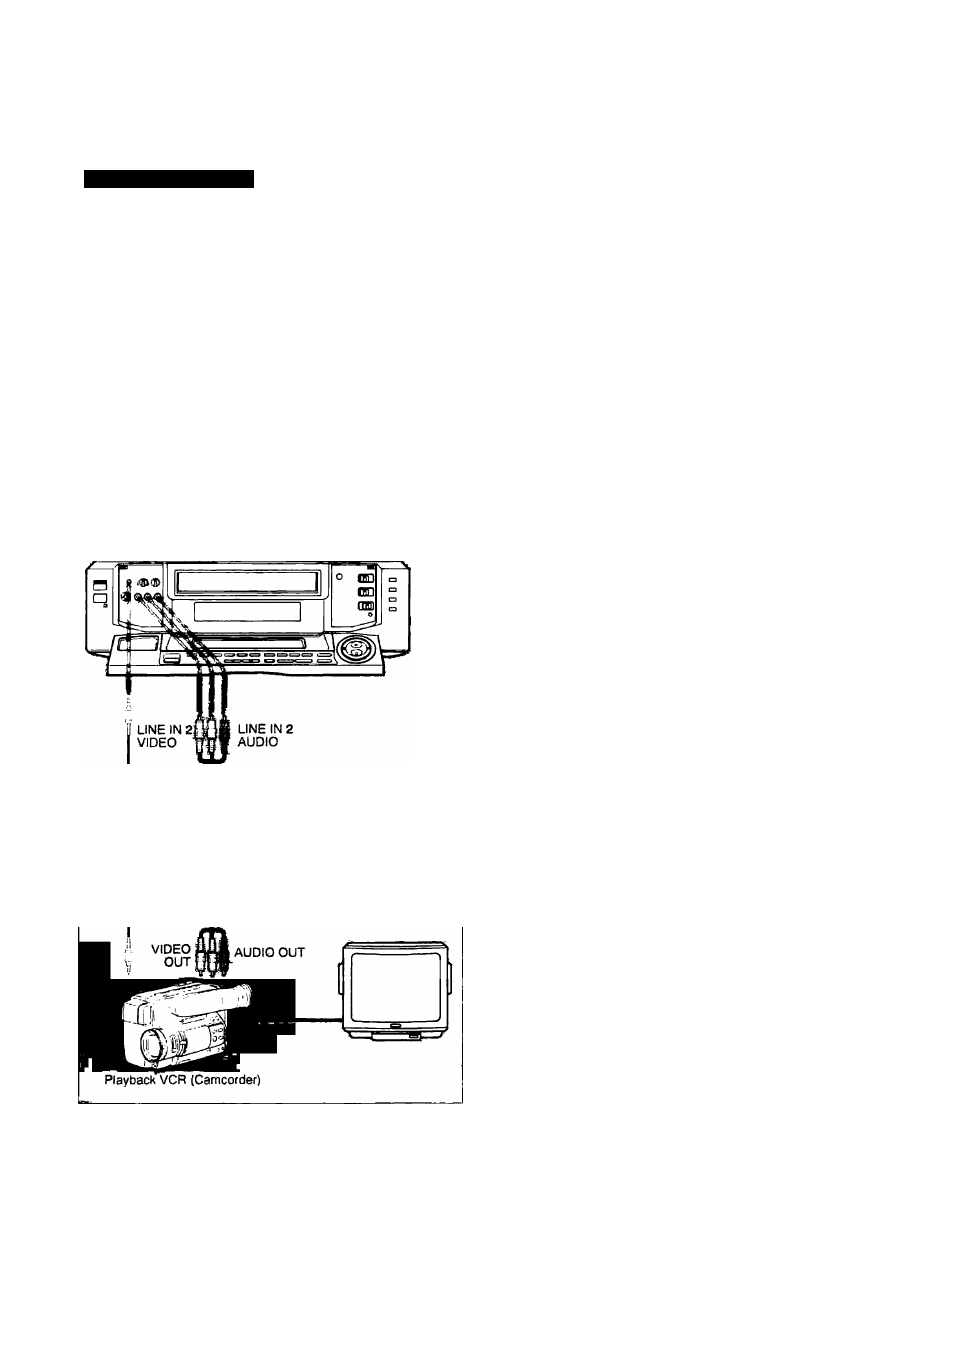
AudioA/ideo connecting cable
(supplied)
Before you start:
• Select external video or LINE on the recording VCR.
• Make necessary settings for recording.
How to edit:
1
Turn on the recording VCR and insert a blank
cassette.
^ g Advanced Operations
2
Insert a source cassette into the playback VCR.
3 Select EDIT position to light the EDIT indicator in the
display window.
If your recording VCR has an editing function, it should
also be selected.
4
Locate the edit start point and select the recording
pause mode on the recording VCR.
5
Locate the playback start point and select the
playback pause mode on the playback VCR.
6 Press SYNCHRO EDIT on the recording VCR.
Both recording and playback will start.
7
At the desired edit end point, press SYNCHRO EDIT
on the recording VCR.
The recording VCR enters the recording pause mode and
the playback VCR enters the playback pause mode.
8 To edit the next scene, repeat steps 5,6 and 7.
When you’ve finished editing, press ■ STOP on both
VCRs.
About the C (LANC)
LANC stands for Local Application Control System.
The LANC connector is used for controlling the tape
transport of video equipment and peripherals
connected to it. This connector has the same function
as the connectors indicated as CONTROL L or
REMOTE.
NOTES:
• If your recording VCR is a monaural unit, make
connections using the VMC-910HG/920HG cable
(not supplied).
• When connecting the VCRs, do not connect both
LINE IN and LINE OUT jacks on your VCRs
simultaneously. Doing so may cause a humming
noise.
• When the other VCR has an S VIDEO connector, use
the S VIDEO connecting cable. This connection
gives you a higher quality picture than using the video
cable.
When using LINE IN 1 S VIDEO or LINE IN 3 S
VIDEO, select LINE IN 1 VIDEO "S" or LINE IN 3
VIDEO “S" in the SET UP MENU depending on your
connection method.
If you use the VIDEO IN jack and S VIDEO IN
connector at the same time when you use LINE IN 2,
the S VIDEO IN connector takes priority.
• You cannot set the LANC MODE to "M" for the
camcorder. Set the LANC MODE to "M" for this VCR
and control the camcorder from this VCR.
• If you set the LANC MODE to the same setting
position for both this VCR and another VCR, it is
possible that there may be a malfunction. Do not use
the same LANC MODE setting for both VCRs.
(Continued)