System Sensor FAAST Comprehensive User Manual
Page 4
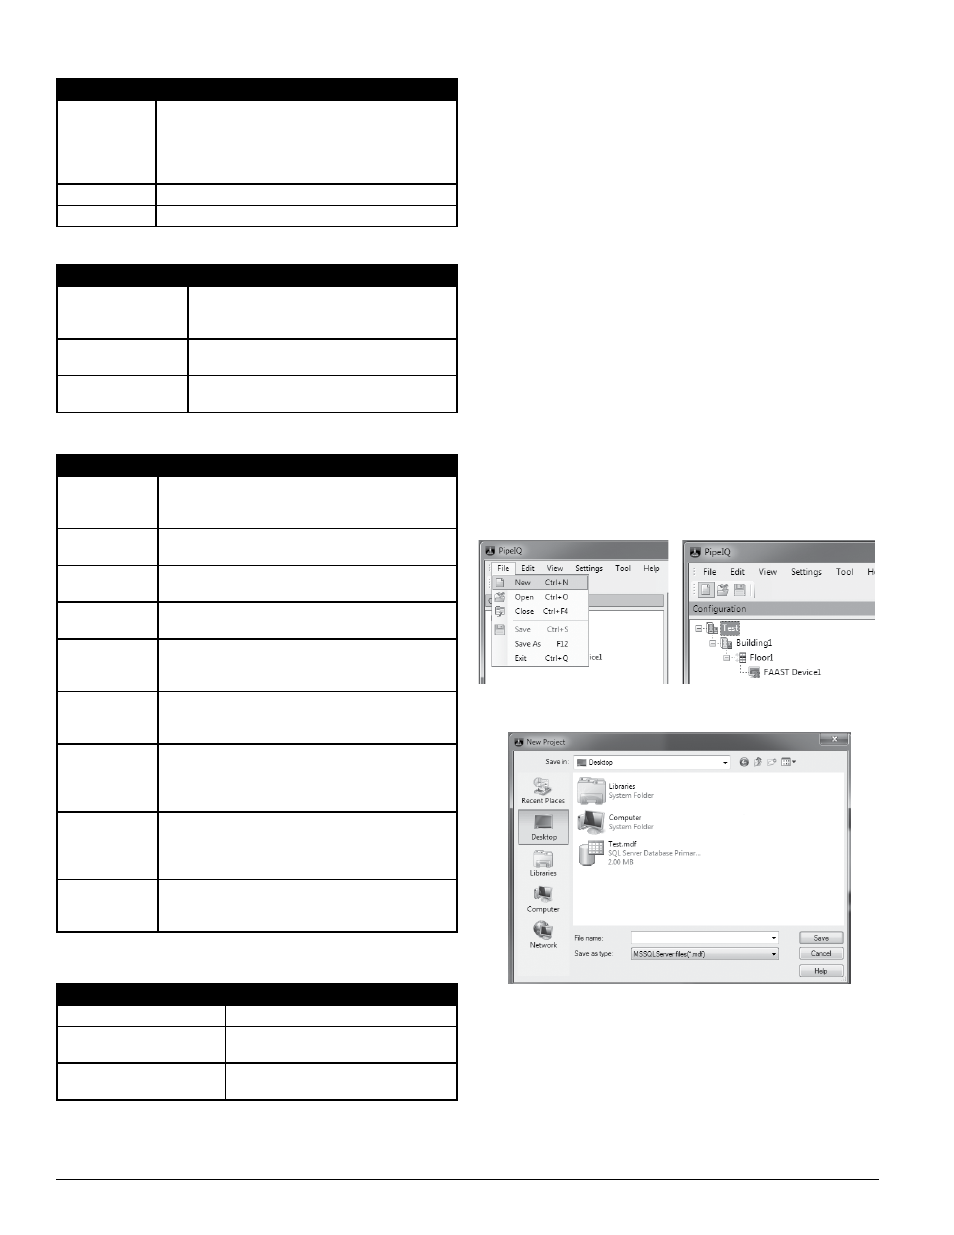
TABle 5. vieW menu
menu ChoiCe
DeSCripTion
Monitoring
Changes the view of the project to the monitoring screen .
(For object levels above the device level, the right pane
shows the event record for the project .) The FAAST device
must be connected via the Ethernet or PipeIQ to use the
Monitor Screen .
Pipe Design
Changes the view of the project to the pipe design screen .
Configuration
Changes the view of the project to the configuration screen .
menu ChoiCe
DeSCripTion
Project Settings
When active, allows selection of different
measuring systems . Options are US Customary or
Metric .
Archive Events Data
Archives the list of events generated by the FAAST de-
vices in the project to the database file on the PC .
View Archived Events
Data
Opens a report window showing archived events .
TABle 6. SeTTinGS menu
TABle 7. Tool menu
menu ChoiCe
DeSCripTion
Connect Device
Connects PipeIQ to a FAAST detector . It is only
active when PipeIQ is not already connected to the
FAAST detector .
Send
Configuration
In Configuration mode, PipeIQ sends updated configuration
information to the connected FAAST detector .
Get Remote
Configuration
In Configuration mode, PipeIQ receives updated configu-
ration information from the connected FAAST detector .
Configuration
Reports
In Configuration mode, PipeIQ opens the PipeIQ report
viewer and generates a configuration report .
Event Log Report In Monitoring mode, the PipeIQ report viewer is opened
and a timeframe for viewing the event log can be se-
lected .
Create
Configuration
Text
In Configuration mode, it creates a text file containing
the device configuration information .
Device
Information
In Configuration and Monitoring modes, when the FAAST
detector is highlighted, it opens the Device Information
window and text information (notes) about the specific
detector can be added .
Disconnect
Device
Disconnects the network communication between PipeIQ
and the connected FAAST detector . It is only active in
Configuration mode when the PipeIQ
application is connected to the FAAST detector .
Upgrade
Firmware
In Monitoring mode, the PipeIQ Upgrade Firmware win-
dow opens, which allows authorized users to transfer
new firmware to the device .
TABle 8. help menu
menu ChoiCe
DeSCripTion
PipeIQ Help
Opens the PipeIQ help file .
About PipeIQ
Opens a window containing the version
number of the PipeIQ software .
Submit Feedback
Opens a link to a website where users may
submit feedback about the software .
Starting the Application
There are no user credentials required to run the PipeIQ application. The only
instances a password is required is to establish administrator level communi-
cation with a FAAST device, to establish web browser communication with a
FAAST device or to unlock the buttons on the User Interface panel.
The administrator has full read/write capabilities within the application. It is
highly recommended that the administrator password is changed when con-
figuring a FAAST detector.
To start PipeIQ, select Start > Programs > PipeIQ > PipeIQ or double-click
on the PipeIQ icon on the desktop. The application opens and a new project
may be created or an existing project may be monitored or modified.
exiting the Application
To close the current project, but allow the application to continue running,
choose File > Close.
To quit the PipeIQ software completely, select the X at the upper right corner
of the application window, or select Exit from the File menu.
CreATinG A proJeCT
Typically, a project consists of a site with buildings, floors and devices. When
a new project is created, the Site, Building, Floor and Device objects are au-
tomatically created. These objects must be configured before designing the
pipe network.
To create a project, start the PipeIQ application and select File > New, or se-
lect the project icon at the upper left of the main PipeIQ window, as shown in
Figure 2. The New Project window opens, as shown in Figure 3.
In the File Name box, type the name chosen for the project and select Save. A
new PipeIQ project is created and displayed.
FiGure 2. iniTiAl pipeiQ openinG SCreen
FiGure 3. neW proJeCT WinDoW
After choosing Save, the Project Settings pop-up window opens, as shown
in Figure 4. To configure the the units of measurement, select US Customary
System or Metric from the list. When the choice is complete, select OK to save
it and close the window.
ASP38-01
ASP26-01
ASP-04
SS-400-007 4 E56-3621-003
PipeIQ